Validation Process: Messages and Error Resolution
Once you submit data from your SIS (student information system) to the Department of Public Instruction (DPI), the data will be analyzed for accuracy through a validation cycle where business rules are applied to your data and processed by DPI. Depending on the quality of the data, validation messages are generated to give you feedback on data that needs review and/or correction.
Validation Messages Screen Overview
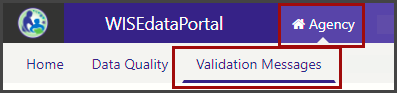
You can locate these validation messages on the WISEdata Portal Agency menu, Validation Messages screen.
The Validation Messages screen three main sections, described in more detail in the accordions below:
- Filters
- Queue Import & Validation (manual validation)
- Table of Validations
Click the links below to navigate to different sections of this page:
- Filters
-
The standard filters are available on the Validations Messages screen, as well as some filters specific to this screen. All selected filters will be applied to the validations for your LEA and will narrow the results appearing in the validation table.
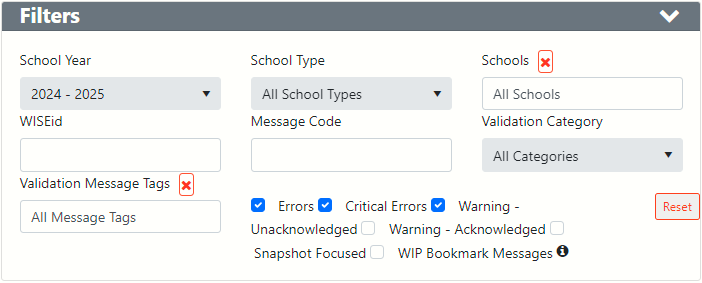
- School Year: allows you to choose from any of the three years of data avaialbel in the WISEdata Portal. You can aonly view one year at a time.
- School Type: allows you to choose from: All School TYpes, Combined Elementary/Secondary School, Elementary School, High School, Middle School, or Junior High School.
- Schools: provides a dropdown list of each school within the local education agency (LEA). Only one school can eb selected at a time.
- WISEid: type in a student's WISEid to see all validations associated to that student.
- Message Code: the four-digit code of a specific error or warning. This is the same code that will be referenced on the Knowledge-Based Article(KBA) Portal.
- Validation Category: allows you to choose from: All Categories, Attendance, Career and technical Education, College and Career Readiness, Demographics, Discipline, Dropouts, Enrollment, High School COmpletion, High School Graduation, IDEA Part B SPP Indicators, Other Programs (CEIS, Section 504, etc), Roster, Special Ed, Year End Exit.
- Validation Message Tags: allows you to choose from: any of the 'Tags' created by your LEA (for example, Attendance Team, CTE Team), as wel as selecting Comments.
- Checkboxes as Filters: Users can also click in the box preceeding the validations type. WHen clicked, only these vaidation types will appear in the table of validations. The box tuns blue when that type is elected. The box also preceeds (comes before) the validation type. This is tricky to line up at time because of the gap between the box and the validation type. In the screenshot above, boxes are checked for Errors, Critical Errors, and Warnings - Unacknowledged. These are the default selectctions.Additionally, there are checkboxes for warnings - acknoweldged, snapshot focused validations and WiP Bookmark Messages. WiP is explaned more below in the validations table accordion.
- Queue Import & (Manual) Validation
-
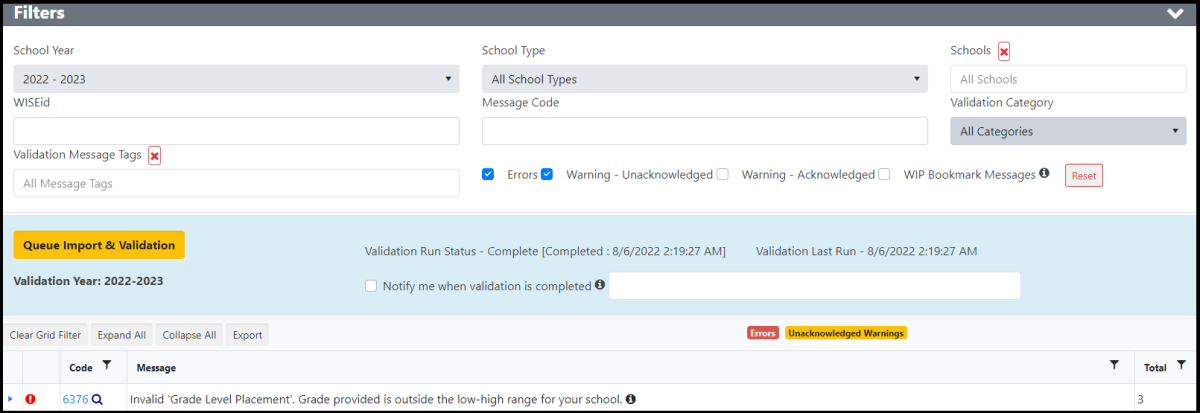
The Queue Import & Validation also appears on the Home screen in WISEdata Portal.

This button allows for users to perform a manual "push" of data to WISEdata Portal from their SIS, outside of the daily push that automatically occurs each evening by clicking the yellow-orange button. The date/time stamps inform you of the last completed validation and the last successful run. The Vlaidation Year shoudl match the school year set in the Filters section. Users can also click the box to get an email notification indicating that WISEdata Portal has received this data.
- Table of Validations
-
The Table of Validations displays all validation messages associte to your LEA, based on the filters selected. The table has five columns when no message is expanded. Expanded messages display an additional table with 10 columns.
Validation Cycles
Validation cycles run through all data submitted to DPI each night. Users can also trigger manual validation by pushing Queue Import & Validation in the WISEdata Portal.
If you wish to be notified when the validation cycle finishes, before you push the Queue Import & Validation button, first check the box to receive an email. Your contact email will default into the email address box but can be edited.
It’s important to note that marking this checkbox for email notification is only for this manual validation, not all validations and not for nightly system-wide validations.
Once you trigger a manual validation by pushing Queue Import & Validation in the WISEdata Portal, data you sent to DPI will await validation in a line of other districts’ data cycling through and awaiting validation. This means triggering manual validation could evaluate your data immediately or not for several hours, depending on how many other schools'/districts' data are in line before yours. For this reason, please only trigger manual validation when you have made substantial modifications, not just one or two student updates.
Validation Types: L1 & L2 Validations
There are two levels of validation rules at work when your data undergoes the business rule calculations and logic evaluation. Certain validation rules may reject your data before it can be stored in our data warehouse and will send you a validation message soon after you push (send) the data to DPI. These are called Level 1 (L1) validations. Other rules will only evaluate your data once it has made it into the WISEdata data warehouse, though this does not mean your data is correct, only that it made it past the L1 validation check.
The second round of validations that happen during validation cycles are called Level 2 (L2) validations. You will see many more of these types of messages when reviewing data in the WISEdata Portal.
Validation Message Types
A Validation Message Summary will appear in the WISEdata Portal for at-a-glance metrics review. You will see total counts of each message type, as well as a donut visual.
Though validations display in the WISEdata Portal, all modifications to the data will happen in your SIS. The only exception may be demographic changes in WISEid. Every validation message will have a message code, a description, and a type. WISEdata uses three message types to assist users in data quality review:
Critical Errors: These are errors that must be corrected before your data can be accepted and moved over to WISEdash for Districts, which is a crucial step prior to a snapshot, as snapshot data is captured from WISEdash. You will see a red icon in the WISEdata Portal next to critical errors.
Error: Error messages flag incorrect data. To clear these messages, edit the flagged record in your local SIS to correct the issue.
Warning: Warning messages flag questionable data. Warnings will display as acknowledged and unacknowledged. Please review the data to see if it is accurate or needs correction. If necessary, correct the data in your local SIS to clear the message, or if the data has been reviewed as correctly reported, acknowledge the warning to ignore the message.
Business rules that create error messages often validate data across the state, so you may need to work with other school districts/schools to fully understand and correct the issue.
To view all the validations and related information about them, see the WISEdata Validation Rules.
Reviewing Data
DPI recommends that staff monitor validation messages by using the WISEdata Portal frequently. Correcting data is often easiest when the transaction flagged by DPI business rules occurred recently. If you are part of a large agency, daily monitoring and correction may be required. Even in smaller agencies, reviewing and updating data weekly at a minimum is good practice.
Using Filters to Review Data
The WISEdata Portal metrics will display validation statuses at a glance, but you can also filter your data to review the accuracy of your data or to find data with a particular message type associated. Filter your data by selecting different menu items in the Filters section, such as School Year, School, and WISEid.
For warnings, you can filter by either Acknowledge or Unacknowledged status before searching. Unacknowledged ones still need review, while acknowledged ones have already been checked as reviewed by a user. While you can filter out acknowledged warnings when reviewing validations, acknowledged warnings will still remain in the system for reference.
Decoding Messages and Resolving Validations
Just above the Validation table, are four buttons: Clear Grid Filter, Expand All, Collapse All, Export. Use these as you need to to help you navigate the Validations Table.
Standard Table (No Information Expanded)
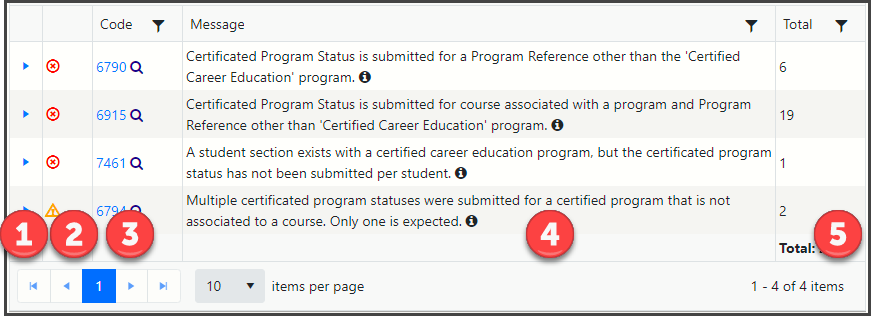
The five columns on the standard table are as follows:
-
The Expander Tool icon: Clicking this blue opointer, expands the information for the validation message ane reveals the 10-column table.
-
The Validation Type icon: A red circle with a red exclamation point inside indicates a critical error, a red circle with a red 'x' inside indiates an error, a yellow-orange triangle with an exclamation point inside indicates a warning.
-
The Code (and filter icon): The four-digit code is hyperlinked, and when clicked will open the KBA Portal for that specific validation rule.
-
Message (and filter icon): Displays the short text from the KBA.
-
Total (and filter icon): Displays the number of students associated with this validation rule. When the expander icon is clicked and the 10-column table displays, the number of rows in that table will match the Total number.
The Filter Tool
The filter tool on the Code and Total Columns are the same. The filter tool on the Message column header has more options. Clicking this icon allows users to show items that match a specific selected value, using phrases like: greater than, greater than, equal to, not equal to, is less than, etc. The Additional feature in the Messages filter allows the use of an 'AND'/'OR' option, along with the phrases.
Expanded Table (All Information Expanded)
The 10 columns on the expanded table are as follows:
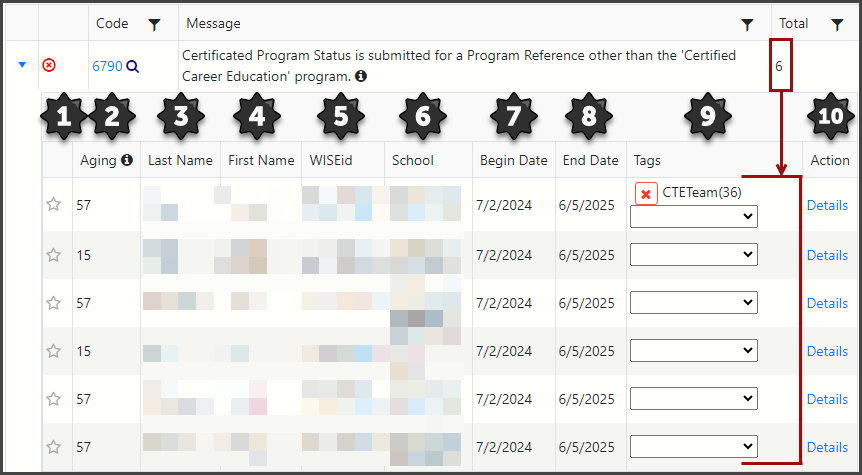
-
Work In Progress icon: This star icon, when blank is not indicated as a Work in Progress (WiP). When it is selected, the star fills in yellow. It can then be filtered with the WiP checkbox.
-
Aging: This number indicate how many days old the validation is, as associated with a given Tag. Once a date is associated with a tag, “aging” will display next to the L2 tag as a digit, indicating how many days the tag has been associated with the L2. For example, if you selected the ‘Investigating’ tag 9 days ago, the tag will now appear as: ‘Investigating (9)’.
-
Last Name: Last name of the student associated with this validation rule.
-
First Name: First name of the student associated with this validation rule.
-
WISEid: WISEid of the student associated with this validation rule.
-
School: Name of the school the student associated with this validation rule attends.
-
Begin Date: Indicates the day the valdation rule became active, or the date of the first day of school.
-
End Date: Indicates the day the valdation rule was resolved, or the date of the first day of school.
-
Tags: Tags is a dynamic feature that assists LEAs with the ability to group and categorize validation messages. This aids in the filtering of messages and also allows LEAs to assign a specific data team/member to resolve that validation. Tags also directly relate tothe "Aging" count in the expanded table. You can hover over any seleted tag to access the date on which the tag was created. Available Tags are listed below:
-
Action: The word 'Details' will also display here. It is hyperlinked and when clicked will open the specific Student Detail screen in WISEdata Portal in a new browser tab.
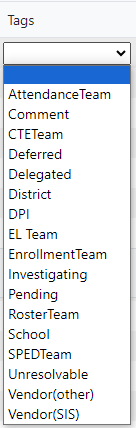
- Attendance Team
-
Comment
-
CTE Team
-
Deferred
-
Delegated
-
District
-
DPI
-
Enrollment Team
-
EL Team
-
Investigating
-
Pending
-
Roster Team
-
School
-
SPED Team
-
Vendor (Other)
-
Vendor (SIS)
Comment: Click this Tag to type comments about this validation. Each Cmment allows for 280 characters of free text. Once free text is added, users can save, close, or delete the comment. This feature will help LEAs communicate and stay organized with their validation repairs. This feature will be especially useful for larger districts with multiple data specialists. A pop-up note will appear when this feature is used, reminding users that, “The notes/comments saved in this comment box will be visible to all WISEdata Portal users within your LEA.” Comments that have been saved will appear in the Tags column. Hovering over the comment will display the date on which the comment was saved. When an LEA user clicks the "Delete" button within the comments/notes pop-up window, a confirmation prompt is now displayed. The confirmation message reads, "Are you sure you want to delete this comment/note entry? This action cannot be undone."
Back to WISEdata Portal Mini Tutorials