
Home - Menu in WISEstaff Portal
Click the links below to navigate to different sections of this page:
Home: Overview Data Quality Dashboard Staff Collection Checklist
Staff Collection Checklist Step-by-Step Guide & Menu
Home: Overview
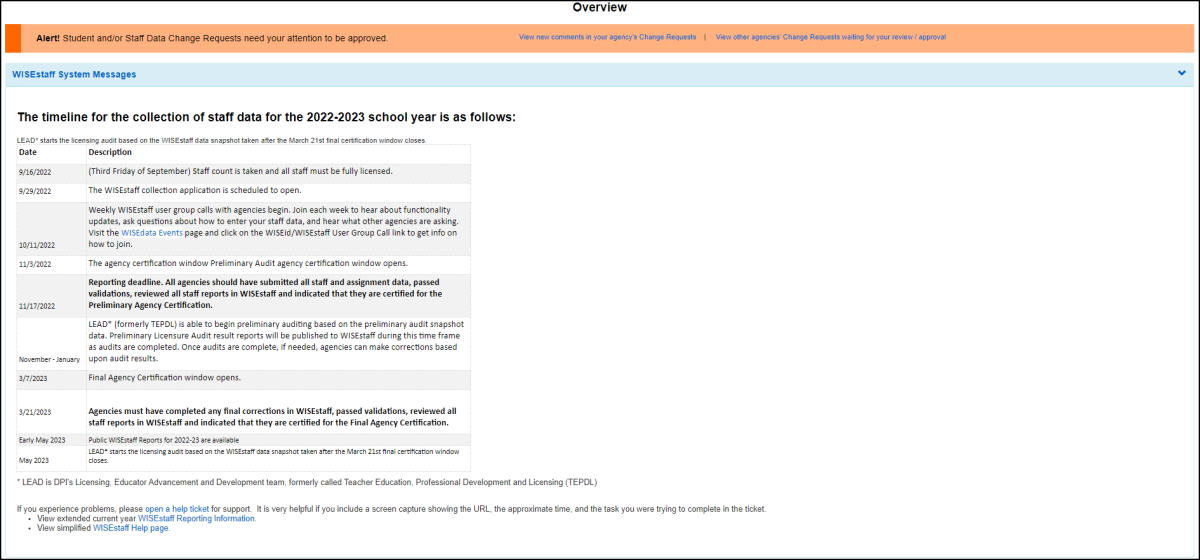
The overview screen provides you with the current timeline for staff collection and licensing audit dates. If there are other important news items or announcements, they will be posted on this main page.
Data Quality Dashboard
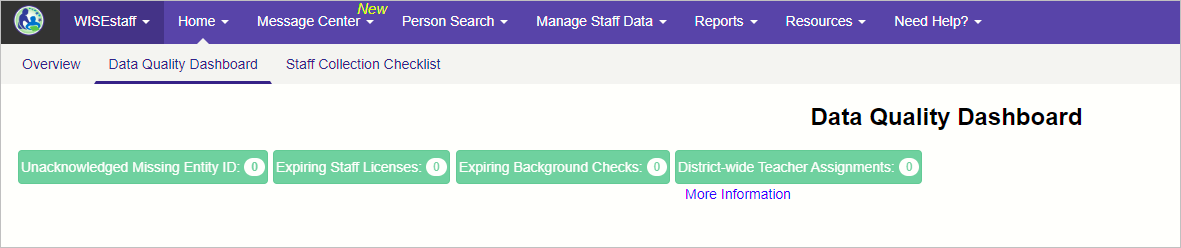
This interactive dash shows a variety of metrics and validation warnings, if you have any. Across the top there will be colored bars - green is good, red and orange colors indicate a need to look at your information to fix potential errors. At the top right there is a filter tool allowing you to display data district wide, or by a single building.
If you are on this screen for the purpose of verifying data to complete steps on the Staff Collection Checklist, know that all of the indicators must be green to meet compliance. The buttons themselves can be clicked, along with other links to direct you to the screens where you can correct the errors.
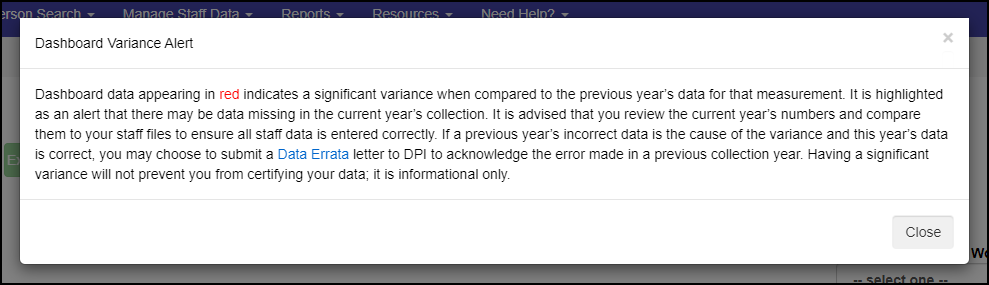
One such helpful link is the small ‘information’ icon that will be visible next to any data on the Data Quality Dashboard that is red. Clicking this icon will open a hovering informational window that will provide further assistance on how to resolve errors and discrepancies.
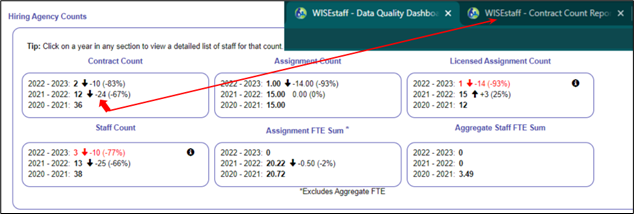
The Hiring Agency Counts section allows users to click on virtually any number presented to reveal further information about each metric. Clicking will open this information in a new tab, showing you a list of the data that makes up the metric.
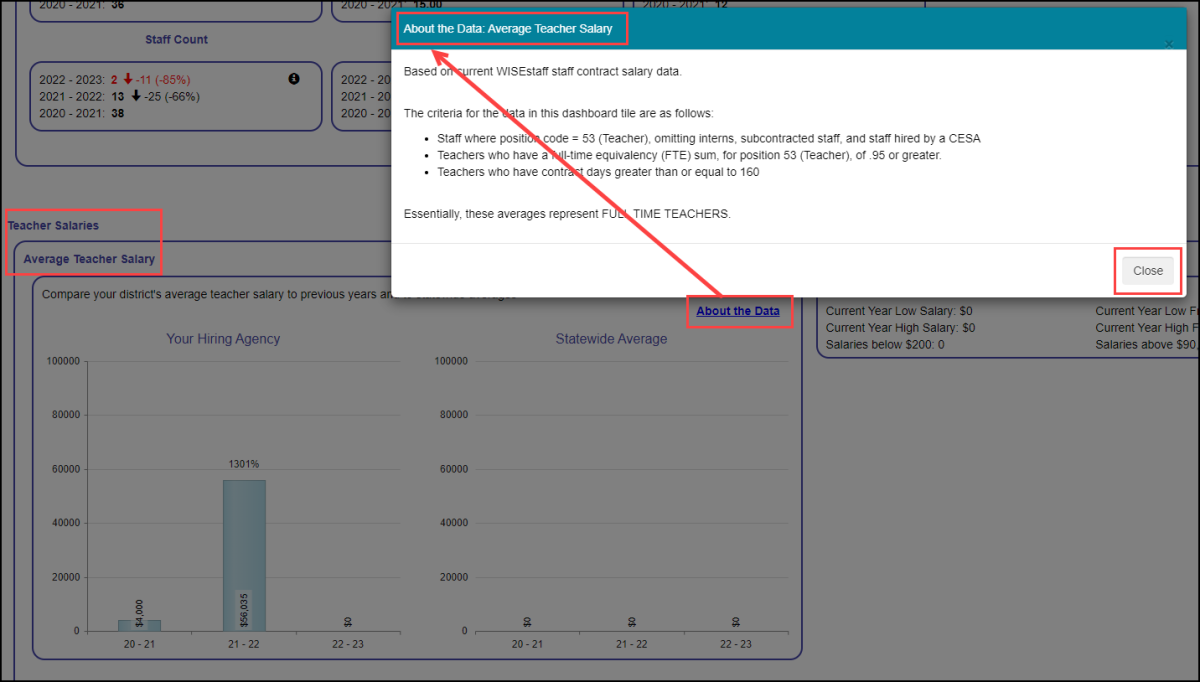
Teacher Salaries are displayed at the bottom of the Data Quality Dashboard in graph form on the left, and in an informational box on the right. These are also interactive metrics - as you hover your mouse over various parts of the graphs, you'll notice your cursor changes from a pointer to a clicker. Clicking opens up a new tab with more detailed information. Clicking the words 'About the Data' in blue opens a hovering informational window which can be closed by clicking the 'close' button in the bottom right corner.
Staff Collection Checklist
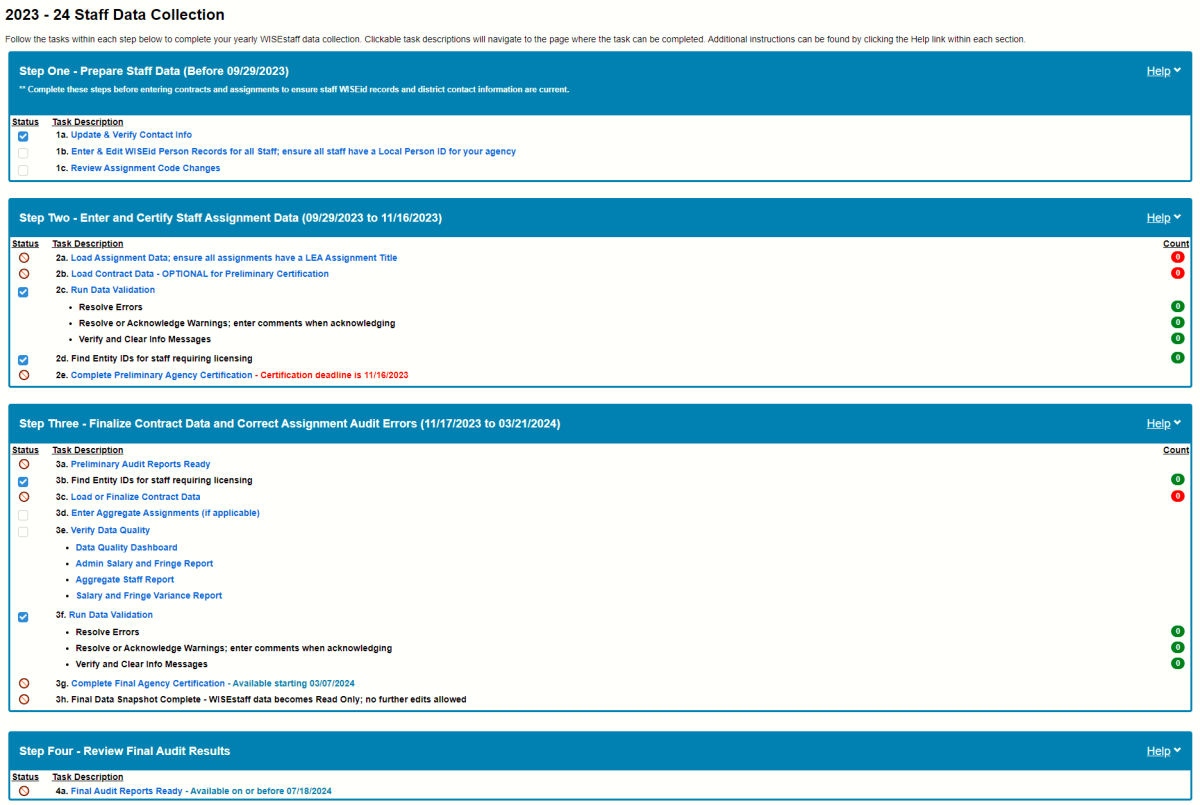
The Staff Collection Checklist provides an overview of the WISEstaff submission process. This checklist guides LEAs through all required steps for their yearly WISEstaff data collection requirements. It is a very good place to start on WISEstaff as it will inform you of what is due, when it is due, and when you’ve completed each task. You’ll also notice, along the far right side, a Count with either green or red indicators marked with a number. Green means you’re good to go, and red communicates the number of issues to be resolved before that step can be completed correctly.
There are four steps total, as indicated in the green box headers, to be completed throughout the course of each school year. Steps one and two are preliminary work for the annual staff audit, and steps three and four are for the review and repair of final audit results. Due dates in the headers indicate when all tasks must be completed for compliance.
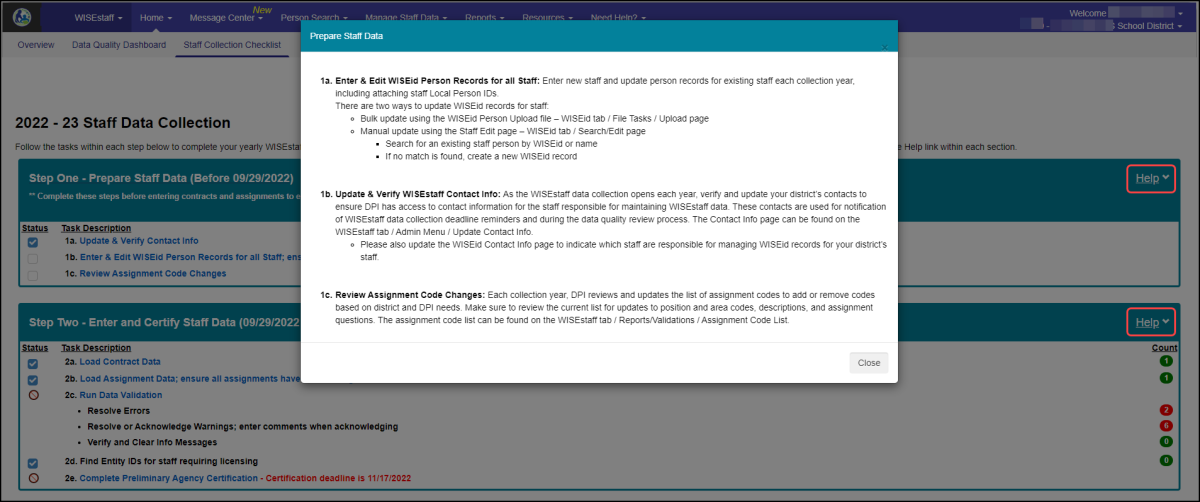
The Checklist is dynamic. Logic is in place to collapse a section that has all tasks completed once the associated deadline date for those tasks has passed. You can however, collapse a step/section manually by clicking on the expander icon (ˇ) located in the upper right corner of the green box headers, next to the word Help. Clicking on the word Help will open a hovering informational window containing definitions of the tasks, along with steps and tips on how to accomplish each task. Close the hovering informational window by clicking the 'close' button in the bottom right corner.
The system will display a blue checkmark beside completed tasks. Some tasks will present a box that you can check yourself when you complete the item, while others are system controlled. Incomplete tasks will be marked with either a blank box or a red ‘No’ symbol beside tasks still needing work.
Staff Collection Checklist Step-by-Step Guide
Step One - Prepare Staff Data
Remember that steps 1 and 2 of the Staff Collection Checklist are preliminary steps in the annual staff audit. The audit is conducted every year to ensure that staff in their employed and assigned roles have the appropriate license/s and certification credentials for their role/s.
The preliminary audit is meant to be as assist, helping your final certification go more smoothly based on the results that you get from your preliminary certification.
Most LEAs will still have data to correct after the Preliminary Agency Certification. And, since the preliminary certification is due in November, you will still have a number of months in which to make those corrections.
For more details on the timeline of the Staff audit for the current school year, please visit the WISEstaff Data Collection page, Data Collection Timeline section.
1a - Update and verify your staff data collection contact info
This is important so DPI knows the correct point people to contact for your LEA. This allows DPI to include the primary and secondary contacts in any communications sent about collection updates, along with training opportunities, like weekly User Group webinars.
When you click the hyperlink for task item 1a of the Staff Collection Checklist, your WISEstaff screen will bring you to the Resources Menu.
Refer to the WISEstaff User Guide for the Resources Menu - Update Contact Info tab for details on how to complete this step.

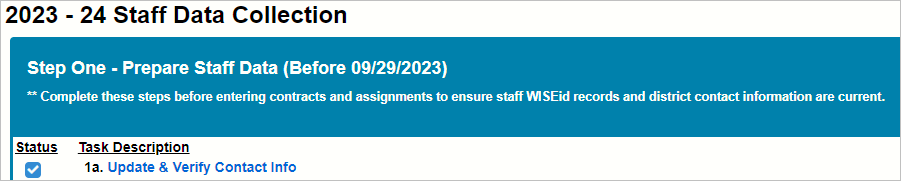
You should notice that there is now a check mark (not a ‘No’ symbol or a blank box) indicating that step 1a is complete.
1b - Enter and edit WISEid Person Records for all Staff; ensure all have a Local Person ID for your agency
This is important so that you have an accurate list of your staff uploaded for the annual staff audit. All staff with contracts or assignments must have a Local Person ID (district staff ID that is NOT a Social Security Number (SSN)) assigned to them and uploaded in their WISEid record. Errors and warnings will result if this is not done, and uploading contracts will not be possible unless all staff are associated with a Local Person ID.
When you click the hyperlink for task 1b, your WISEstaff screen will bring you to the Upload Person Data tab of the Manage Person Data Menu in WISEid (as indicated in the upper left corner). Directions to complete step 1b are detailed in that section of the WISEid User Guide.
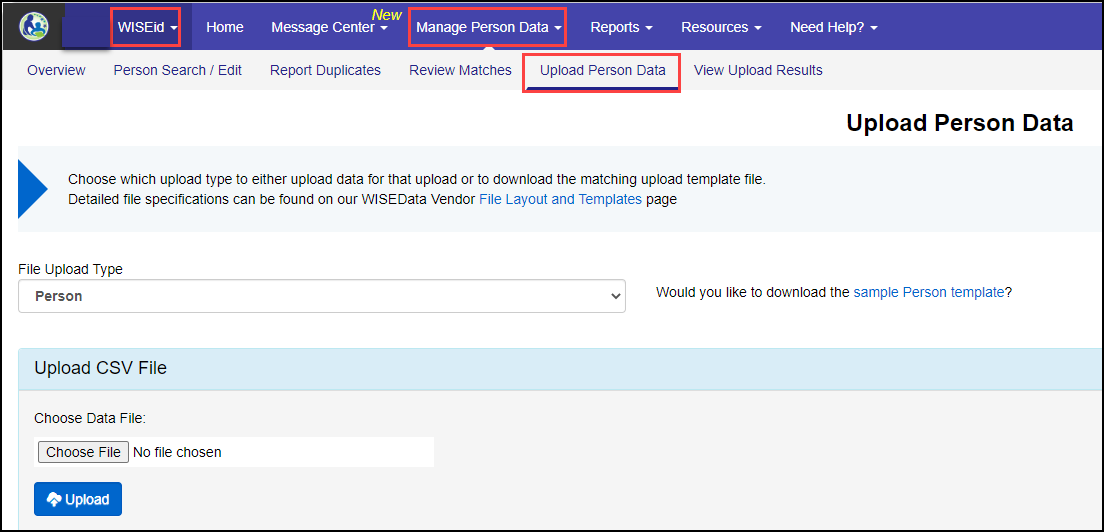
There are many ways to accomplish this task as an upload, but the file being uploaded must be in” .csv” format and must contain Local Person IDs to be successful. An orange error banner will appear if there are problems with your upload.
You can also enter data manually one person at a time. To do this you must click on the Person Search menu from WISEstaff and use the Person Search/Edit tab.
When your updates are complete, you must return the Staff Collection Checklist by clicking on the WISEid/WISEstaff toggle, selecting the WISEstaff Home menu, then clicking on Staff Collection Checklist. You must manually click in the blank box to obtain the blue check mark to indicate that step 1b is complete.
1c - Review Assignment Code Changes
When you click the hyperlink for task 1c, a new tab will open in your browser, directing you to the DPI WISEstaff Data Collection page where you can find the latest spreadsheet of assignment code changes, listed in the “Technical Documentation” section. You may download a copy of this spreadsheet for your reference.

Step 1 is now complete!
Return to WISEstaff Info & Help page
Staff Collection Checklist: Step Two - Enter and Certify Staff Data
2a - Load Assignment Data - Ensure All Assignments Have a LEA Assignment Title
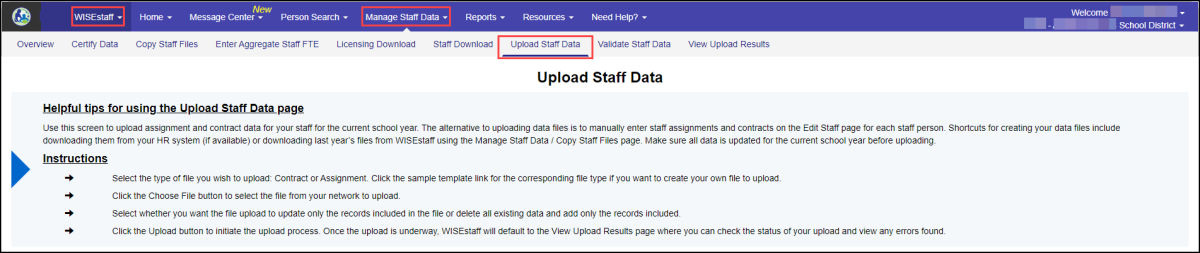
Clicking this step on the Checklist will bring you to the Manage Staff Data Menu, Upload Staff Data tab in WISEstaff.
On the Staff Collection Checklist page, the indicator (green or red circle) on the far right side, will turn green once one assignment or contract is entered, since DPI does not know how small or large your agency is. Keep this in mind as the preliminary audit date comes due, since a green circle may only be indicating that this task has only been partially completed. Look at the number in the circle to help you determine if more assignments or contracts need to be added.

2b - Load Contract Data - OPTIONAL for the Preliminary Certification.
This step is optional for the preliminary certification (due in mid-November) but is an absolute must for the Final Certification (i.e., the annual staff snapshot) due in March. You can read the "Helpful Tips for Using the Upload Staff Data Page" to help you successfully complete this task.
Clicking the hyperlinks will als bring you to the Manage Staff Data Menu, Upload Staff Data tab in WISEstaff. Other details to help you complete this step can be found on the Add Contracts section of the Person Search/Edit Menu User Guide.
2c - Run Data Validation: Resolve Errors, Resolve or Acknowledge Warnings (enter comments when acknowledging), Verify and Clear Info Messages
When you click the hyperlink for task 2c, it will bring you to the Manage Staff Data menu of WISEstaff, Validate Staff Data tab. This is the screen where you manage all of the errors and warnings that appear in the Count on the far right side of the Staff Collection Checklist.
2d - Find Entity IDs for Staff Requiring Licensing
This item on the Checklist is not hyperlinked. Technically it is a sub-part of step 2c. It is called out specially on the checklist as a separate item to communicate the importance of this task. If a staff member does not have an Entity ID this means that there is a staff member in a position that requires "X" license and this license has not yet been finalized approved. Persons without an Entity result in an automatic ‘fail’ for the audit. This means LEAs will not know if their staff have the correct license or not from preliminary audit results. A lack of information on the preliminary audit results can hinder LEAs from submitting accurate data for the final audit.
Missing Entity IDs for staff means that this staff member has not yet initiated the application process. As soon as someone applies for their license in the ELO system, an Entity ID is created, whether the license has been awarded or not.
Missing Entity IDs will result in a validation that needs to be resolved in Step 2c. If a green zero is listed in the Count column on the right of the Staff Collection Checklist, this step is complete. A red circle with a number in it will tell you how many Entity IDs require your attention before you can proceed to the next step. You must achieve the green 'zero' in order for your LEA to complete the next step, Preliminary Agency Certification.
2e - Complete Preliminary Agency Certification - Due Date for Preliminary Certification is Listed
Completing Preliminary Agency Certification is the final step in Step Two. Clicking the hyperlink will direct you to the Manage Staff Data menu in WISEstaff, in the Certify Data tab.
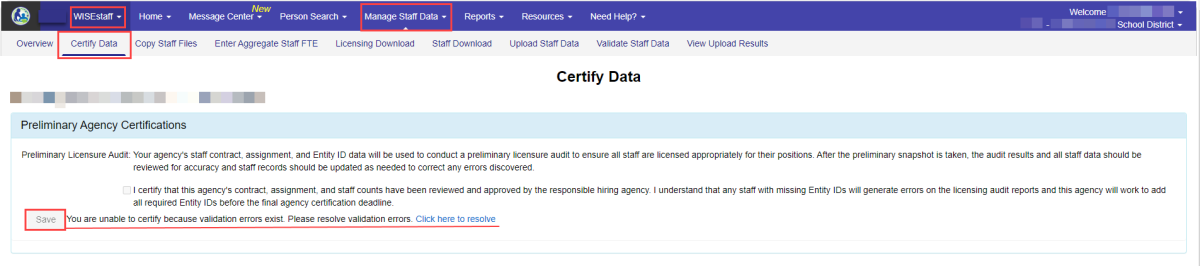
You will see the Preliminary Agency Certification screen. Note that on the Checklist screen, a date is listed, telling you when this option will become available. If you try to click in the blank box on the Certify Data page, the system will change your cursor into the ‘No’ symbol, and the Save button will be grayed out. There may even be a message next to it, explaining that you are, “unable to certify because validation errors exist. Please resolve validation errors.” There will then be a hyperlink available to bring you to the information that needs you attention. You will not be allowed to certify or save until all validations are resolved.
Final Agency Certification with the Data Quality Dashboard in view, will become available to view in the spring of each school year.
Step Two is now complete! Steps one and two need to be completed in time for the Preliminary Audit, which occurs in the fall and winter of a school year. At this time the LEAD team at DPI begins auditing all submitted data to ensure all staff assignments are aligned with approved licenses for those assignments.
An auditor from DPI will communicate your preliminary audit results back to the school/LEA. Based on this audit, further corrections can be made to (a.) provide the most accurate information possible, and to (b.) ensure that your school/LEA staff are appropriately licensed for their jobs.
When those preliminary results are completed, usually sometime in January. You can view the results of your Preliminary Audit Report. To do this, take the following steps:
- WISEstaff: Home menu
- Staff Collection Checklist - Step 2e (a green checkmark will indicate when complete) - click the hyperlink: Complete Preliminary Agency Certification
- WISEstaff: Reports - Audit Results.
These preliminary results inform you of licensing problems or errors that need to be resolved before the Final Agency Certification deadline (steps three and four on the Staff Collection Checklist).
Steps Three and Four need to be completed in time for the Final Audit, which occurs in the spring and summer of every school year.
Return to WISEstaff Info & Help page
Staff Collection Checklist: Step Three - Review Preliminary Audit Results and Apply Corrections
3a - Preliminary Audit Reports Ready
Clicking the hyperlink for this task will bring you to the WISEstaff Reports menu, Audit Results tab. Tips and sources of more information are listed at the top to help you successfully complete this task.
Below this you will see a list of Audit Results. Clicking the File Name will open the file as a pdf. Each report can be downloaded as a ‘.csv’ file by clicking the ‘open file’ icon. The audit will show licensing discrepancies your LEA is responsible for resolving by the due date for Final Certification. This date is listed on the Staff Collection Checklist.
Return to the Home menu, Staff Collection Checklist tab to continue on with the next step.
3b - Find Entity IDs for Staff Requiring Licensing
Similar to step 2d, this item on the Checklist is not hyperlinked. Technically it is a sub-part of step 3a. It is called out specially on the checklist as a separate item to communicate the importance of this task. If a staff member does not have an Entity ID this means that there is a staff member in a position that requires "X" license and this license has not yet been finalized approved.
Missing Entity IDs for staff means that this staff member has not yet initiated the application process. As soon as someone applies for their license in the ELO system, an Entity ID is created, whether the license has been awarded or not.
Missing Entity IDs for staff will result in a validation that needs to be resolved in Step 3c when you verify your Quality Data. If you have a warning associated to a staff member based on an Entity ID, you should check on the status of this staff member's licensure. If you have a warning associated to a staff member based on an Entity ID, you should check on the status of this staff member's licensure. If the staff member has applied for the license, but it has not been awarded yet, they should have an Entity ID assigned to them. Please enter this information into the comments and then Acknowledge the warning.
The Count on the right hand side will indicate the errors and warnings that must be resolved in order for the Checklist to provide you with a check mark indicating this is complete. If a green-zero exists in the Count column on the right of the Staff Collection Checklist, this step is already complete.
3c - Load or Finalize Contract Data
This step was optional for the preliminary certification (due in mid-November) but is an absolute must for the Final Certification (i.e., the annual staff snapshot) due in March. You can read the "Helpful Tips for Using the Upload Staff Data Page" to help you successfully complete this task.
Clicking the hyperlink will bring you to the Manage Staff Data Menu, Upload Staff Data tab in WISEstaff. Other details to help you complete this step can be found on the Add Contracts section of the Person Search/Edit Menu User Guide.
3d - Enter Aggregate Assignments (if applicable)
Clicking the hyperlink will bring you to the Manage Staff Data Menu, Enter Aggregate Staff FTE tab in WISEstaff.
3e - Verify Quality Data
There are a number of links to click in this task. Each one is important and must be completed.
- Clicking the hyperlink for Verify Quality Data will bring you to the WISEstaff Reports menu, Overview tab.
- Clicking the hyperlink for Data Quality Dashboard will bring you to the WISEstaff Home menu, Data Quality Dashboard tab.
- Clicking the hyperlink for Admin Salary and Fringe Report will open a new tab showing your Admin Salary and Fringe Report for the current school year. You can filter results for this report by Hiring LEA, Working LEA, Working School and Position. Click the expander tool on the list to see more details about each administrative staff member. Use the Edit Person tab in the Person Search/Edit menu to correct errors and discrepancies. You can also download this report by clicking the Download button. Close the report when you are done and return to the WISEstaff tab.
- Clicking the hyperlink for Aggregate Staff Report will open a new tab. Filters for year, working LEA and working school will allow you to adjust what you see in the report. Click the blue ‘Filter’ button when your selections have been made. Your reports will show up below, and will allow you to export them as an Excel file.
- Clicking the hyperlink for Salary and Fringe Variance Report will also open a new tab. You can filter information on this report by hiring LEA, working LEA, staff qualifier filters for FTE and contract days, along with a variety of data variance filters about salary and fringe benefit information. Click the blue ‘Filter’ button when your selections have been made. Your reports will show up below, and will allow you to download a file of the report. Clicking on the WISEid number of any staff member listed on this report will open yet another tab, in the Edit Staff tab of the Person Search menu of WISEstaff where you will be able to make corrections. Validation messages about this staff member will appear on the top of the scream, with hyperlinks leading you to helpful resources like KBAs.
3f - Run Data Validation
When you click the hyperlink for task 3d, it will bring you to the Manage Staff Data menu of WISEstaff, Validate Staff Data tab. This is the screen where you manage all of the errors and warnings that appear in the Count on the far right side of the Staff Collection Checklist. There are three types of validations:
-
Errors - Most severe, must be resolved in order for certification to be completed.
-
Warning - Have to be addressed, either through resolving the problem or they can be acknowledged. Some acknowledgements also require a comment to explain why the warning isn’t being resolved before you can click the blank box in the “Ackn” column.
-
Informational - Nothing needs to be resolved, but the information provided here may be helpful.
Clicking the hyperlink in the resolve column for each error or warning will direct you to the page where the validation exists (for example, Edit Staff or Staff List) so that you can view that data and rectify it. Errors and warnings will all be linked to a knowledge base article (KBA), which appears as a four-digit code in the Code column. The KBA will provide you with more details on the validation, and will also provide example scenarios, business logic behind the validation dn steps on how to resolve it. All errors and warnings will be resolved, ideally, prior to certification. This will be reflected as a green zero in the Count number on the right side of the Staff Collection Checklist.
3g - Complete Final Agency Certification
Completing Final Agency Certification is the final step in Step Three. Clicking the hyperlink will direct you to the Certify Data tab in the WISEstaff Manage Staff Data menu. Final Agency Certification will be available to view in the spring of each school year.
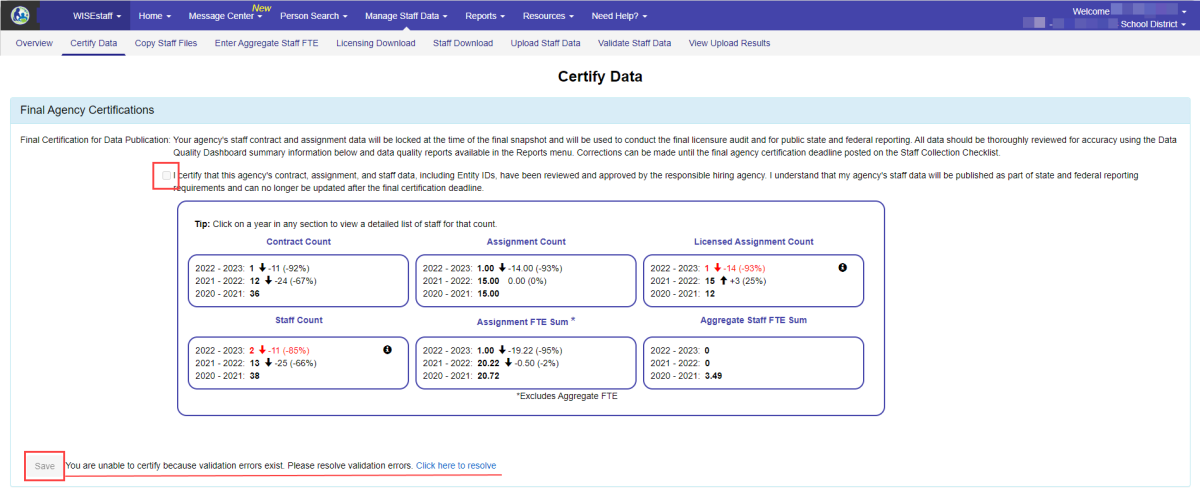
You will see the Final Agency Certification screen, which is very similar to the Data Quality Dashboard. Note that on the Checklist screen, a date is listed, telling you when this option will become available. If you try to click in the blank box on the Certify Data page, the system will change your cursor into the ‘No’ symbol, and the Save button will be grayed out. There may even be a message next to it, explaining that you are, “unable to certify because validation errors exist. Please resolve validation errors.” There will then be a hyperlink available to bring you to the information that needs you attention. You will not be allowed to certify or save until all validations are resolved.
3h - Final Data Snapshot Complete
This is informational only, reminding LEAs that when the annual spring snapshot is complete, WISEstaff will no longer allow any edits to be made.
Step Three is now complete!
If there is missing or incorrect data on the final staff report, this data cannot be changed. You can, however, annotate changes and corrections by way of submitting a data errata letter. Submitting data errata letters do not change the final report, but they do provide a way for many researchers and other viewers to see your corrected data in your letter. Please visit the Data Errata page for more information. Please view the WISEadmin Portal User Guide, Data Errata Screen section for instructions on how to submit a data errata letter.
If you are a CESA, and need to submit a data errata letter, please send your letter as a PDF file to this email address: DPICustomerService@dpi.wi.gov.
Return to WISEstaff Info & Help page
Staff Collection Checklist: Step Four - Review Final Audit Results
4a - Final Audit Reports Ready
Clicking this task will bring you to the WISEstaff Reports menu, Audit Results tab, just as it did for task 3a. A date will be listed on the Staff Collection Checklist indicating when this report will be ready and available for downloading.
Return to WISEstaff Info & Help page