
Manage Staff Data - Menu in WISEstaff Portal
Click the links below to navigate to different sections of this page:
Manage Staff Data: Overview Certify Data Download Staff Files
Snapshot Data Enter Aggregate Staff FTE Licensing Download
Staff Download Validate Staff Data Validate Staff "Navigator"
Upload Staff Data Which Upload Option is Best View Upload Results
Manage Staff: Overview
The Manage Staff Data menu groups the screens related to uploading and managing staff contract and assignment data. A complete list of all the available WISEstaff reports and validations, including descriptions, if provided here.
Certify Data
(Previously called Sign off or Certification): This step is required to attest (certify) that all required staff data for your agency has been submitted and validated to be error-free in preparation for the preliminary and final audits conducted by DPI. Managing the accuracy and quality of data benefits the submitting agency and DPI and will be reflected in subsequent staff data reporting.
Download Staff Files
Download Staff Files is an OPTIONAL step, used by districts that do not generate fresh Contract and Assignment files from their staffing system vendor tool each year. Instead, they copy the data reported to DPI in previous years as their current year starting point. Files from previous school years may be copied to ensure data consistency. Use Download Staff Files to begin working on the next school year's data. This screen is often used during steps 2a and 2b of the Staff Collection Checklist preliminary certification.
This screen has three sections:
- Copy Forward Files
- Current WISEstaff Data
- Snapshot Data
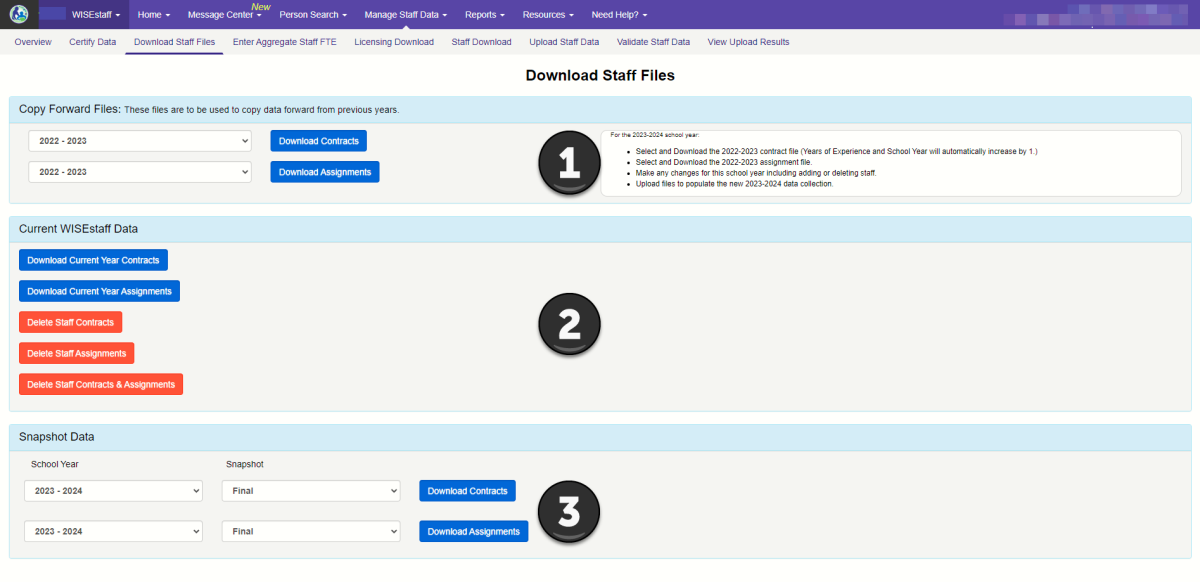
Copy Forward Files (Download Data from Previous Year)
You may need to complete these actions as part of Step 2a and 2b on the Staff Collection Checklist.
The Copy Forward Files section of the Download Staff Files screen allows users to essentially download a file of a previous school year, going all the way back to the 2014-15 school year.
Contract and Assignments files are downloaded separately, and year selections for that file can be made applied separately, too (i.e., you can download Contracts from 2020-21, and download assignments from 2021-22)
Clicking the ‘Download Contracts’ or ‘Download Assignments’ buttons will generate a ‘.csv’ file with information from that year’s staff - and - this file automatically updates various columns to reflect for the current year, such as “School Year,” “LEA Experience,” and “Total Years.” You should also make any manual updates needed (salary, for example) to this downloaded file. When the file is accurate and complete, save it so that you can upload it. You can also download this information from your HR system, if applicable.
The ‘Tips’ text box gives you information about that file and next steps:
-
For the 2023-2024 school year:
Select and Download the 2022-2023 contract file (Years of Experience and School Year will automatically increase by 1.)
-
Select and Download the 2022-2023 assignment file.
-
Make any changes for this school year including adding or deleting staff.
-
Upload files to populate the new 2023-2024 data collection.
Current WISEstaff Data
The Current WISEstaff data section of the Download Staff Files screen allows users to download a file from the current school year. There are five options: two download options, and three delete options. Each will be explained:
Downloading: You would use these buttons to get a copy of what WISEstaff has ‘on file’ within the application for your LEA this year. You want to download this file before you delete anything!
- Download Current Year Contracts: This download will contain all of the hiring agency’s staff contracts for the current school year. You can then open this file, make any required changes, save it, and upload it in the Manage Staff Data, Upload Staff Data tab.
- Download Current Year Assignments: This download will contain all of the hiring agency’s staff assignments for the current school year. You can then open this file, make any required changes, save it, and upload it in the Manage Staff Data, Upload Staff Data tab.
Deleting: Once you have downloaded and saved the file/s you need for the current year from the blue buttons, then you can delete.
Best practice is to delete all, and then re-upload files so that both systems (your school files and WISEstaff) contain matching data. This is also the best way to avoid validation errors and warnings due to duplicate items.
-
Delete Staff Contracts: This will delete all of the hiring agency’s staff contracts for the current school year. This allows the LEA to upload a new file with a ‘clean slate’.
-
Delete Staff Assignments: This will delete all of the hiring agency’s staff assignments for the current school year. This allows the LEA to upload a new file with a ‘clean slate’.
-
Delete Staff Contracts and Assignments: This will delete all of the hiring agency’s staff files - contracts and assignments - for the current school year. This allows the LEA to upload a new file with a ‘clean slate’.
How to Download Staff Files:
-
Download the file/s you need from the options explained above. Make sure you select the appropriate school year (past year or current) and type (contracts, assignment or both).
- NOTE: The downloaded file from a previous year, automatically increases the Years of Experience and School Year by 1.
- Make changes to the downloaded files for the school year (adding or deleting staff, adjusting FTE, salary adjustments, assignment changes, etc).
- Save files to the desired location on your computer/drive.
- Go to the Manage Staff Data - Upload Staff Data screen to populate the new school year's data collection.
- NOTE: There is not an option on Upload Staff Data to upload contract and assignment files simultaneously. Contract file must be uploaded separately from assignment files. Aggregate assignment files may be different from assignment files.
Once you have your newly updated files ready, you can delete the existing assignments &/or contracts stored in WISEstaff by clicking the desired red button/s under Manage Staff Data - Download Staff Files screen. This will allow you to start over with fresh data when you upload the new file, ensuring that your LEA's data matches exactly to what's in WISEstaff. This will alleviate dealing with errors and warnings, too.
You're now ready to Upload Staff Data (further down this page). Read carefully so that you know Which Upload Option will work best for your situation.
Snapshot Data
This section is used to provide reports of the ‘snapshots’ of Wisconsin school staff data at a specific point in time, which is used to generate the annual staff audits. The final snapshot data is then made available to the public and is reported on the Public Staff Report webpage. The goal of this tool is to create a download file that allows LEAs and the DPI Licensing Team to see what data was in place on a given snapshot date because that data may or may not match what is currently visible in WISEstaff.
This tool is most helpful after the preliminary staff audit, before data is ‘snapped’ with the final certification. This preliminary snapshot takes place in the fall, for staff with assignments (not contracts) in a school setting.
From this preliminary snapshot date (e.g., for the 2023-24 school year, the preliminary snapshot date was November 28, 2023), a teacher licensing audit is conducted, to ensure that educators are appropriately licensed for their reported assignments.
Unfortunately, DPI is not set up to provide feedback on ‘real time’ data. Instead, we must rely on snapshot data - data that is frozen in time, based on the date it was collected, regardless of how it may have been changed since then. As such, it occurs very often that the errors reflected on the audit report have already been corrected by the LEA when they get their audit results.
For example, during these ‘audit processing’ months (i.e., November, December, January), LEAs may locate errors from within their WISEstaff data and make corrections within the WISEstaff application. This means that the data living in WISEstaff is not the same data that was ‘snapped’. This also means that the audit report may be given to an LEA in February, annotating a data error that was captured in November which the LEA fixed in December.
This time-lapse is the source of much confusion, and is the reason behind the WISEstaff Snapshot Data tool. These Snapshot Data downloads will provide LEAs and the DPI Licensing Team staff with the ability to see the assignment &/or contract data as it was at the time of the snapshot.
The Snapshot Data tool will be the documentation of the data in WISEstaff as it was when the snapshot occurred. This will clarify if the data currently living in WISEstaff is the same or different than the data used to create the audit report.
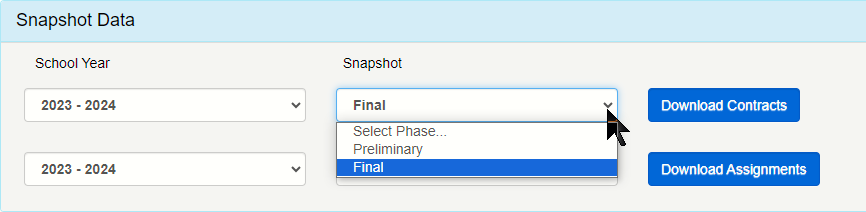
How to Use the Snapshot Data Tool:
- Select the year you need for the School Year filter. The most current year is listed at the top, and data goes back all the way to the 2013-14 school year.
- From the Snapshot filter, select either Preliminary or Final, based on the snapshot results you need to verify.
- Click the blue button - either Download Assignments (suggested for use after preliminary certification) or Download Contracts.
- Access the downloaded file on your computer. This file will display assignment/contract data as it existed on the snapshot date (preliminary or final, depending on what you selected from the Snapshot filter).
- NOTE: This snapshot data may or may not match your current WISEstaff data.
- This download will allow you to see what a staff member’s Contract/Assignment was at the time of the snapshot, along with all the standard information: WISEid, Name, Position Code, Assignment or Contract, Hiring LEA, FTE, Assignment Related Questions, Grades, Assignment Titles, etc.
- You can use “Ctrl + F” to search for a staff member’s name.
- Once you have located the staff member’s name, you can compare your data from the snapshot date with the data on your Audit report.
- This will allow you to compare your snapshot data against the audit errors and your current data to see if you have rectified all of your errors.
Enter Aggregate Staff FTE
In the WISEstaff application, you will find the Enter Aggregate Staff FTE option under the Manage Staff Data menu. Clicking Enter Aggregate Staff FTE will open a screen where you can enter FTE information about your subcontracted employees.
Users may come to this screen on WISEstaff when completing step 3d (Enter Aggregate Assignments - if applicable) on the Staff Collection Checklist when preparing for the final certification of the annual staff audit.
As the Hiring Agency, you will be able to enter assignment data for subcontractors for whom you aren't otherwise able to obtain personal information, such as birth dates, to create WISEids for these employees. Note, if you are able to obtain the demographic information needed to create a WISEid, use that data to create a WISEid and enter the staff member in the standard method. The aggregate method should ONLY be used when you do not know the demographic data to report the employee as traditional staff.
Enter your subcontracted staff for whom you are unable to obtain demographic data necessary for creating individual WISEid records for each staff person. This option to enter aggregate staff is available only for the 'Other Support Staff' position with a bus driver, plant maintenance / operations personnel, or cafeteria worker assignment. The FTE for each assignment should be calculated based on 1 FTE = one full time staff person in that assignment rather than indicating a percentage of an assignment.
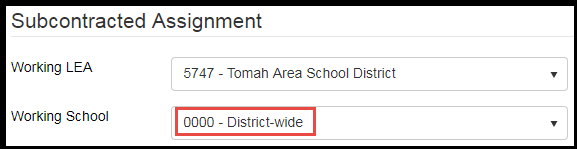
To enter subcontracted assignment data:
- Select the Working LEA from the drop-down menu under the Subcontracted Assignment section.
- Then select the Working School.
- If you want to enter the assignment FTE for the whole district, choose '0000 - District-wide' from the drop-down menu.
- Select the Position.
- At this time, the only option is 98 - Other Support Staff.
- Choose the appropriate assignment Area from the drop-down menu.
- The aggregate area options include: Bus Driver - Special Education, Bus Driver, Plant Maintenance and Operation, and Cafeteria Worker.
- The Contracting Agency Name field is free text where you can enter a specific contracting agency's name if you wish.
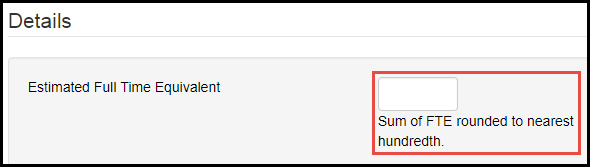
- Enter the FTE total on the right side under the Details section.
When your FTE data has been added, return to the Staff Collection Checklist by clicking the WISEstaff Home menu, then clicking on Staff Collection Checklist to move on to step 3e.
Licensing Download
This optional tool can be used to review licensing details for all staff or a selected group based on a list of Entity IDs or WISEids. The download includes details like license type, stage, position/subject, renewal guidelines, and expiration date. An additional feature allows you to filter the download to include only licenses expiring during a selected date range, to help keep track of staff who will need to renew or update their licenses during or before the next school year.
Staff Download
(Previously called Staff Download by Local Person ID): Use this link to generate a download of all staff with a Local Person ID assigned to your agency. The .csv file will appear at the bottom of the WISEstaff page once complete. Download includes data from each person's WISEid record: Local Person ID, WISEid, name, demographic data, Entity ID, email address, and WISEsecure role, if assigned.
Upload Staff Data
(Previously called Upload): Here you can upload a file containing assignment or contract data for your staff using the designated file format. Detailed file format specifications can be found on the File Layout and Templates page. When uploading a file, you can choose to update only the records that are included in the file, or have the upload replace all existing data, which would delete all records for the current year and insert only the records contained in the uploaded file.
Staff Collection Checklist: Steps 2a/2b - '+Add Assignments / Contracts'
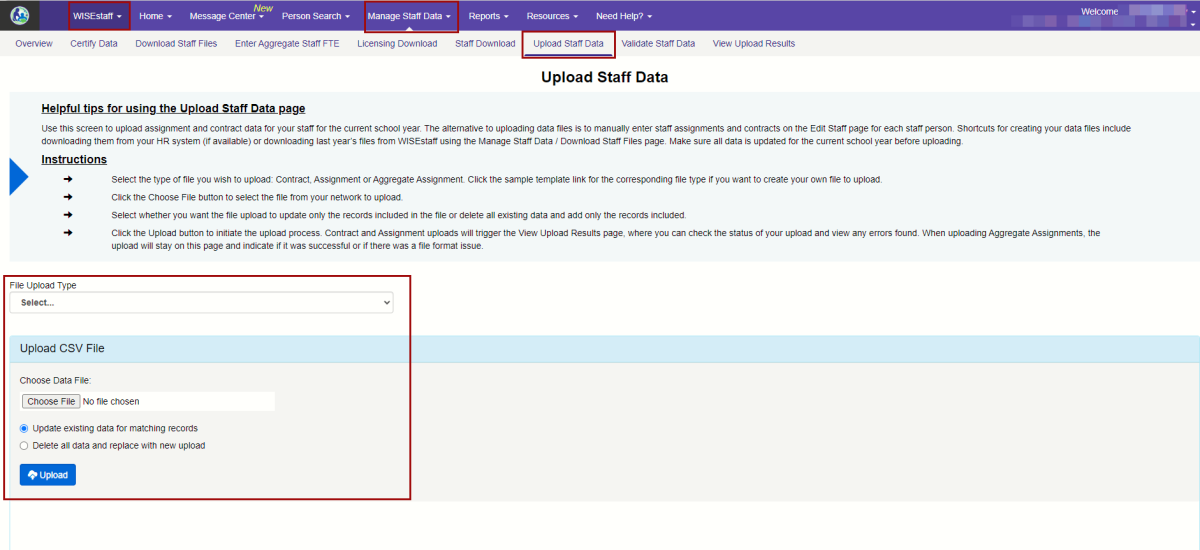
Use the dropdown menu to select your File Upload Type, Contract or Assignment. Note that with each selection, WISEstaff provides you with a bank of tips and a sample template that you may download to ensure your upload is following the specified requirements.
You may also copy and forward last year’s Contracts and Assignments. To do this, click the Download Staff Files tab in the WISEstaff Manage Staff Data menu (up above on this same webpage).
Which Upload Option Should I Use?
When you need to upload either or both Assignment and Contract records, before clicking the blue ‘Upload’ button, select the radio button that best matches the file you want to upload:
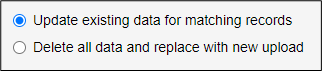
Update Existing Data for Matching Records (Option 1)
This option looks for matching elements and updates any assignment with matching items (same person, the same exact working school, the same exact hiring agency, working school assignment position and area code, etc.).If there is not an exact match - it will create a new row for that person/assignment. This could create potential duplicates if the school and assignment data don't match an existing record.
Another reason to select this option is if you have you have done manual edits on the ‘Edit Staff” screen in WISEstaff and you don't want to lose those updates. In this scenario, then the “Update existing” option would be the better option.
NOTE: This upload option does not delete rows or records of data. If you are deleting contracts from the file, and there is existing data in WISEstaff for that contract that was previously uploaded, this option does not remove the contract from WISEstaff which you removed from the file. This may cause a discrepancy in the number of records and result in a warning or error.
As such, this upload option is best used only when there are minor changes reflected in the upload, especially where new/updated data is being added in and no data is being removed/deleted.
OR
Delete All Data and Replace with New Upload (Option 2)
This option is the preferred method for the majority of uploading scenarios. As long as your file has full and complete and accurate data. Especially if you download your file from a staff system vendor tool. This option deletes everything you have in WISEstaff for the current school year and replaces it with whatever you have in the file. This option is recommended most of the time.
Choose the ‘.csv’ file you want to upload.
Now you can finally click the blue ‘Upload’ button.
You can view the Manage Staff Data, View Upload Results tab to see if any errors or warnings were created from this upload.While the upload is processing, the View Upload Results Tab displays and will update once the upload is complete.
Manual Data Entry for Assignment and Contract Data
Staff contract and assignment data can also be entered manually. This might be an option if you work in a smaller district or if there are very few staff changes from the previous year. To do this, go to the Person Search menu in WISEstaff, and use the Person Search/Edit tab.
For specific details on adding Contracts and Assignments, please visit the Add Contracts and Add Assignments sections of this User Guide.
For Step 2c on the Staff Collection Checklist you need to validate the staff data you uploaded against the logic (expected data) in the WISEstaff application. Details for this step are in the next section below.
Validate Staff Data
As part of the annual staff preliminary audit, all errors and warnings need to be resolved, ideally, prior to certification. If errors and warnings are not resolved by the preliminary certifcation deadline, this will affect your Audit results, and they may be tricker to resolve for the final certification. For Step 2c, the red circle on the right will indicate only the unacknowledged warnings.
The Validate Staff Data process typically runs each morning throughout the data collection period or you can run it as needed by clicking the Refresh Validation button. The validation process will review all of your agency's assignment and contract data for the current school year and generate errors, warnings, or informational messages for anything that doesn't meet DPI requirements. All errors must be corrected and all warnings must be corrected or acknowledged before your agency can certify your staff data for the collection year. You can use the Navigator Tool to help you correct errors and warnings one person at a time by clicking the 'Go To Navigator" button on the right side (details below).
For Step 2e on the Staff Collection Checklist, the count on the right will show in orange if the Entity ID warning has been acknowledged.
When all errors and warnings are resolved, this will be reflected as a green zero in the Count number on the right side of the Staff Collection Checklist. If you have acknowledged warnings (and added comments if comments are required), the red circle will be replaced by a green checkmark.
There are three types of validations:
Errors - Most severe, must be resolved in order for certification to be completed.
Warning - Have to be addressed, either through resolving the problem or they can be acknowledged. Some acknowledgements also require a comment to explain why the warning isn’t being resolved before you can click the blank box in the “Ackn” column.
Informational - Nothing needs to be resolved, but the information provided here may be helpful.
Clicking the hyperlink in the resolve column for each error or warning will direct you to the page where the validation exists (for example, Edit Staff or Staff List) so that you can view that data and rectify it. Errors and warnings will all be linked to a knowledge base article (KBA), which appears as a four-digit code in the Code column. The KBA will provide you with more details on the validation, and will also provide example scenarios, business logic behind the validation dn steps on how to resolve it. All errors and warnings will be resolved, ideally, prior to certification. This will be reflected as a green zero in the Count number on the right side of the Staff Collection Checklist.
If you have a warning associated to a staff member based on an Entity ID, you should check on the status of this staff member's licensure. If the staff member has applied for the license, but it has not been awarded yet, they should have an Entity ID assigned to them. Please enter this information into the comments and then Acknowledge the warning.
Once you’ve resolved all of your validations, you can:
View Upload Results
This screen (previously called 'Results') is where you can review the status and validation results of your uploaded data files. This screen becomes visible while a file upload is processing. It updates fully once the upload is complete. The results queue indicates the status of each file during and after the upload process. Once the file is finished processing, you will see the number of records processed, the number of changes made to existing data, and the number of potential duplicate WISEid records, if applicable.
- This number must be rounded to the nearest hundredths place.
-
Move on to Step 2d of the Staff Collection Checklist for Preliminary Certification
- Move on to Step 3e of the Staff Collection Checklist for Final Agency Certification
- From the ‘Validate Staff Data’ screen click the “Go to Navigator” button to launch the tool.
-
Reviewing the “Navigator” Tool in WISEstaff as part of the Validate Staff Data Screen
The Navigator is a good tool to use if you are fixing information on Staff records as part of the Staff certification process. This tool allows you to step through your staff validations and correct assignments one at a time.
Alternatively to correcting these items in WISEstaff, you could also fix these errors in your HR system and then re-upload the assignment file to WISEstaff, clearing the errors.
- There will be a table showing all of the errors. We strongly recommend that you right click to open each record in a new tab.
- Review the content on the error and address the specific content that needs to be changed to resolve the error.
- Once the data is corrected, you have two options: you can either save or you run the validation.
- Running the validation takes longer, but then you can be 100% sure that the problem has been resolved.
- You can go to the next button and go step through your entire list one error at a time.
- NOTE: If you click the “Next” button without clicking 'Save', your changes will not be saved!!
Return to the Staff Collection Checklist to move on to Step 2d.