WISEid File Uploads
In the Manage Person Data section, users with the appropriate access can upload files into WISEid and work with them once processed. Uploading a Person record will create WISEids and/or update WISEid data during the process. It is essential that ALL students and staff have WISEids assigned. It is also imperative that ALL students and any staff members associated to Roster coursework have Local Person IDs assigned as well, so their data can be claimed and linked to your district. The results of a file upload should be examined and corrected as needed. The information below will guide you through this file upload and examination process.
Uploads
DPI suggests running WISEid File uploads once a week to maintain accurate data within WISEid, WISEdata, and WISEstaff. This is recommended for both student and staff person record uploads. Person record uploads are always completed through the WISEid application, while Contract and Assignment uploads needed for the WISEstaff collection can be completed through the WISEstaff application.
**Please note, if you do not have access to WISEstaff, you will not be able to upload a Person file with staff names. To obtain access to WISEstaff, please contact your local WISEstaff security administrator.**
If it is the beginning of the school year, you can break Upload tasks into manageable parts. Suggestions include, but are not limited to,
-
New students who would not have a WISEid assigned to them yet because they have not been enrolled in a Wisconsin School
-
Students new to your school who already have a WISEid
-
Follow the Match Review Section for these students carefully.
-
-
School breakdowns (e.g., elementary school, middle school, etc.)
Follow the steps below to complete the file upload process.
-
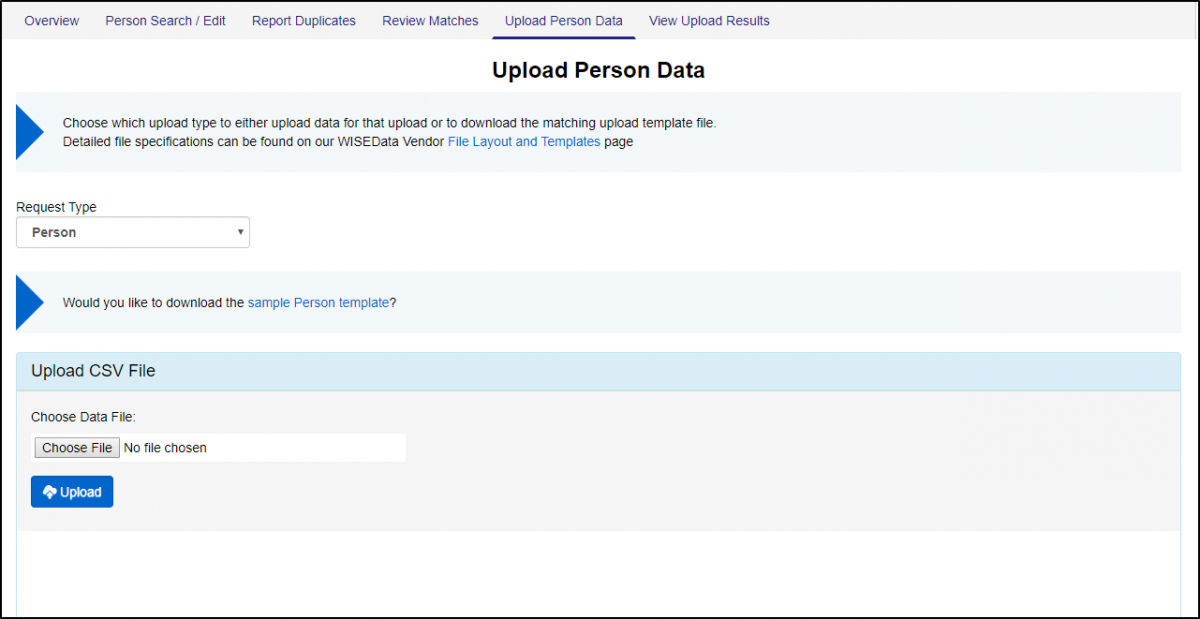
Download your WISEid file out of your SIS for either your students or your staff members (if you are unsure on how to do this, contact your SIS vendor). This file should be a .csv file. Save it where you can find it later.
-
Click Upload Person Data from the Manage Person Data menu.
-
Click Choose File to select your saved .csv file that you downloaded from your SIS.
-
As you are updating the WISEid Person Upload, please keep in mind that it is best practice to transfer PII using a secure format, such as an FTP client or encryption software. Email is not appropriate.
-
-
Click Upload.
The latest WISEid detailed file upload specifications and templates can be found on the DPI vendor webpage and the Upload screen in WISEid.
Results
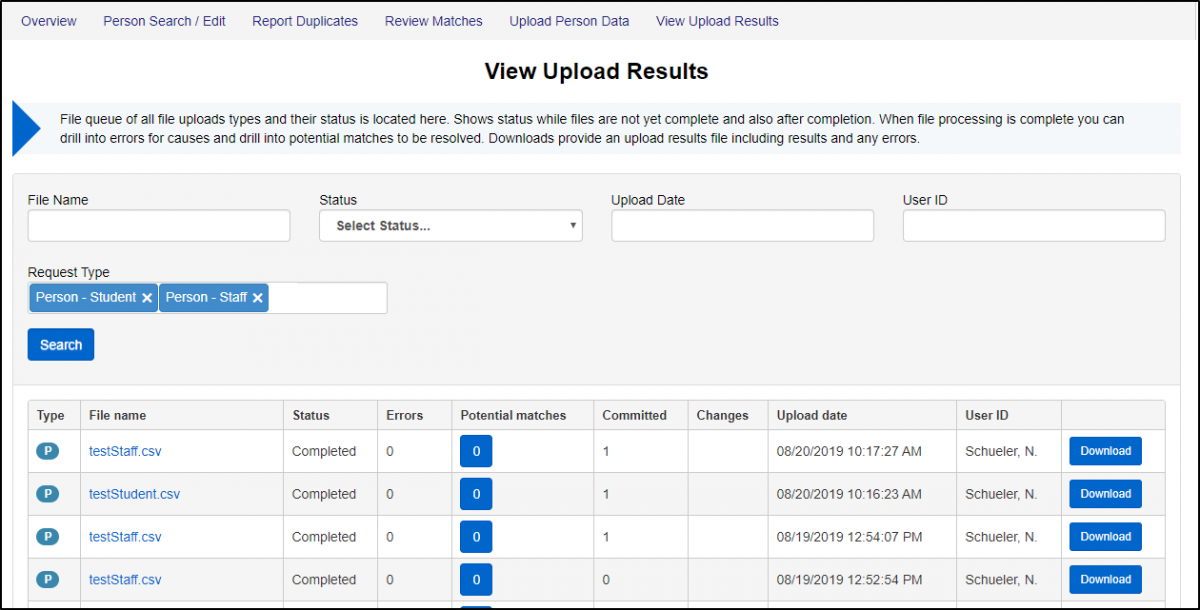
Once you have completed your upload, you should check your results to see your data.
-
Type: This can be Person, Contract, or Assignment. Contracts and Assignments can be uploaded through WISEstaff and reviewed through the Results tab.
-
File Name: Clicking this hyperlink will show you the file you have uploaded.
-
Status: This shows you the status of your upload. You cannot work with your data until the status is Completed.
-
Errors: These are issues within the file that you uploaded; you will need to fix these errors in your file and re-upload a new file to correct them.
-
Potential Matches: These are possible matches to people whom you have uploaded. The system will check for matching names and birth dates within the WISEid system and then ask you to review to ensure that duplicate records are not created.
-
Committed: This is the number of lines from your file upload that were processed and do not need any manual review.
-
Changes: This is the number of change requests created from this file upload, for example, a student whose last name has changed.
-
When you upload the student to WISEid with the new last name, the system will create a change request to the student’s associated school districts to approve or deny before the change takes effect. This process is in place to ensure person record changes are applied correctly prior to saving them to the database.
-
-
Upload Date: This identifies when the file was uploaded.
-
User ID: This identifies who uploaded the file.
-
Download: This button allows you to download your committed file. If WISEids are newly assigned to students, you should download this file and upload it back into your SIS.
Errors
If you have an error, you will need to click the blue box with a number in it. This will bring you to your Person Error Review Screen (shown below). You can see the details of the error by clicking the [+] to the left of the row number. You will need to make your corrections within your student information system (SIS). After corrections are made, download a new .csv file from your SIS and upload it into WISEid. Remember to save your upload file on your hard drive for future reference. After the error has been corrected and your upload has finished processing, errors on your new upload should appear as “0”.

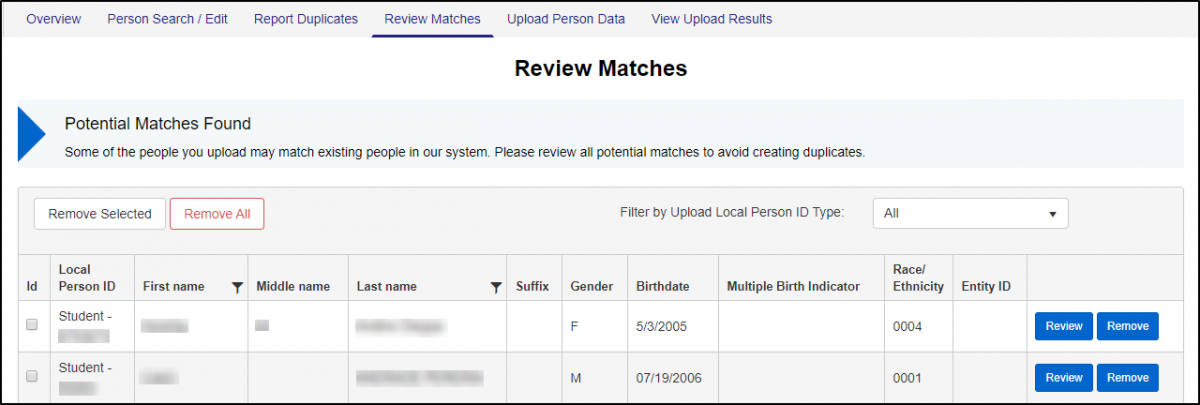
Review Matches
Once person records have been uploaded, they will go through the match review process. This helps determine if people already have a WISEid and should be linked to that WISEid. You can get to your Potential Matches by clicking the blue box from your Results menu or from the File Tasks Menu on the left.
-
Click Review for the person who has a potential match.
-
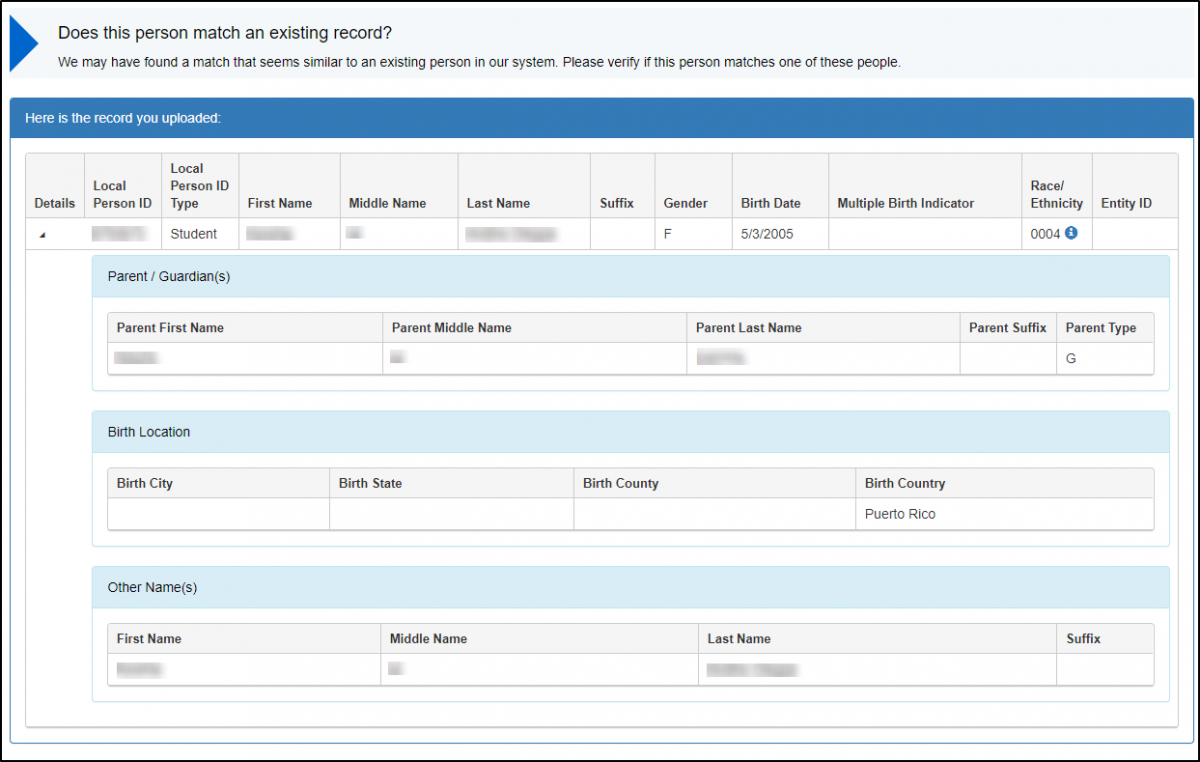
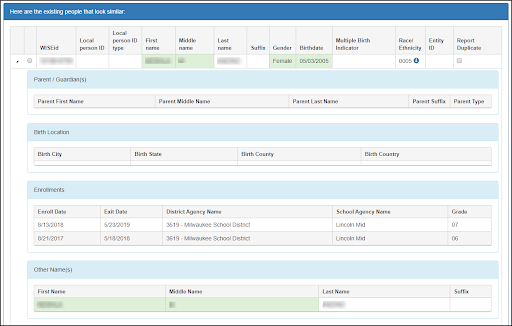
A new screen will pop up. The top box will show what you have uploaded. Below this box will display existing people who look similar. In the bottom box you will notice green squares. These squares show you boxes that match what you have uploaded. Be careful when matching; a matching name doesn’t mean it is the same person. Verify the birth date as well. If you aren’t certain, check other information available to verify the match.
-
If you believe you have a match, click the radio button next to the existing match and then click Next. This will combine your upload with the existing record.
-
If the existing records do not match your person, select the Create a new person radio button and then click Next. This will create a new WISEid for your uploaded person.
Downloads
Results Download: From the Results screen, click the Download button next to a person transaction. This will save a .csv file containing all information, including any changes made, to your local computer. This file may be used to update or automate changes in your local information system—SIS, HR system, etc.
The Status and Message Text columns in this chart indicate which type of processing transaction each row represents. A single upload transaction may have multiple rows indicating multiple statuses.
Download Transaction History: Download your transaction history by clicking on the link under Reports. A .csv file containing your history will download to your local computer. The Download Transaction History file may be used to update or automate changes in your local information system, SIS, HR system, etc. This is similar to the person results download except that all download types are included. ‘Download transaction history’ is a catchall for anything users wish to pull out of the system. By entering a date range, you may gather all the potential matches resolved in a specific period, gather information on duplicate merges completed by DPI, review record modifications, and more.
For more information on Downloads, download statuses and messages, as well as Download Transaction History specifications, see the WISEid/WISEstaff Downloads knowledge base article.