Finding Prior Year ACCESS Score in WISEdata Portal and in WISEdash for Districts
ACCESS for ELLs® is a test designed to measure English language proficiency. It is a large-scale assessment that is based on the WIDA Consortium’s ELD Standards that form the core of Wisconsin’s approach to instructing and testing ELs. The test name is an acronym that stands for: Assessing Comprehension and Communication in English State-to-State for English Language Learners.
Click the links below to navigate to different sections of this page:
Where to find ACCESS scores for a specific student WISEdata Portal
ACCESS Scores and ELP Codes: How They Connect
The ACCESS test results in a score called the English Language Proficiency (ELP) code. It will be a number, between one and seven, that may contain a digit behind the decimal point, for example, 4.2.
The ELP code is derived from a student’s ACCESS test score. Students who have taken the test will have a score of one through six (i.e., 1, 2, 3, 4, 5, 6). It is also important to note that the maximum ELP code for a student who has taken an ACCESS test is a “6 - Former EL.” Additionally, the ELP code of 7 is used to indicate students who are fully English proficient and who have never been an EL student. An EL student should never have an ELP code of 7 - Never EL. More information on ELP scores can be found on the English Language Proficiency (ELP) Code data element page.
Data Needs to be Pushed and Synced In Order to View
When a new English learner (EL) student transfers into your school, you will need to review their prior year ACCESS score data.
In order to view a student’s ACCESS score information, you must first perform the following:
- Pushed the student’s enrollment record to WISEdata and
- Allowed for a nightly sync with the WISEdash system.
Once the student’s records are synced, there are two places you can find prior year ACCESS scores.
- The WISEdata Portal student demographic record
- WISEdash for Districts
This tutorial will show you how to find the scores in each location.
Where to Find the ACCESS Scores and ELP Codes in WISEdata Portal
Finding the ACCESS score for a Specific Student in WISEdata Portal
ACCESS scores are associated with a specific student, so you’ll need to know the student whose ACCESS score you want in order to locate it.
To find an ACCESS score for a specific student, follow the steps below:
- Log into WISEdata Portal.
- Click Student Search from the Agency menu.
- Enter information into the fields that will display the student you are seeking (e.g., WISEid, first and last name, etc.).
- Click Search to get results in the table below the free text fields.
- Click the hyperlinked word “Details” from the Action column (far right column).
- This will open a new tab in your browser with a Student Detail screen for the student you selected.
- The Student Detail screen displays a number of gray and teal colored expandable section headers. Expand the Demographics section. The top portion of the Demographics section displays 'Student Level' data: WISEid, first and last name, etc.
- The bottom right section is where ACCESS for ELLs® and Last ELP values are displayed.
In the screenshot, you can see an ACCESS score of 4.5 circled in green below. This is the student’s last year's ACCESS score. Last year's ACCESS score is used to determine this year's English language services (LIEP) and reported ELP code.

Notice that these values are in blue text, indicating that they are hyperlinked. Click either of these to view the Overall Composite Proficiency Score data element page, which provides you with more information about how the ACCESS for ELLs® test score determines the student’s ELP score.
Finding the ELP Codes for All Students in WISEdata Portal
You can locate the ACCESS score for all of the students in your LEA by downloading a WISEdata Export.
- Log into WISEdata Portal
- Click Exports from the Agency menu.
- Scroll until you locate the Programs: Student Language Instruction Program Associations export.
- Student Language Instruction Program Associations is sent for students with an ELP code. Information includes the ELP code based on the prior year ELP assessment or current year screener and Language Instruction Education Program (LIEP) services.
- Click the blue ‘Download’ button.
- On the downloaded .csv file, look for Column L, ‘Proficiency Level’. This is the ELP Code, as determined from the ACCESS for ELLs® test. It will be a number code, one (1) to seven (7).
Choice Schools and EL Data
ELL Status*EL data must be reported by Choice schools receiving Title III funding.
This ensures compliance with federal guidelines and supports English learners effectively.
Conversely, for Choice Schools not receiving Title III funding, ELL data remains optional.
Visit the WISEdash Extracts for Choice Schools webpage for more information.
Where to Find ACCESS Scores and ELP Codes in WISEdash for Districts
NOTE: WISEdash content is not available to Choice schools. Visit the WISEdash Exports for Choice Schools webpage for details.
Finding the ACCESS Score for a Specific Student in WISEdash for Districts
All prior year ACCESS scores can also be located in WISEdash for Districts.
To find this, follow the steps below:
- Log in to WISEdash for Districts.
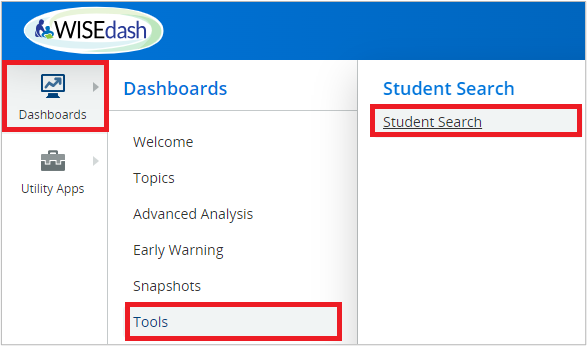
- Click the Dashboards icon.
- Click Tools.
- Click Student Search.
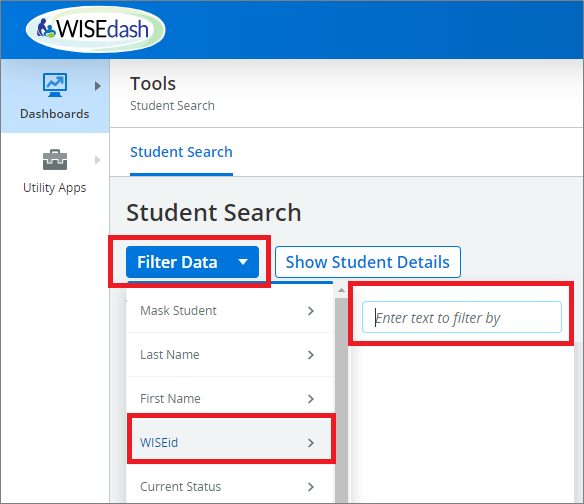
- From the Student Search screen in WISEdash for Districts, click Filter Data.
- Filter by: WISEid.
- NOTE: It is highly recommended to use the student's WISEid when doing a student search to minimize the potential options shown in the search results.
- Type in the student’s WISEid.
- Click the Enter button and/or click off of the filter area to complete the search.
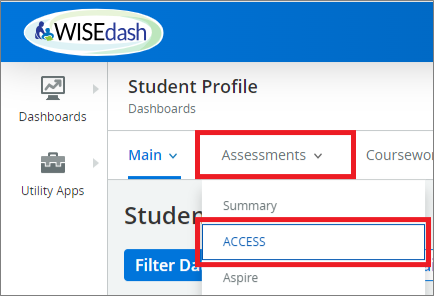
- Once you have found the correct student, click on them to bring up the Student Profile.
- Once the Student Profile has loaded, click Assessments and select ACCESS from the dropdown menu.
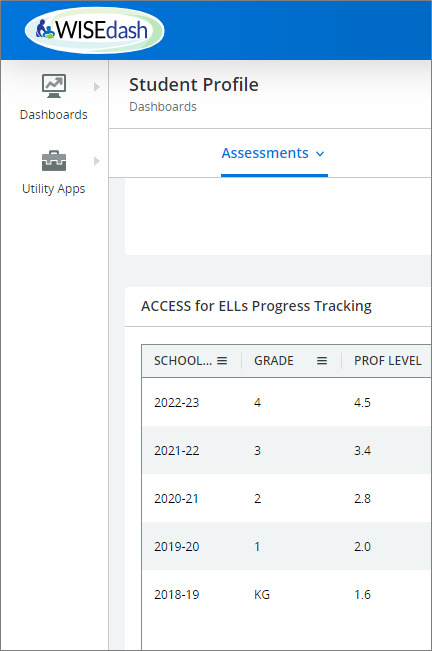
This will bring up a lot of good information on the student’s past ACCESS scores, including trending graphs from prior years.
Scrolling down to the bottom of the page, you can also view the prior year ACCESS scores, grade level, school year, and submitting school and district.
It is very important that the ELP code be set correctly by using the provided ACCESS score. Visit the Overall Composite Proficiency Level Score data element page to help you figure out what the ELP code should be based on the student’s ACCESS score.
Finding the ELP Codes for All Students in WISEdash for Districts
All prior year ELP codes can also be located in WISEdash for Districts.
To find this, follow the steps below:
- Log in to WISEdash for Districts.
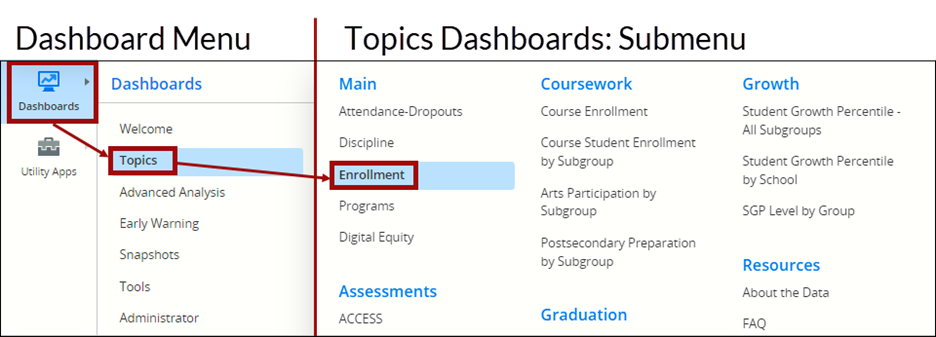
- Click the Dashboards icon.
- Click Topics.
- Click Enrollment. This will display all of the students in your LEA..
From the Enrollment by Subgroup dashboard, click the blue, ‘Filter Data’ button. You have multiple ways to find ELP codes:
Method 1 to Locate All ELP Codes on WISEdash:
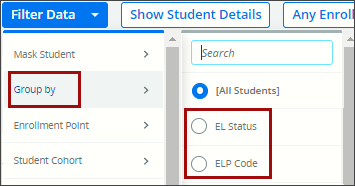
- Click the ‘Filter Data’ button.
- Click 'Group by' for either, EL Status or ELP Code.
- Click anywhere on the dashboard screen to apply the filter.
- EL Status will display current enrollment in two groups: EL and English Proficient (EngProf).
- ELP Code will display current enrollment in eight (8) groups: 1-Entering, 2-Beginning, 3-Developing, 4-Expanding, 5-Bridging, 6-Formerly EL, 7-Never EL, and Unknown.
- Hovering your cursor over the EL bar will display the number of students in that group and what percentage it constitutes.
- Clicking on the EL bar will bring up a Detail table of those students' data.
- If you filtered by EL Status, you can scroll through the table to look for the column header “ELP Code” along with any of the other demographic headers you may want to use for disaggregating this data.
Method 2 to Locate All ELP Codes on WISEdash:
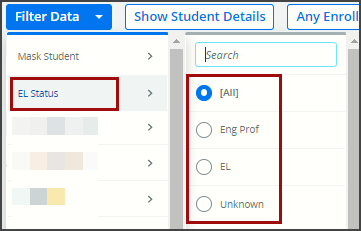
- Click the ‘Filter Data’ button.
- Click 'EL Status'.
- Clicking All will display all students associated with an EL status.
- Clicking Eng Prof will display students with an ELP code of either 6 or 7.
- Clicking EL will display all students with an ELP code of 1-5.
- Clicking Unknown will display all students with an unknown ELP code designation.
- Click anywhere on the dashboard screen to apply the filter.
- This will now display current enrollment of the subgroup you selected as a single bar graph.
- Hovering your cursor over the bar will display the number of students in that group and what percentage it constitutes.
- Clicking on the bar will bring up a Detail table of those student’s data.
- Scroll through the table to look for the column header, “ELP Code” along with any of the other demographic headers you may want to use for disaggregating this data.
Tips for Adjusting Table Data in WISEdash.
- Click and drag the column header to move it to a new location within the table.
- Click the column header name to sort contents by ascending order (arrow pointing up), descending order (arrow pointing down), or alphabetical order (default/no arrow).
- Click the three lines next to the column header to use the filter function.
Filtering to Create a Group
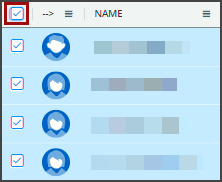
This filtering option is the ONLY method that allows you to “Select All.” You can do this by clicking the empty square in the top, left corner of the table. Students who have been selected appear in blue.
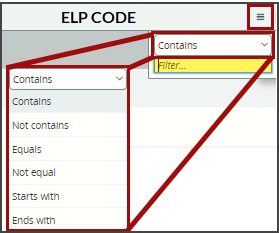
You can filter by a variety of values:
- Contains
- Not Contains
- Equals
- Not Equals
- Starts With
- Ends With
You can also filter by two values, using AND or OR.
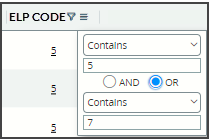
Using “AND”
This can help you display multiple subgroups within the group of students you have for any of the demographic column headers within the table. Select the filter phrase that works best for you. Below that, type in the word or number for which you are filtering (for example, female or a grade level or an ELP code). As you type, those filtered results will appear in the table.
Using “OR”
You can also use the “OR” Feature to obtain two different subgroups. Student results will appear alphabetically by student last name. If you want them to appear in a different order (ascending or descending) by a specific column header, then click the header to show the upwards or downwards pointing arrow.