
Click the links below to navigate to different sections of this page:
What is WISEid?
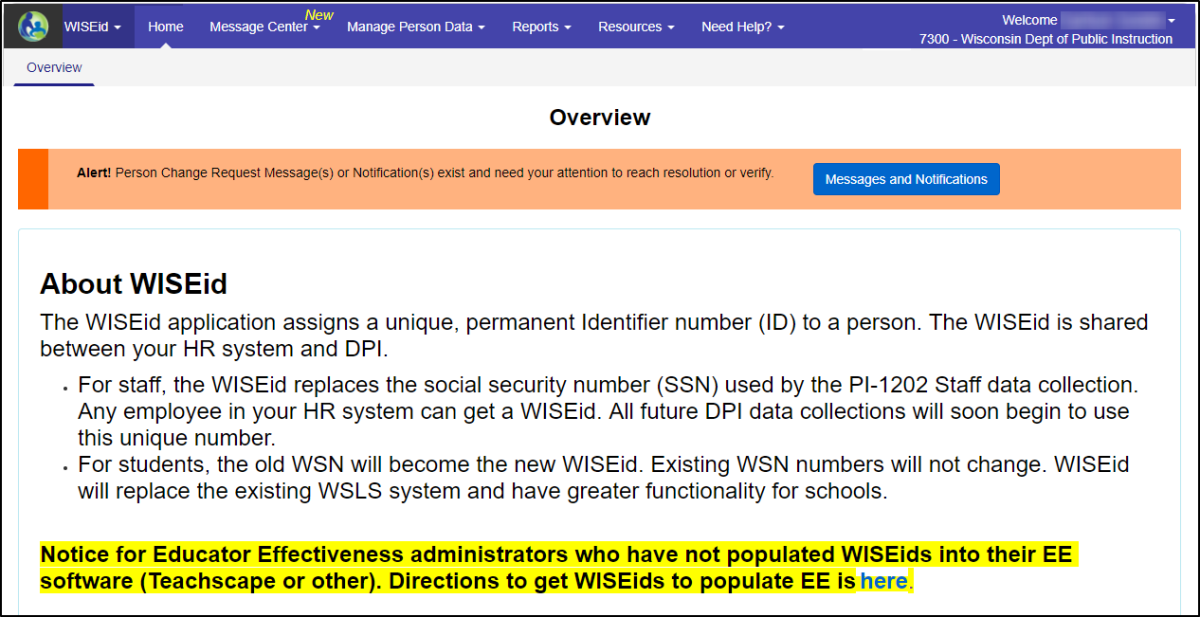
WISEid is a secure web application used to maintain basic demographic information about people in schools. WISEid provides identity management through the assigning of a secure, individual identification number.
Through the use of these unique identification numbers, WISEid aims to prevent some data quality issues, namely duplicate identifiers and mismatched records, in state and federal reports while also enabling detailed data collection/reporting in other WISE applications. In WISEid, you'll work with person records and their ID codes, including Local Person IDs and WISEids.
For more detailed instruction on WISEid, you can take this WISEid eLearning course.
What is a WISEid?
A WISEid is a unique, permanent, and unduplicated person identifier assigned to each person by DPI.
It's important to note that a WISEid is NOT the same as a Local Person ID, nor does it serve the same function. Assigning a Local Person ID to a student or staff allows a district to "claim" or link the district to that person. This is essential because the person's unique WISEid record is shared among any district associated with that staff or student; therefore, in order to send data for a particular person from your district, you need to assign a Local Person ID. If you don't populate the Local Person ID field, those person records are not pulled during a student or staff download file.
A student’s WISEid is considered PII (Personally Identifiable Information). The definition below is directly from the Forum Guide to Privacy:
“FERPA generally prohibits schools from disclosing personally identifiable information (PII) from a student’s education records to a third party without written consent from the parent or eligible student. Each school year, LEAs must notify parents and eligible students of their rights under FERPA. The FERPA definition of PII includes direct student identifiers (e.g., name, student identification number, Social Security number), indirect identifiers (e.g., date of birth, address), and any other information that alone, or in combination with other information, is linked or linkable to a specific individual and would allow a reasonable person in the school community to identify the student (34CFR §99.3). Because this definition includes indirect identifiers and other linked or linkable information about the student, there is no definitive list of data elements considered to be PII under FERPA. Any student information may potentially be PII if it can be used by a reasonable person in the school community to identify the student. Aggregate or tabular data may be considered PII under FERPA if it includes information about individuals or small groups with unique or uncommon characteristics or extreme values.”
Staff members who need to be associated to a section in Roster are also required to have Local Person IDs assigned. Schools must assign staff both a WISEid and Local Person ID to properly pull into WISEdata for Roster.
How Do I Access and Log in to WISEid?

This application is available to school personnel who have had their DSA (District Security Administrator) set them up with WISEid roles using WISEsecure by using their district provided email address or their WAMS account user ID.
To access the WISEid application you must log in to the application via WISEhome.
For more detailed information about the different ways to gain access to applications via WISEhome, please visit the WISEhome and WISEsecure Information page.
WISEid: User Guide

The WISEid portal is very nearly identical to the WISEstaff portal. You should also notice that by clicking on the expander tool (tiny triangle) next to the words WISEstaff in the upper left corner, you can toggle between WISEid and WISEstaff, as some functions in one portal require work to be completed in the other.
Across the top of the WISEid portal screen is a dark colored band with the following menu topics:
Home
Home Overview
Each menu, when clicked, will show a row of tabs below, indicating functions within each menu.This tutorial will walk through each of the menu topics and the functions of their respective tabs.
Home - Menu in WISEid Portal
Home - Overview
If there are important news items or announcements, they will be posted on this main page.
Message Center - Menu in WISEid Portal
Message Center Overview Agency Notifications Change Requests Duplicate Merge Requests Notification Inbox
Message Center Overview
General introductory information is provided here.
Agency Notification
This is the WISEid user "opt in" page where you can choose to receive an email alerting you of new system notifications and the frequency for receiving those emails. Most, if not all, notifications require user attention. Examples include: changes requested to student or staff demographic data requiring your approval, addition of comments from dependent districts or DPI regarding changes requested by your district, or existence of errors in recent person uploads.
Change Requests
Use the links below to navigate to specific sections of the Change Request Menu:
A change request occurs for the purpose of updating previously entered demographic information that now needs to be changed. Every student and staff member is assigned a WISEid when they enter the school system. For this reason, change requests can be found on either WISEid or WISEstaff in the Message Center menu. There are two main types of change requests - to correct a name, or to correct a date of birth.
For students, there is a nightly job that replicates name and birth date changes from the SIS to WISEdata, and then into WISEid for the active school year's most recent, current, and primary enrollment. These replications will generate a Change Request, if warranted.
FILTERS and FUNCTIONS of the Change Request tab in WISEid:
The Change Requests page provides a view and status of changes requested to personal demographic data. Requests made by your district and by other districts who have former students enrolled or staff employed by your district are displayed. If there are change requests that require your approval this will be indicated by a large orange banner spanning the top of the screen. The number of new change requests for your district will appear in a red circle next to the message icon.
Moving across the screen are the following filters and functions:
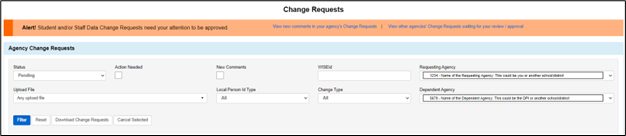
- Status - This filter tells you the status of your change requests. Filter can be set to:
-
All
-
Pending - Waiting for the dependent agency to complete the request work.
-
Approved - Your change request was successfully granted.
-
Denied - There was a problem with your change request. One big reason for denial of a change request is that a required comment was not provided. You can appeal denied change requests. Please read the example on Date of Birth Change requests for details on how to appeal a denied change request.
-
Canceled - This change request no longer needed to be completed.
-
Appeal Pending - You have submitted an appeal to a previously denied request and are now waiting for the dependent agency to complete the request.
-
Appeal Denied - You have submitted an appeal to a previously denied request but the dependent agency denied the appeal. Read the comments section to learn more about why your appeal was denied.
-
-
Action Needed - By clicking this blank box, you can filter to see only change requests that require your attention.
-
New Comments - There is a new comment attached to this change request. New comments should be viewed in the comment section. NOTE: Replying to comments is not the same as appealing a denied request!
-
WISEid - Lets you see change requests that only apply to a specific WISEid.
-
Requesting Agency - The requesting agency is the source of the change request.
-
If you are (i.e., District A) receiving the change request from another district (i.e., District B), District B is the requesting agency and District A is the dependent agency.
-
-
Upload File - Allows you to see change requests that you have created for other districts to review.
-
Local Person ID Type - Lets you see change requests that only apply to a specific Local Person ID.
-
Change Type - Shows a list of all possible change requests:View the examples below for more details on requirements for each type of change request
-
Entity ID (Entity ID data element page)
-
First Name, Last Name, Middle Name, Suffix (Student Name data element page)
-
Dependent Agency - The dependent agency is the agency receiving the change request. Dependent agencies have work to do to complete, and submit or deny change requests.
-
If you are (i.e., District A) sending a change request to another district (i.e., District B), District A is the requesting agency, and District B is the dependent agency.
-
DPI is agency number 7300, listed as - Wisconsin Department of Public Instruction. DPI is always the dependent agency for birth date change requests.
-
-
Filter - This button is blue; once you have selected all of your desired filters, click this button to apply the filters to the results you will see in the table below.
-
Reset - Clears all filters and resets to default settings
-
Download Change Requests - Click this to download a .csv file of all change requests visible in your table
-
Cancel Selected - On the table below, there is a column titled Cancel CR; you may click in the blank boxes to select any change requests in your table. Selected change requests will be indicated with a blue checkmark. Clicking the ‘Cancel Selected’ button will bring up a hovering information window, asking “Are you sure you want to cancel all selected Change Requests?” and you may either select Yes to cancel them, or No to not cancel.
Below the field of filters and functions will be a table. All of the headers in this table are clickable and can sort the information in the entire table in either ascending (indicated with an upward pointing arrow) or descending order (indicated with a downward pointing arrow) for the header that was clicked. Column headers are as follows:
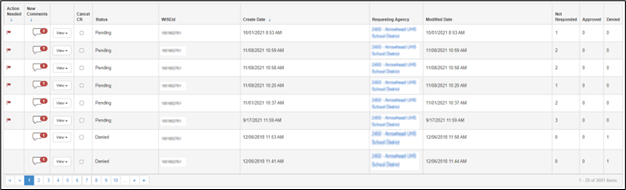
Column headers on the filter results table are as follows:
-
Action Needed: Requests with a red flag mean they are waiting on your district for action. This means you are the dependent agency and someone else is requesting your help.
-
New Comments: The ability to add comments to change requests which can help to clarify the reason for the change. Comments are very helpful for other districts and for DPI when reviewing and determining whether to approve the change. Sometimes comments are required, and if they are not present your change request will be denied.
-
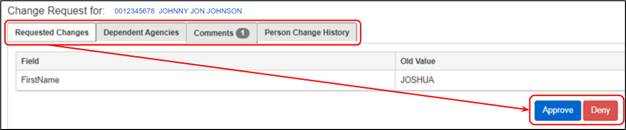
(View): To see more about the request, click View and the request will expand. Here you can see the requested change. If you need to deny a change request, you are required to to enter a comment about why you are denying it. Conversations can happen in the comments sections to determine if the change is correct or not.
-
Cancel CR: See "Cancel Selected" in the filters section above
-
Status: This will have one of the status labels listed, view them above for definitions.
-
WISEid: Shows the WISEid of the person connected to the change request.
-
WISEid and WISEstaff are secure portals, so you are not divulging personally identifiable information (PII) by sharing WISEids on this platform.
-
Use the comment function to communicate using WISEids.
-
DO NOT share WISEids via district or other emails as they are not considered secure and you may be at risk of sharing PII to persons without a need to know.
-
-
Create Date: Change requests are displayed in that order with a date - time stamp.
-
Requesting Agency: Shows the four-digit District Code and the name of the school/district requesting the change request.
-
Modified Date: Displays the date - time stamp when the change request was last modified by either the requesting or dependent agency.
-
Not Responded / Approved / Denied: These columns display the number of requests with this status.
Bundled Change Requests
In an effort to prevent cases where the wrong person has been chosen from being incorrectly updated, last name and suffix (if applicable) are required fields on Change Requests for first name, middle name and/or birth date changes.
As such, there are no more change requests available solely for last name changes. Last name change requests will only occur if they are 'bundled'. Bundled Change Requests include multiple fields being changed at one time (for example - the last name and the first/middle name are being changed at the same time, or the student's last name and birth date are being changed at the same time).
Bundled Change Requests of any name type that also include a birth date change will go to DPI to review. Read the sections below for more details on how to perform Change Requests for first names and how to perform Change Requests for middle names.
Otherwise, bundled Change Requests will go to dependent agencies with Local Person IDs for review.
Date of Birth Change - Change Request
First, verify the student's date of birth. Check it against the information in your SIS. Schools/districts have local control in Wisconsin, so each LEA may create its own list of acceptable documents to serve as evidence for birthdate verifications and changes (meaning, "x" document verified the student's real birthdate, so we need to change the incorrect birthdate we have listed on the school SIS). Common examples include but are not limited to documentation such as a birth certificate, passport, immigration form, legal affidavits, etc. to verify this change of birth date. The document used to verify a student's date of birth does not need to be seen by DPI.
Next, add comments to the WISEid Change request regarding how the birthdate was verified. The agency requesting the change must indicate what document required by the LEA has been viewed by the attending school/district to validate the change. Change requests for date of birth are routed to the DPI. Birth dates are used for match review purposes, so DPI must approve them.
Birth date change requests require comments.
Comments entered on change requests for birth dates must indicate that the district has approved the change request based on district policy for such changes.
District policies determine what document or information is required by a district to prove the birth date and what is required may vary by district. One example is:
-
"The parent brought in a birth certificate, which I viewed, and the birth date on the student record now does not match their birth certificate."
If a birth date change request is submitted without the proper comment, DPI will automatically deny the change request with the following comment:
“Please appeal with how the correct birth date has been verified and what means of identification was used (i.e. birth certificate, I-9, driver's license).”
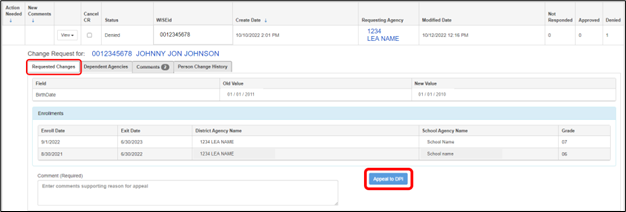
Here is an example of what a denied change request looks like:
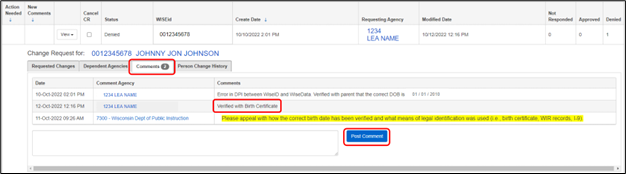
Notice DPI’s denial statement highlighted in yellow. Also notice that the requesting agency responded with a comment, “Verified with Birth Certificate”. Also notice that the comments are not presented in chronological date order, which is why DPI’s comment from 11-Oct-2022 appears below the reply comment to the denial from 12-Oct-2022.
Six Steps to Appeal a Denied Change Request
If your change request is denied, that means DPI has closed the change request in their queue. The next step for the school/district requesting the change is to:
- Login to WISEid, and get to the Change Request tab in the Message Center menu.
-
On the Message Center Change Request screen, find the Change Request you want to check on using the filters (i.e., Status, Denied, or Change Type, Birth date).
-
Click View to see the expanded view, including the Comments. Here you will read DPI’s denial comment. (Example highlighted in yellow in the image above.)
-
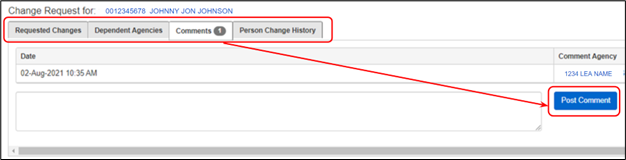
Write your comment in the comment box - indicating that you have viewed legal documentation to support the change request - and click the blue ‘Post Comment’ button. (Example outlined in a red box in the image above.)
-
Provide a comment that states the required documentation was viewed.
-
Name the specific form of legal documentation in the comment.
-
NOTE: Adding a comment and clicking the “Post Comment” button does not change the status of the Change request.
-
-
Click on the Requested Changes tab.
-
 Click the blue button that says, “Appeal to DPI”. If you do not click this button, your change request will not send the appeal to DPI and DPI will not be able to help you with this change request.
-
NOTE: If you do not click the "Appeal" button, your comments will never make it to DPI. When DPI denies a change request, it closes that change request in DPI’s queue. Clicking the "Appeal" button is the only way to re-open the item and return it to the queue.
-
Student First Name Change - Change Request
Change requests for student first names do not come to DPI initially. Rather, change requests for first names will go to all districts besides the requesting agency who have a Local Person ID, regardless of year of enrollment, attached to this student in WISEid. Some common reasons for a ‘first name’ type change request is to correct the spelling of a first name, or if a student's first name changes. In an effort to prevent cases where the wrong person has been chosen from being incorrectly updated, last name and suffix (if applicable) are required fields on Change Requests for first name, middle name and/or birth date changes. Comments are not required for name type change requests, but are very helpful to the dependent agency and DPI. If the dependent agency denies a change request for a first name, that appeal will come to the DPI. Please refer to the Bundled Change Requests section for information on change requests for last names.
Change requests will be sent by the current attending school, who is the requesting agency. The change request will be received by the previous attending school, who is the dependent agency. The job of the previous attending school / dependent agency is to:
-
Verify that the student on the change request previously attended that school/district - AND -
-
Agree that the student on the change request is the correct student. Do this by checking multiple points of verification - especially by checking that the WISEid for the student matches, and that you can confirm the transfer with a request form.
When the prior attending school can successfully achieve the two steps above, it is their job to Approve the change request. Prior schools do not need to update the student's name, nor should they.
Name change requests - for first name and middle names - that are not responded to by the prior attending school within seven (7) days will be automatically approved by the WISEid system, thereby allowing the new school/district to adjust the WISEid record.
Suffix change requests - do not process for additional approval. They can get changed automatically within an agency’s student information system (SIS).
Student Middle Name Change - Change Request
Change requests for student middle names do not come to DPI initially (but, like first name change requests, if the dependent agency denies the request the requesting agency can appeal that denial - that appeal comes to DPI). Rather, change requests for middle names will go to all districts besides the requesting agency who have a Local Person ID, regardless of year of enrollment, attached to this student in WISEid. In an effort to prevent cases where the wrong person has been chosen from being incorrectly updated, last name and suffix (if applicable) are required fields on Change Requests for first name, middle name and/or birth date changes. Comments are not required for name type change requests, but are very helpful to the dependent agency and DPI, especially if the middle name is changing to an entirely new/different middle name. Change requests that are expansions of current middle names, such as from middle initial 'M' to middle name 'Michael', do not generate a Change Request. This change can be made by the school/district directly in their SIS.
When Should You Deny a Change Request?
Denying a change request should only occur when the prior attending school is absolutely certain that the student being referenced in the change request is not attending the new school (i.e. it is likely that the new school has mistakenly chosen the wrong person in the change request). This should be verified by using multiple points of identification for every student that gets a change request, such as matching WISEids, transfer request forms. If legal documentation provided does not support the change, - or - DPI special rules don't apply for overriding the legal name, such as for transgender or similar protected student group rules, the request should also be denied.
Change requests for birth dates will be denied by DPI when there are no comments provided indicating that legal documentation(for example, a Birth Certificate) proving that the request has been viewed .
Race and gender changes are up to parent choice and should not be denied unless you believe that incorrect persons may be linked together. If you believe that two persons are incorrectly linked, please create a Help Desk Ticket. A WISEsupport member will investigate and can help you separate the people.
Duplicate Merge Requests
This is where WISEid Administrators can resolve duplicate WISEid records. Also, agencies can view the status of submitted duplicates.
Notification Inbox
The inbox provides a view of system notifications which alert you to missing, incomplete, or updated WISEid person data. The number of new, unread notifications will appear in a red circle next to the envelope icon in the sub-menu. Within the inbox, click on any notification subject line to navigate to the page where the requested update can be made.
Manage Person Data - Menu in WISEid Portal
Manage Person Data Overview Person Search/Edit Report Duplicates Review Matches Upload Person Data View Upload Results
Manage person Data Overview
General Introductory information is provided here.
Person Search / Edit
This feature allows you to look up person records by entering known information about them and clicking Search. You can search by WISEid or by entering a person’s first and last name.

Person suggestions will show below your search. Green highlighted boxes match your search criteria as entered. You can click the [⏵] to expand more summary details or click the WISEid number to see the full details about the person.
If you search for a WISEid that was deactivated because of merged duplicate WISEids, you will see the results for the active WISEid.
If the person you are searching for doesn't have an existing WISEid you can create a new WISEid for the person. Click the 'Create New Record' button, located at the bottom, below the 'Search Results Returned'.

Helpful Search Tips:
The WISEid search engine is very reliable, but there are times when a search may prove difficult. It is possible that the person for whom you are searching may have incorrect information or information appearing differently than expected. Here are some things to keep in mind as you search:
- Middle Name: This field is not always populated or only contains an initial, which may or may not include a period. If you are having difficulty searching, leaving this field blank may help, or you may try common variations of names (e.g., “Bobbie” instead of “Bobby”).
- Last Name: Hyphenated/multiple last names can sometimes make a search difficult. If you are having trouble searching, entering only one of the last names may help.
- Misspellings: Occasionally names are misspelled. Sometimes searching with common misspellings may help.
Return to Manage Person Data Menu
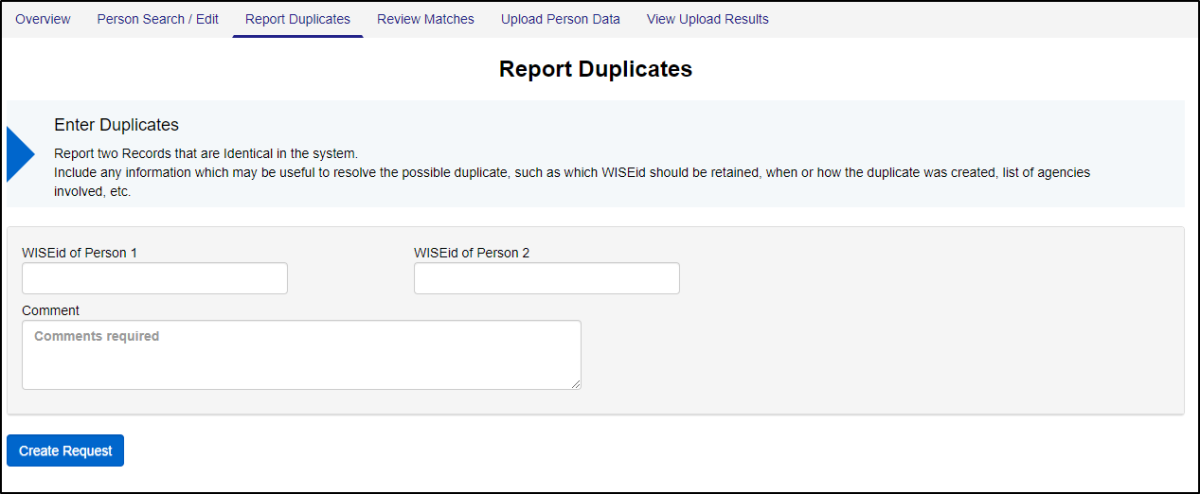
Report Duplicates
If you find that one person has two different WISEids associated, you should report the WISEids as duplicates. Type the two WISEids into the fields provided and explain in the comment section what you think happened, as well as which WISEid should be retained.
Return to Manage Person Data Menu
Review Matches
Once person records have been uploaded, they will go through the match review process. This helps to determine if persons already have a WISEid and should be linked to that WISEid.
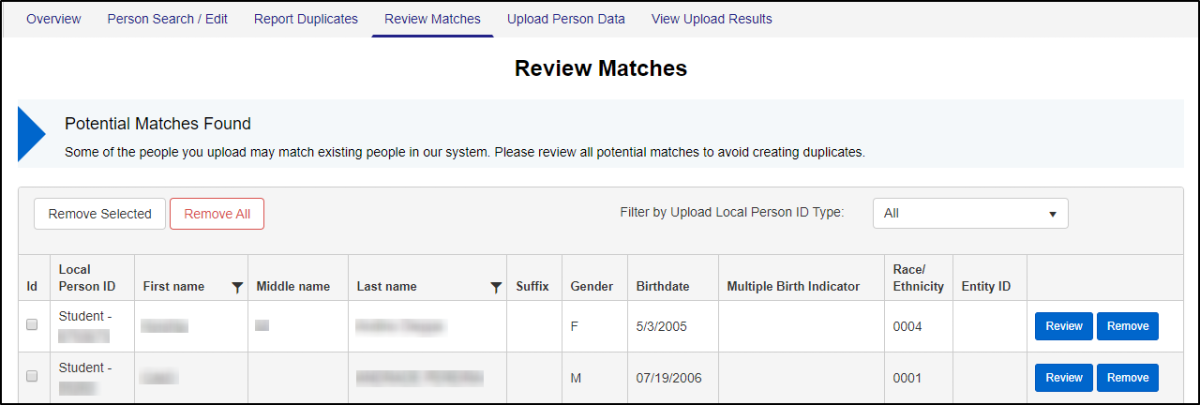
1.) Click Review for the person who has a potential match.
2.) A new screen will appear. The top box shows what you have uploaded.
3.) Below this box will display existing people whose data look similar. In the bottom box (the header reads, "Here are the existing people that look similar:") you will notice green squares. These green squares show you boxes that match what you have uploaded.
Be careful when matching; a name matching doesn’t mean it is the same person. Verify the birth date and gender as well. If you aren’t certain, check other information available to verify the match.
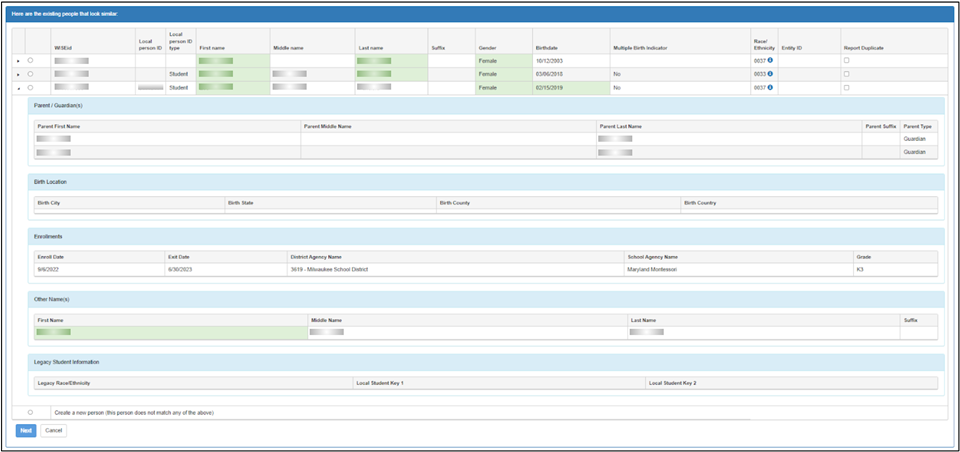
4.) If you believe you have a match, click the radio button next to the existing match and then click Next. This will combine your upload with the existing record.
5.) If the existing records do not match your person, select the Create a new person radio button and then click Next. This will create a new WISEid for your uploaded person.
Return to Manage Person Data Menu
Staff and Student Identity Integration (SII)
Staff and Student Identity Integration allows student information system (SIS)/HR/payroll vendor tools to integrate with the WISEid application, which assigns a unique ID to a person. Vendor tools that implement this integration provide a means for their schools and districts to retrieve and review potential student matches and to create WISEids for students and staff through the vendor tool. The matches displayed on the vendor tool should be examined before creating a new WISEid.
NEW! for the 2024-25 School Year: Staff Identity Integration: Select vendors will support the capacity to create WISEids for staff using the Identity API. Stay tuned to the to the Vendor List located on the Staff and Student Identity Integratiom webpage to find out if your vendor support this new feature!
If your SIS/HR/payroll vendor tool supports the Staff and Student Identity Integration feature, you can perform several WISEid tasks directly in your vendor tool, including reviewing potential student matches and creating WISEids for students. Refer to your vendor's documentation for instructions on using these features in your vendor tool(s).
Schools and districts must continue to upload student records to WISEid through the Upload Person Data tool at least twice per year: once at the beginning of the school year, and once at the end of the school year.
Return to Manage Person Data Menu
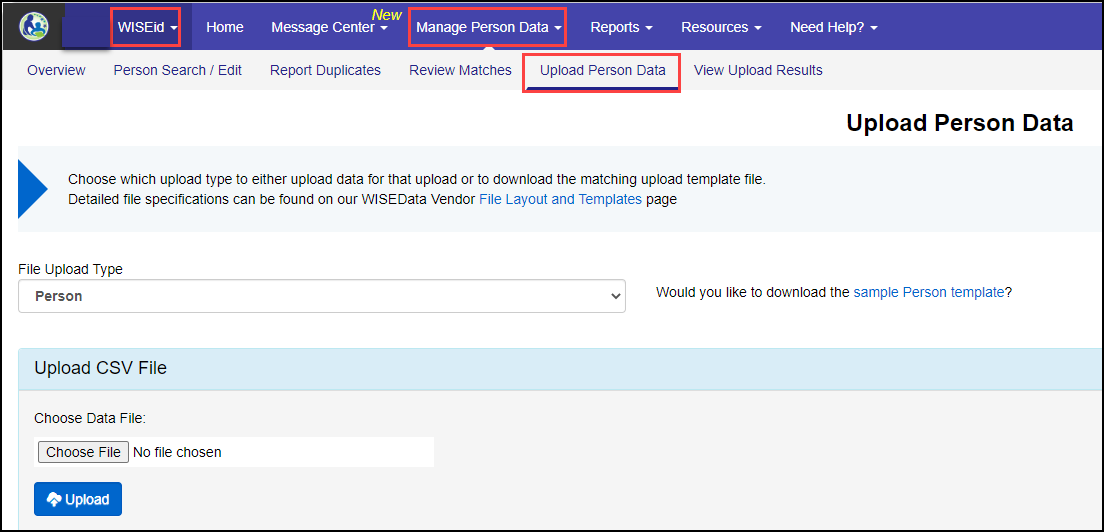
Upload Person Data
The Upload Person Data option under Manage Person Data allows users with access to upload files into WISEid and to work with them once processed. Uploading a Person record will create WISEids and/or update WISEid data during the process.
It is essential that ALL students and staff have WISEids assigned. It is also imperative that ALL students and any staff members associated with Roster coursework have Local Person IDs assigned as well, so their data can be claimed and linked to your district.
The results of a file upload should be examined and corrected as needed. The information below will guide you through this file upload and examination process. DPI suggests running WISEid File uploads once a week to maintain accurate data within WISEid. If your SIS/HR/payroll vendor tool is utilizing SII, these weekly uploads will be accomplished for you through this feature.
NOTE: Even if your vendor tool is utilizing Staff and Student Identity Integration schools and districts must continue to upload student records to WISEid through the Upload Person Data tool at least twice per year: once at the beginning of the school year, and once at the end of the school year. If your vendor tool does not utilize Staff and Student Identity Integration, these manual uploads are suggested for both student and staff throughout the year.
Staff records must continue to be managed through the normal WISEid person upload processes, while Contract and Assignment uploads needed for the WISEstaff collection can be completed through the WISEstaff application.
NOTE: If you do not have access to WISEstaff, you will not be able to upload a Person file with staff names. To obtain access to WISEstaff, please contact your local WISEstaff security administrator.
At the beginning of the school year, you can break this into manageable parts. Suggestions include, but are not limited to:
- New students who would not have a WISEid assigned to them yet because they have not been enrolled in a Wisconsin school
- Students new to your school who already have a WISEid
- Follow the Match Review Section for these students carefully.
- School breakdowns (e.g., Elementary School, Middle School, etc.)
WISEstaff Collection Checklist - Step 1b: Enter and Edit WISEid Person Records for all Staff; Ensure All have a Local Person ID for your Agency
Read the section above for important information about this process. Read the steps below to learn how to conduct an Upload in WISEid. When you are done, you can return to Step 1c of the WISEstaff Staff Collection Checklist.
How to Upload Person Data (File Upload)
There are many ways to accomplish this task as an upload, but the file being uploaded must be in” .csv” format and must contain Local Person IDs to be successful.
An orange error banner will appear if there are problems with your upload. If you plan on entering data through the File Upload process, follow these steps.
Follow the steps below to complete the file upload process:
1.) Download your WISEid file out of your SIS for either your students or your staff members (if you are unsure on how to do this, contact your SIS vendor). This file should be a .CSV file. Save it where you can find it later.
2.) Under Manage Person Data, select Upload Person Data.
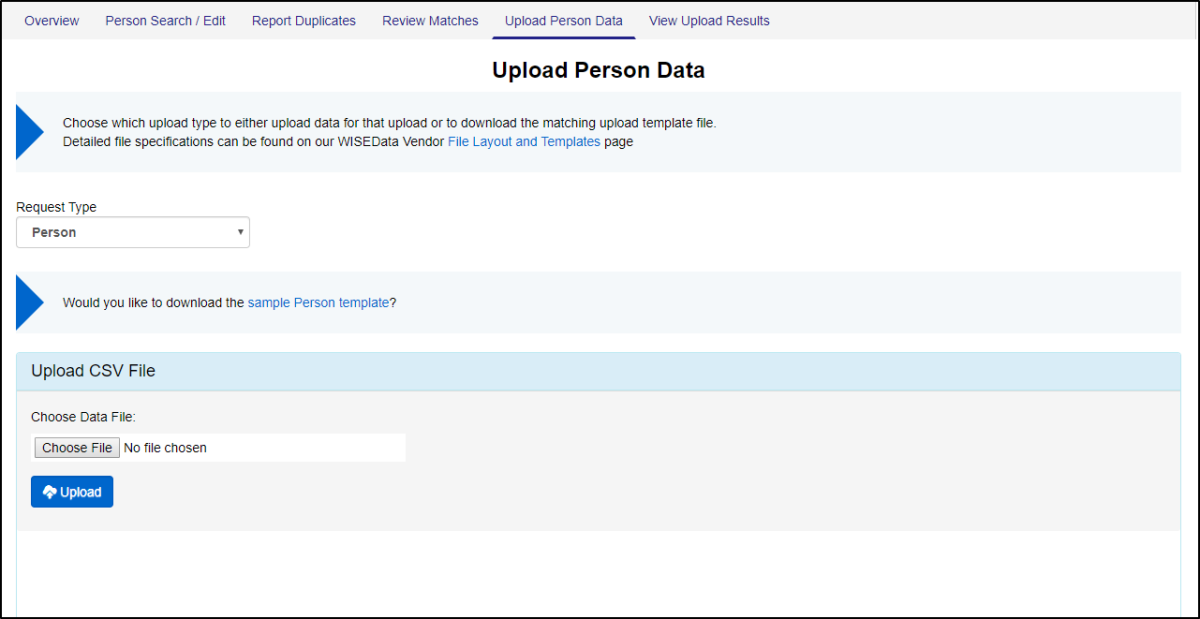
3.) Click Choose File to select your saved .CSV file you downloaded from your SIS.
4.) Click Upload.
You can also enter data manually one person at a time. To do this you must click on the Person Search menu from WISEstaff and use the Person Search/Edit tab.
When your updates are complete, you must return the Staff Collection Checklist by clicking on the WISEid/WISEstaff toggle, selecting the WISEstaff Home menu, then clicking on Staff Collection Checklist. You must manually click in the blank box to obtain the blue check mark to indicate that step 1b is complete. You can then proceed to Step 1c.
Reading Upload Results
Once you have completed your upload, you should check your results to see your data in the View Upload Results tab.
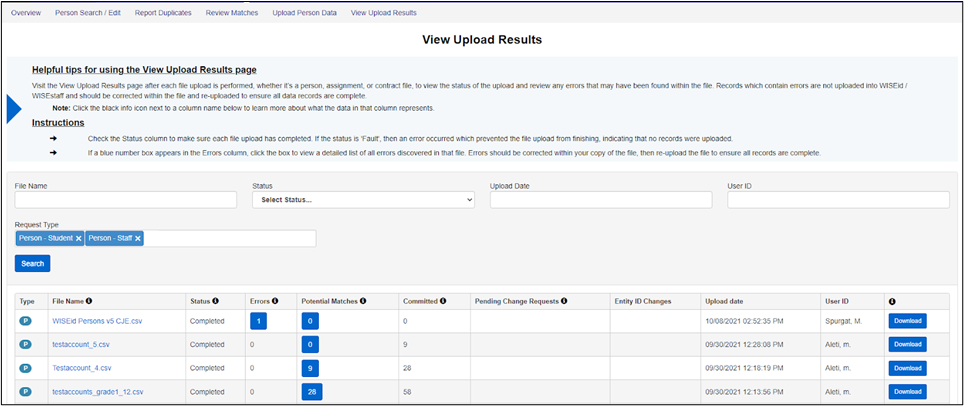
- Type: This can be Person, Contract, or Assignment. Contracts and Assignments can be uploaded through WISEstaff and reviewed through the Results tab.
- NOTE: Choice Schools are not required to submit data to WISEstaff
-
File Name: Clicking this hyperlink will show you the file you have uploaded.
- Status: This shows you the status of your upload. You cannot work with your data until the status is “completed”.
-
Errors: These are issues within the file that you uploaded; you will need to fix these errors in your file and re-upload a new file to correct them.
- Potential Matches: These are possible matches to people whom you have uploaded. The system will check for matching names and birth dates within the WISEid system and then ask you to review to make sure that duplicates are not created.
-
Committed: This is the number of lines from your file upload that were processed and do not need any manual review.
- Changes: This is the number of change requests created from this file upload, for example, a student whose last name has changed. When you upload the student to WISEid with the new last name, the system will create a change request to the student’s associated school districts to approve or deny before the change sticks. This process is in place to ensure person record changes are applied correctly prior to writing them to the database.
-
Upload Date: This identifies when the file was uploaded.
-
User ID: This identifies who uploaded the file.
- Download: This button allows you to download your committed file. If you uploaded a file of students missing WISEids, the Download button will return your file with the WISEid column completed. This file can then be uploaded into your SIS to save the new WISEids to your person records.
Return to Manage Person Data Menu
View Upload Results
Errors
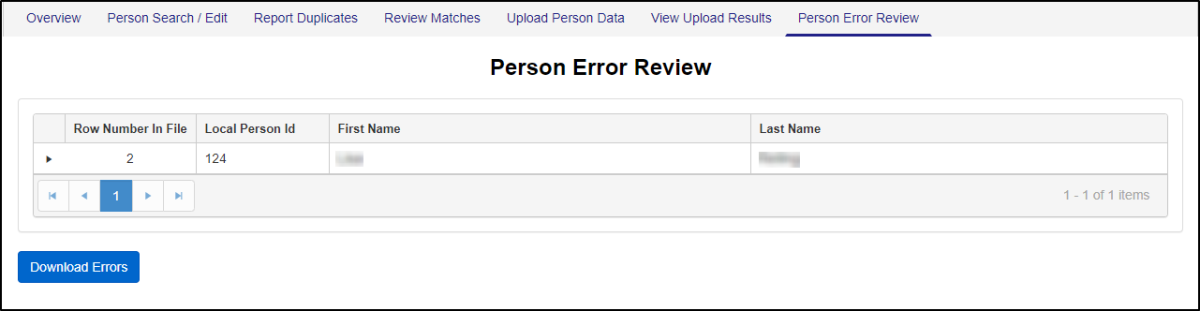
If you have an error, you will see it in the View Upload Results tab (under the Manage Persons Data menu), once you scroll down to see your results. Click on the blue box with a number in it, located in the errors column.

This will bring you to the Person Error Review Screen (shown below). You can see the details of the error by clicking the [⏵] at the far left end of the row. You should make your corrections within your student information system (SIS), download a new file with corrected records in a .CSV file, and re-upload the records to WISEid. Remember to save your upload file on your hard drive for future reference. Corrections must be made in the .CSV file saved to your computer and re-uploaded to WISEid. After the error has been corrected and your upload has finished processing, errors on your new upload should appear as “0”.
Return to Manage Person Data Menu
Reports - Menu in WISEid Portal
Report Overview
General introductory information is provided here.
Download Transaction History
By filling in the dates in the fields provided, you can then click the blue ‘download’ button to obtain a report showing all transaction results history including errors. It will download in a CSV format.
Merge Report
When a date range is entered, this report will show you WISEids that have gone through the report duplicate process.
Staff Download by Local Person ID
Clicking this text will automatically download a .CSV file. Within this file you can see ALL staff who have ever been uploaded by your district. These staff will be sorted by Local Person ID. Any users who also have access to the WISEstaff application can see this same or similar information via available downloads in that applications Reports menu options.
Student Download by Local Person ID
Clicking this text will automatically download a .CSV file. Within this file you can see ALL students who have ever been uploaded by your district. These students will be sorted by Local Person ID.
Resources - Menu in WISEid Portal
Depending on their role, some users may also have access to the Resources menu.
Resources Overview
General introductory information is provided here.
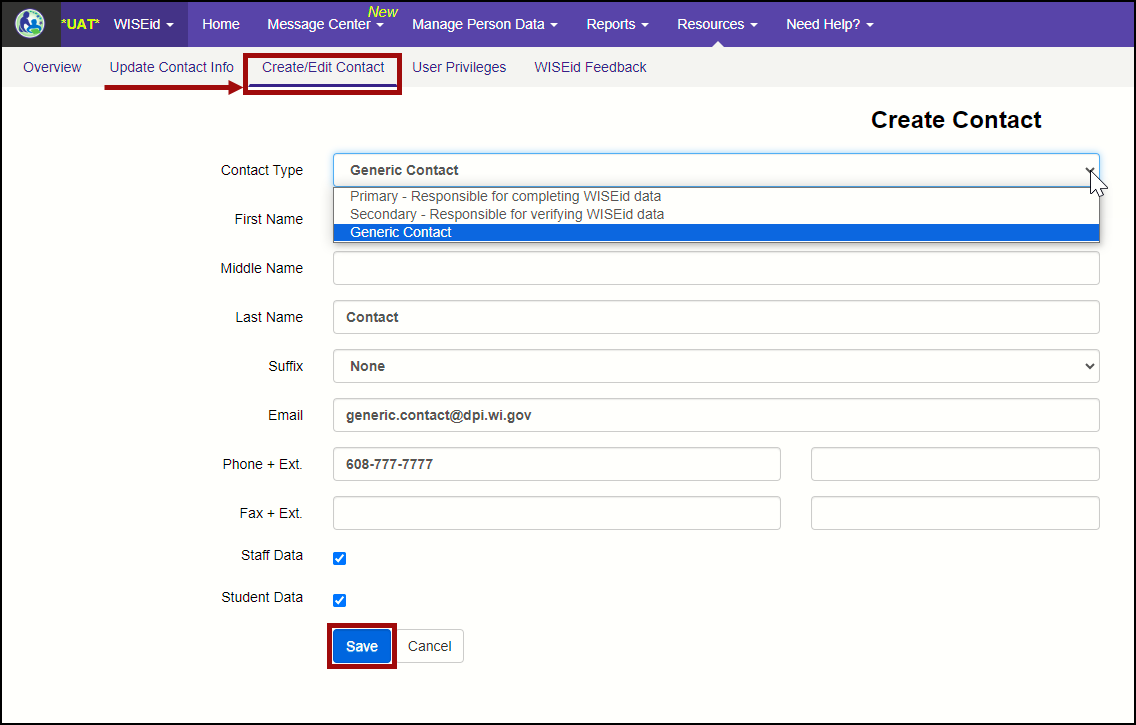
Update Contact Info
WISEid Primary and Secondary contacts need to be updated with each new school year. These updates be accomplished directly in the WISEid application when viewing the Update Contact Info screen under the Resources menu. The 'Update Contact Info' screen has a banner across the top, reminding users to get this done.
The WISEid user roles of Admin or Data Entry are required to make these changes. Persons with the user roles of 'Support' or 'View' cannot make changes to agency contacts for the WISEid application.
Contacts are carried over from year to year, so agencies need to click the "Contacts Verified" button for each new school year when updates to LEA contacts are complete.
Remember to make any updates throughout the school year if/when staff changes occur.

Each LEA needs to have contacts listed here, naming the staff members who are responsible for maintaining the digital health of their agency's WISEid information. Best Practice is to list at least three contacts:
- The Primary Contact is the person within the LEA responsible for completing WISEid data. This is a required contact.
- The Secondary Contact is the person responsible for verifying WISEid data. This is a required contact.
- Generic Contacts support the primary and secondary contact's work.

The Agency Administrator should use the Edit or Delete icons to the right of the email address to make changes or delete a contact.
New staff contacts can be added by clicking the ‘+Add Contact’ button located above the list of contacts. At the far right of each listed staff member is the edit button and the delete button. You will then see the 'Create Contact' screen. Select the type of contact from the dropdown menu. Then, at a minimum, enter the person's: first name, last name, email address and phone number; information entered into other fields is also welcome. Click the checkboxes below to indicate if this contact is responsible for Staff data, Student data or both. Click 'Save' when done.
Once the Agency Administrator confirms the accuracy of the contact information, click the ‘Contact Verified’ box to get a green ‘success’ message.

User Privileges
Displays user information of the person who is logged in, along with their roles and access within WISEid.
WISEid Feedback
Clicking this will open a new tab, outside of the WISEid application, where users can report suggestions or problems about the application to DPI. We read all feedback and use this information in our continuous improvement efforts to make these apps as useful and friendly as possible.
Need Help? - Menu in WISEid Portal
Need Help? Overview
General introductory information is provided here.
Open a Help Ticket
Clicking this opens a new tab in your browser allowing you to submit a Help Ticket to the Customer Service Team. We are happy to help! Please be as specific as you can in your help ticket request, being careful to not reveal personally identifiable information (PII) about students or staff.
Site Map
Displays a site map of all WISEid menus and tabs.
User Guide
Clicking this opens a new tab in your browser linking you to WISEid: Info, Help and FAQs.
Staff and Student Identity Integration (SII)
NEW! for the 2024-25 School Year: Staff Identity Integration: Select vendors will support the capacity to create WISEids for staff using the Identity API. Many of the most popular vendors do utilize this integration feature, which provides a means for their schools and districts to retrieve and review potential student matches and to create WISEids for students through their vendor tool(s).
Visit the Staff and Student Identity Integration web page to learn if your SIS/HR/payroll vendor supports this handy feature.
There is also a section in the Manage Persons Data - Menu in WISEid Portal Tutorial that explains how SII works with the Upload Person Data feature in WISEid Portal.
WISEid Resource Links
- Knowledge Base Article Portal (KBAs)
- Protecting Privacy in WI
- Release Notes for WISEid
- Student Identity Integration
- WISEid Basics, eLearning
- WISEid and WISEstaff Bug & Deficit List (Completed tab, scroll down for current information)
- WISEid Notification System User Guide (doc)
- WISEid Quick Guide for Choice Schools
- WISEid Quick Guide for Public Schools
User Groups
- Visit the WISEdata Calendar of Events for all scheduled, upcoming webinars, and training.
- WISEid/WISEdata User Group Agenda - for Public and Choice Schools (View Only doc)
Google+ Community
WISEid FAQ and Use Cases
Questions About Staff and Students
- Where can I find the WISEid person upload file format? The file format may be located in the following WISEid Person Upload File Format pdf. If needed, a person template is available within the upload function to easily create a file to upload. You can also refer to the section about Person Uploads in the Manage Persons Data section of the WISEid Portal Tutorial above.
- How do I work potential matches? There are two methods to view the same potential match. You may click the number under the Potential Matches column within Results to view the potential match. Or, read the section, Review Matches, above. You can also view this training video for guidance.
- Where is a file that I can upload into my SIS (student information system) or HR (Human Resources) system? From the View Upload Results screen, click Download next to a person transaction. You can then open these files in a spreadsheet program (like Microsoft Excel or Google Sheets), save as a .CSV file to your local PC and review all information, including any changes made with the user interface screens.
-
Can DPI include WISEids in public download files? No. A WISEid is a unique person identifier assigned to both students and staff in Wisconsin by the WISEid application at DPI. This ID is used by LEAs to submit data to the state for required reporting and is used by DPI on the back end to link the data between systems for this reporting.
Because a WISEid is used for both student and staff unique identification, we do not publish WISEids publicly for external general use. DPI also does not provide statewide files with WISEids to a vendor for general public use.
-
Can an LEA ever share WISEids? WISEids, whether belonging to students or staff, should not be shared publicly because they are considered PII. However, there are circumstances where WISEids can and should be shared in a secure manner between a district and a 3rd-party provider. For example, when LEAs send data to the state through the secure WISEdata system, the WISEid is required to be sent for reporting and is usually stored in their SIS. WISEids could also be shared on a local case-by-case basis. For example, an agency can choose to upload their own agency data with WISEids if they have a secure version of software used for business activities like Human Resources, Payroll, and/or Financial/Budget type systems. Local data sharing agreements would be needed in all of these cases.
Didn't Find What You Needed?
The Customer Services Team is here to help!
Please submit a Help Ticket so we may better assist you.
Want help from a live DPI employee about a WISEstaff or WISEid question you have about your agency's staff? Please join us! Every Tuesday at 11am there is a WISEstaff & WISEid User Group. The WISEstaff and WISEid User Group Agenda allows Users like you to add questions to our agenda as a comment, and also provides the link you need to join the Teams Meet.