WISEstaff Home Page
The Home screen provides a dashboard of metrics that gives the hiring agency its staff data at a glance. Users can hover over the bars in the graphs for specific counts in each category. The same menu of available functions as in WISEid resides on the left-hand side of the dashboard. If there are important news items or announcements, they will be posted on this main page in the top Alerts panel.

Home Page Left-hand Menu Sections
-
Use the Person section to search for or edit a person, as well as work with duplicate IDs and communicate with other districts and schools about changes to student and/or staff information.
-
The File Tasks section is for uploading and working with data files.
-
View reports and manage and validate your data in the Reports/Validations section.
-
Depending on their role, some users may also have access to the Admin Menu.
WISEstaff Admin Menu: Update Contact Info
Contact information for staff working on data can be entered in WISEid and/or WISEstaff, depending on whether the contact person will work exclusively with staff data or also with student data in WISEid. The agency administrator updates the WISEstaff system contact information in the WISEstaff tab Update Contact Info section for the person doing the WISEstaff tab-only work. Note that in some districts the same person may be doing both the work for WISEid and WISEstaff. In that case, make sure to enter the contact person on both the WISEid and WISEstaff tabs for Update Contact Info.
Both Primary and Secondary Contact are required for each agency for both WISEid and WISEstaff and must be updated each year. Use the Edit or Delete icons to the right of the email address to make changes or delete a contact.
Make sure to select the “Staff Data” check box for anyone doing staff-related work, and the "Student Data" check box for WISEid work.
WISEstaff Roadmap & Process
To see an overview of the WISEstaff submission process, you can expand the Annual Staff Collection Roadmap section (defaults to collapsed). You can see all the necessary steps, and you can see the progress you make as you complete certain tasks. The system will automatically display a green checkmark beside completed tasks or a red No symbol beside tasks still needing work. Some tasks will present a box that you can check yourself when you complete the item.
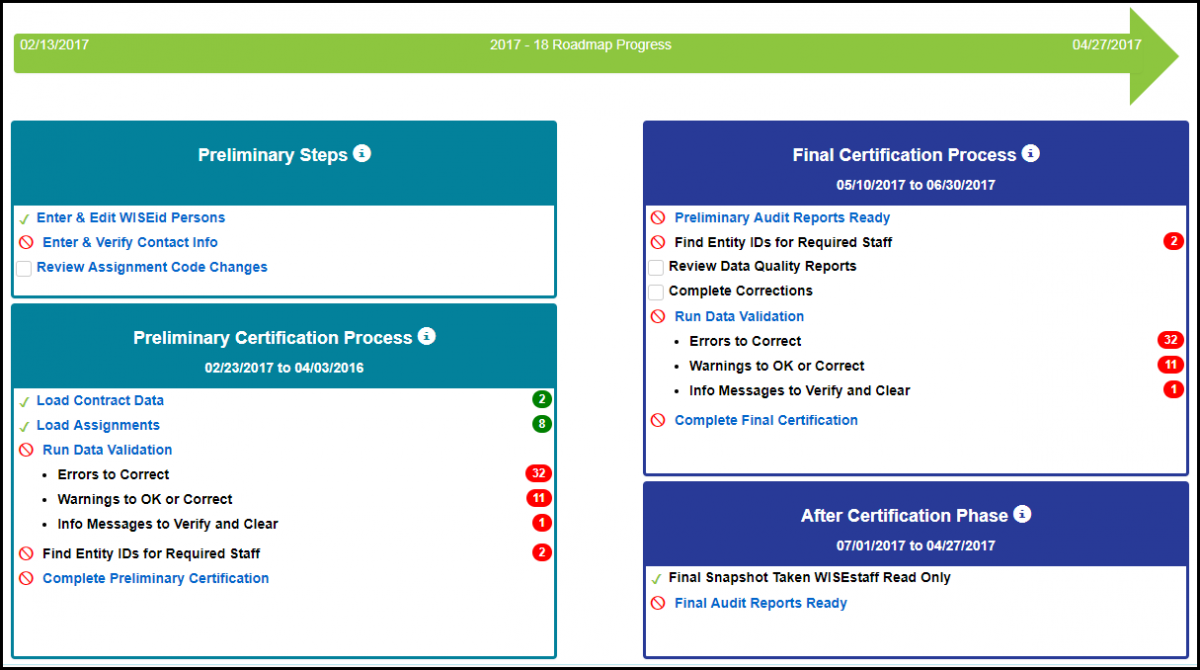
Roadmap: Summary of WISEstaff Submission Process
- Obtain a WAMS account with access to WISEid. For additional information, see the WISE Application Security Basics Mini Tutorial. For information on user roles, see the WISE Application User Roles Mini Tutorial.
- Update and verify your staff data collection contact info. This is important, so DPI knows the correct point people to contact for your LEA. See the Update Contact Info section of this tutorial for more information.
- Enter and edit WISEids. Generate WISEids for all new staff. Upload Local Person IDs (district staff ID that is NOT SSN) for your staff.
- If you plan on entering data manually through the application User Interface one person at a time, see the WISEid/WISEstaff Overview & Person Menu Mini Tutorial.
- If you plan on entering data through the File Upload process, see the File Tasks Mini Tutorial.
- Review Assignment Code Changes.
- Export WISEids for all your staff from the WISEid system for import into your district information systems. Either by
- Person List by Local Person ID
- Download Transaction History processing
- See the Downloads knowledge base article for more on downloading information from WISEid/WISEstaff.
- Upload Contract and Assignment data.
- If you are copying last year’s Contracts and Assignments forward inside the WISEid system, complete the steps in the Copy Forward Files Mini Tutorial.
- To upload the Contracts and Assignments file, see the File Tasks Mini Tutorial.
- Run validation and then complete any necessary correction of staff data issues.
- Find Entity IDs for required licensed staff and enter them into WISEstaff files.
- Complete Preliminary Certification for ELO License Status reporting review.
- Once the audit reports are returned to agencies, review the data quality reports and complete any required follow-up work, such as obtaining new Entity IDs and resolving errors.
- Correct errors and run validations until issues are resolved.
- Lastly, sign off on the data for final certification before the data snapshot is taken.