
Purpose of Cohorts
Cohorts within WISEdash for Districts is a tool that allows users to create student groups. Cohorting within WISEdash for Districts is basically the same thing as group management. In fact, you may even see the term 'group management' appear in your SIS, on maintenance screens, or other documentation. If, or when, you do see the term 'group management', you can safely substitute that term with the word 'cohorting' to obtain the same results.
Cohorts are an excellent tool for data inquiry. Cohorts inside WISEdash for Districts lets you create groups of students or schools to follow longitudinally, to gather trends, and to analyze data over time. Early in the school year, a whole classroom cohort could be established to monitor its members’ progress. During year-end data investigations, a cohort could be created to provide evidence for instructional or school improvements. Cohorts can either have students as members or schools as members (groups of schools).
Different types of Cohorts can be built in different ways.
- DPI creates Public Dynamic Cohorts that appear under the blue ‘Filter Data’ button on all dashboards. These cohorts are called ‘dynamic’ because they are maintained centrally by DPI through a data query based around the criteria for that cohort. That means these cohorts are “refreshed” every night, and the set of students are completely updated upon the changing of the “Current Year” or “Prior Year” in July of each new school year. So, no intervention is required by the LEA. More details will be provided later in this User Guide, but the main DPI Dynamic Cohorts are: CTE students (Concentrators, Graduates, Participants), Immigrant students, Mobile Students, and Parent in Military Students.
- WISEdash users can manually create cohorts. Accomplish this through a student search or by selecting students from the detail list (a.k.a. “drill-and-click”).
Public cohorts can be accessed and used by any WISEdash for Districts user.
Private cohorts are created by individuals and can only be used by those individuals unless they are shared
NOTE: Your WISEsecure Role always applies while viewing a cohort. If your security role disallows access to sensitive student information, you will not see sensitive data, even if the cohort is public.
Data Disclaimer
Groups may identify students by their membership in groups or contain protected information regarding students.
Group data should be handled as sensitive student data.
The data in this secure application, dashboard, or report are not redacted and may contain confidential aggregated or record-level student or staff data.
As a WI Department of Public Instruction user, you are obligated under state and federal law, as well as local and/or agency-specific policies or regulations, to respect and safeguard the privacy of students and staff and the confidentiality of the data you view.
Data should only be used for a legitimate purpose. Do not share with persons unauthorized to view the data. For more information on data privacy, please visit the DPI Student Data Privacy webpage.
Terminology
The following icons are used throughout WISEdash for Districts:
| ICON | DESCRIPTION |
|---|---|
| Dashboards Menu (upper left screen). Dashboard menu items appear on the left. Each Dashboard menu item has a corresponding sub-menu that appears on the right. Sub-menus are dynamic, changing with the selected dashboard. | |
| Utility Apps (upper left screen, below dashboards icon) | |
| Dashboard Tools (mid-right screen in darker gray area) |
The following terms are used frequently with cohorts:
- Cohort Group ("Group'): This term is used when referring to the creation of a cohort group.
- Cohort Filter ("Cohort"): This term is used when referring to the cohort filter.
- Student Cohort: A cohort group that applies a predefined list of students to your dashboard results. Any other available dashboard filters can also be applied.
- School Cohort: School cohorts are similar to using the School Types filter, displaying data across all elementary schools, high schools, etc., in a cohort group.
Cohort Types
Public Dynamic Cohorts
These instructions show you how to locate and use DPI-created Public Dynamic Cohorts: CTE students (Concentrators, Graduates, Participants), Immigrant students, Mobile Students, and Parent in Military Students.
- Public Dynamic Cohorts: How-To
-
- Log in to WISEdash for Districts via WISEhome.
- Click the dashboards icon to view dashboards.
- Select a dashboard from which you’d like to use the Public Dynamic Cohort.
- For example, to select Enrollment by Subgroup:
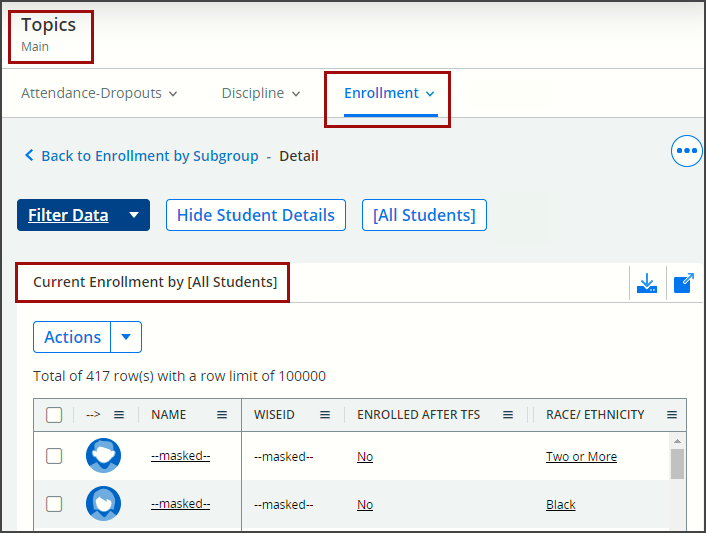
- Click “Topics” from the Dashboards Menu items.
- Select the Enrollments under the Main category.
- Select 'Enrollment by Subgroup.'
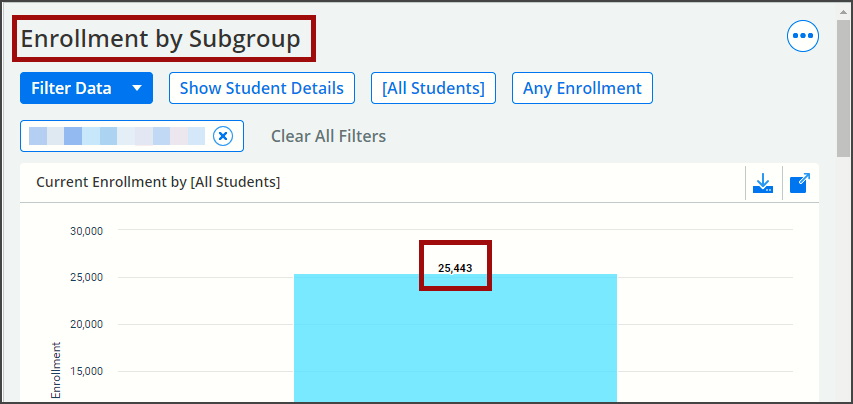
- For example, to select Enrollment by Subgroup:
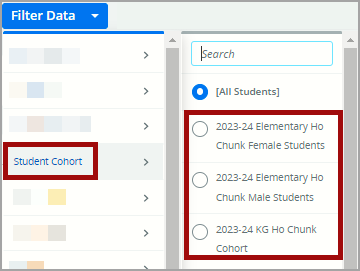
- Click the blue ‘Filter Data’ button.
- Click Student Cohort.
- Then select the radio button for the Dynamic Cohort you want applied to the dashboard. NOTE: If selecting a “Prior Year” cohort, the data displayed represents students within the current school year who matched this cohort criteria in the previous school year.
- Only one can be selected at a time:
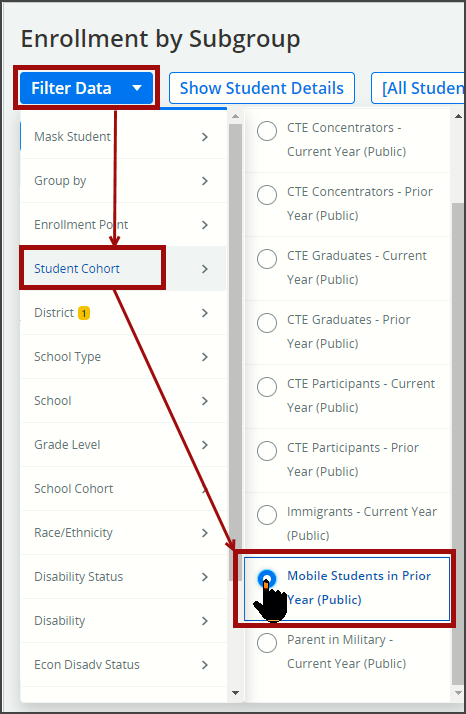
- CTE Concentrators – Current Year (Public)
- CTE Concentrators – Prior Year (Public)
- CTE Graduates – Current Year (Public)
- CTE Graduates – Prior Year (Public)
- CTE Participants – Current Year (Public)
- CTE Participants – Prior Year (Public)
- Immigrants – Current Year (Public)
- Mobile Students in Prior Year (Public)
- Parent in Military – Current Year (Public)
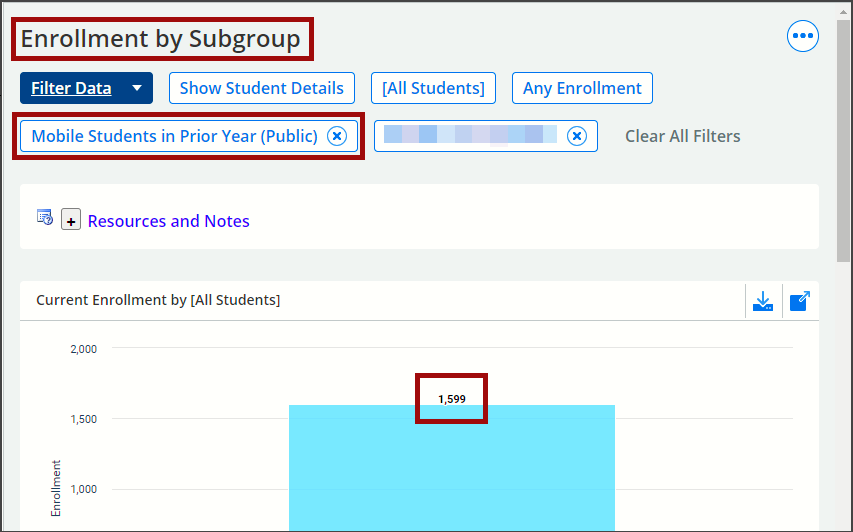
- Click anywhere on the dashboard, or tap Enter on your keyboard, to apply the filter. The bar graph may not appear different, but the number on the top of the bar graph will change to show only the number of students within this Dynamic Cohort. (In these screenshot examples, the number changes from 25,443 All Enrollment to 1,599 in the cohort).
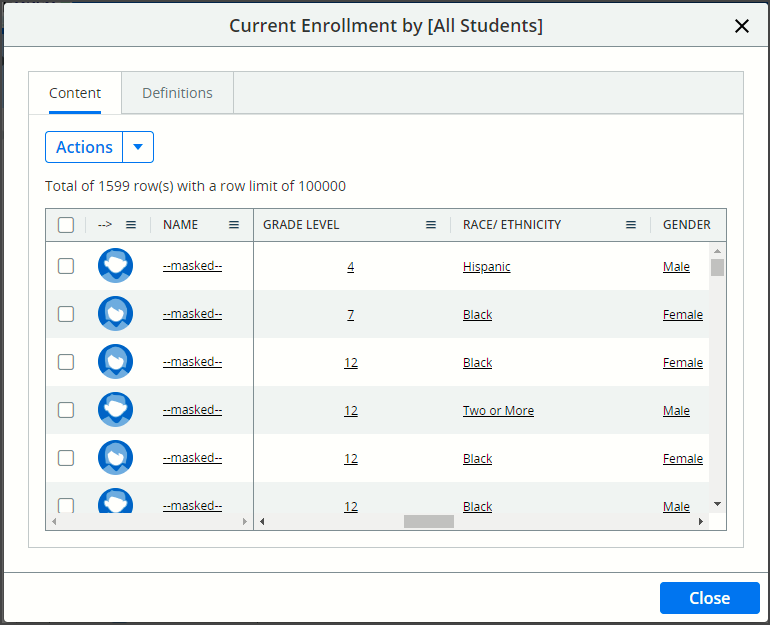
- Click the bar graph to display student-specific data in a table. Table data will appear in a new browser tab.
For details on how to adjust Table View data in WISEdash, please visit the “Tips for Table Data in WISEdash” section of this User Guide.
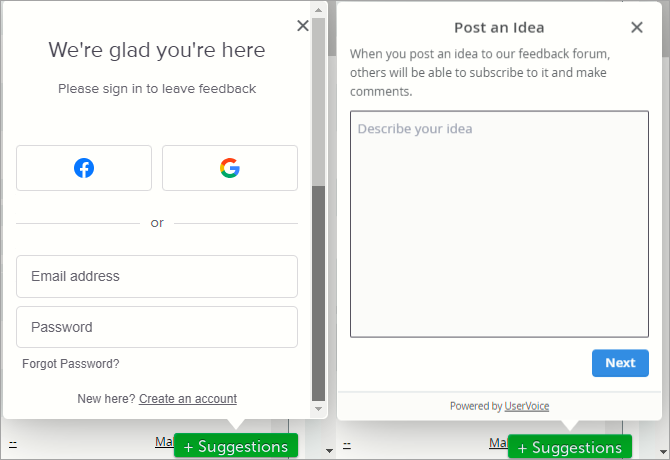
If you’d like to provide feedback to DPI about creating more/other Public Dynamic Cohorts, please feel free to use the “+Suggestions” button within WISEdash. It hovers over any dashboard screen in the lower-right corner. Follow the prompts to log in to your Google Enterprise account; then type in the free text field to give us your ideas.
Manual Cohorts
These instructions show you different ways to manually create Cohort Groups in WISEdash for Districts. Manual Cohort Groups do not automatically add new students as the Public Dynamic Groups do. Manual Cohort Groups will require manual maintenance to add or remove students using the Actions, Manage Groups feature. Please visit the How-To: Cohorts for Tribal Affiliation for a specific example or follow the steps below whenever you need to update the cohort.
Cohort groups can be applied to any dashboard - even snapshot dashboards!
Cohort groups can also be modified at any time during the school year, so if you needed to add a student to a cohort group mid-year, you could do that.
Each step will go into more detail below, including screenshots to assist with your navigation.
The following methods for creating Manual Cohorts assume that:
- You are logged in to WISEdash for Districts and are aware of your WISEsecure Role and the viewing access associated with that Role,
- You are viewing your WISEdash data as a Students Details table.
To view WISEdash data as a Student Details Table you can either, click on any bar graph ("Drill and Click"), or use the Student Search Tool
- "Drill and Click"
-
- Click the Dashboards button.
- Select a dashboard that best applies to the data you want in your Cohort Group.
- Click on the bar graph, and the Student Details screen will open as another tab in your browser.
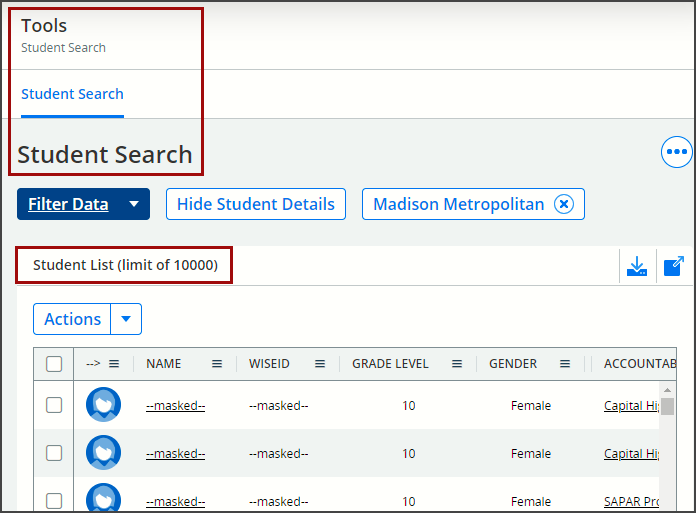
- Student Search Tool
-
- Click Dashboards, Tools, Student Search.
- NOTE: The Student Search screen only displays table data, not bar graphs.
- Set filters as preferred to populate a table of student data.
- Click Dashboards, Tools, Student Search.
Methods for Selecting Students from Tables
There are a number of ways to select students from tables in WISEdash.
NOTE:
- Students who have been selected appear in blue.
- A group must contain at least ONE student.
-
OPTION 1: FILTER Column Headers: Allows for “Select All”
-
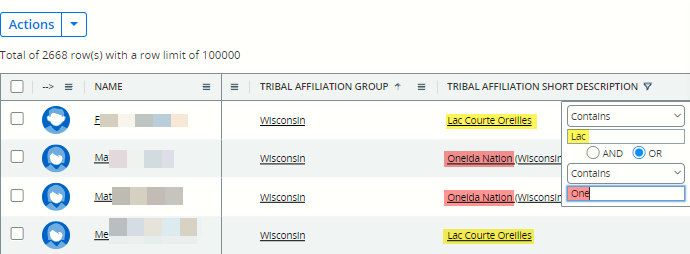
Click the three lines in the column header “Tribal Affiliation Short Description.” This will create a small pop-up window. The drop-down feature in the top cell allows you to select from Contains, Not Contains Equals, Not Equal, Starts with, and Ends with. Select the phrase that works best for you.
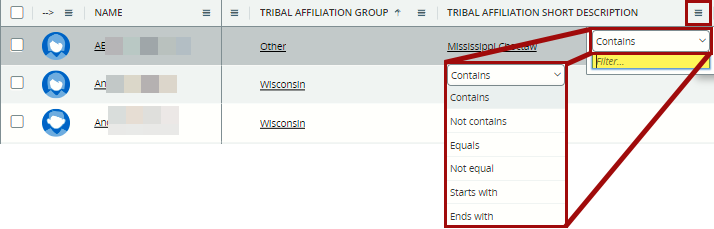
Then in the bottom cell (containing the word ‘filter’) type in the name of a specific tribe (e.g., Red Cliff, or Ho Chunk). As you type, those filtered results will appear in the table.

You can also use the “OR” Feature to obtain two Tribal Affiliation Short Descriptions. Student results will appear alphabetically by student last name. If you want them to appear in alphabetical order by Short Description, then click the header to show the upwards arrow.
This filtering option is the ONLY method that allows you to “Select All.” You can do this by clicking the empty square in the top, left corner of the table. Students that have been selected appear in blue.

The example screenshots above show using the filter feature on the Tribal Affiliation Short Description header. However you can also use this filter on the Tribal Affiliation Group header. Using the filter with the “OR” feature, typing in Wisconsin and Other should bring up every single student in your districts with a tribal affiliation association.
This all-inclusive Tribal Affiliation Cohort group can be applied to any dashboard, and can be filtered using the standard dashboard blue filter button options. This is the best way to view students with a Tribal Affiliation who also identify as “Two or More” races.
-
OPTION 2: SORT Column Header (Arrows): Does NOT Allow “Select All”
-
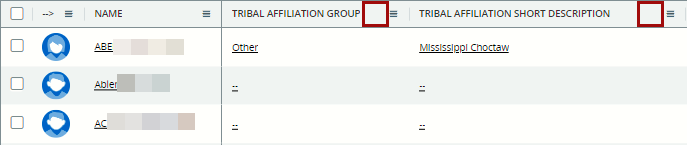
Click on the column headers allows you to sort column contents by ascending, descending, or alphabetical (default) order. When you click column headers, look for a very small arrow.
- If there is no arrow, the column is displaying alphabetically organized information.
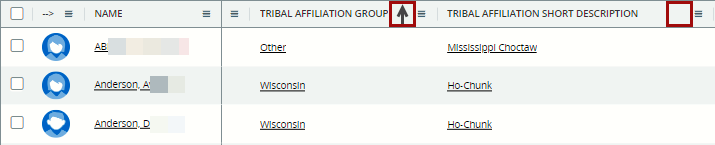
- If there is an upwards pointing arrow, all students with data in that column get moved to the top of the table.
- If there is a downwards pointing arrow, all students with data in that column get moved to the bottom of the table.
Press and hold the “shift” key on your keyboard to sort multiple columns. For example,
- The default sort has all students by alpha order.
- Then I click the Tribal Affiliation Group header to sort by Group, alphabetically by group and student name. Notice the upward pointing arrow by Tribal Affiliation Group to annotate that students are now being alphabetized within each Tribal Affiliation Group, and the Tribal Affiliation Groups are also appearing in alphabetical order.
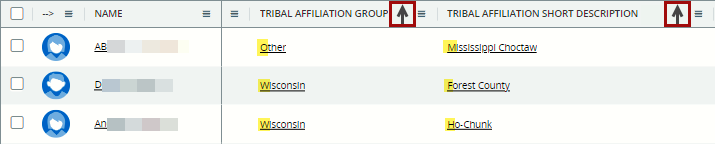
- Finally, I press and hold the shift key, and then click the Tribal Affiliation Short Description header to also alphabetically sort by Short Description and student name. Notice how both Tribal Affiliation columns have upward pointing arrows. This means that students are now being alphabetized within each Tribal Affiliation Group, and the Tribal Affiliation Short Descriptions are also appearing in alphabetical order.
There is no Select all for this option. You must click on each individual student if you want them in the Cohort. Students that have been selected appear in blue.
If you need/want to continue filtering for different subgroups of students within your agency’s Tribal Affiliation population (e.g., Tribal Affiliation by grade, by gender, by race, ELP code, etc.), you can also continue to filter the selected list with any of the demographics in the other columns. Remember to press and hold down the shift key for each other demographic you sort for, or it will ‘undo’ the previously sorted columns.
To do this:
- First, click the header on the Tribal Affiliation Group to sort data in alpha, ascending, or descending order.
- Then press and hold the Shift key, and click the header on the Tribal Affiliation Short Description to match the order of Tribal Affiliation Group.
- Finally, you must press and hold the “shift” key on your keyboard; then click the header of the next demographic (e.g., grade).
- This will sort *each Tribal Affiliation Short-Description* by that next column header (e.g., grade).
- Click the far-left box to select each student.
- Table rows will highlight blue to indicate they have been selected.
For example, all students identifying as Wisconsin, Ho-Chunk will be sorted from youngest grade to oldest grade in the table, then students in Lac Courte Oreilles will be sorted from youngest grade to oldest grade in the table, etc. Each sub-filter can provide you with a new dynamic to watch longitudinally, over time.
This option allows you to “layer” data of your cohort students by sub-groups.
-
OPTION 3: Scroll through the List: Does NOT Allow “Select All”
-
Scrolling through the table will allow you to select each student who is listed as having a Tribal Affiliation. This can be very time consuming. There is no Select all for this option. You must click on each individual student if you want them in the Cohort. Students that have been selected appear in blue.
Create Your Cohort Group
Now that you have your students selected, remember:
- Students who have been selected appear in blue.
- A group must contain at least ONE student.
- Creating Cohorts with Students Selected from a Table
-
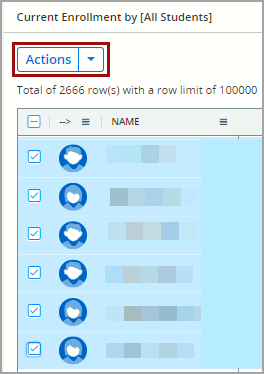
- Click Actions (above the table, near top, left corner of the table).
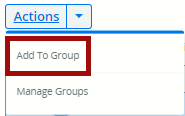
- Click Add to Group.
- Click Create New Group.
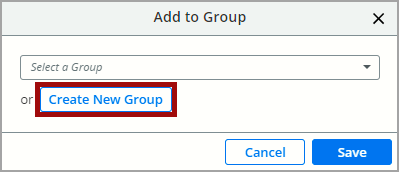
- Click in the Name of Group field.
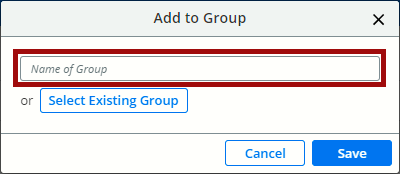
- Type a unique and meaningful group name. The saved name will appear in dropdown fields, metrics, and reports, so if the name is too general, you’ll have a difficult time locating the Cohort Group you want.
- Cohort Group names should be specific. For example, “Graduating Class of 2028” is preferable to “Graduates.”
- Avoid overly general names like, Group 1 or My Group.
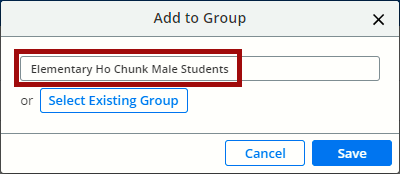
- Click Save and look for the confirmation pop-up.
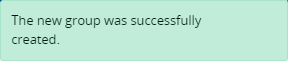
- Once the Cohort Group is created, it will appear on the Student Cohort Filter, below all of the Public Dynamic Cohorts.
- Finish the Group Management Editor:
- Click Actions.
- Click Manage Groups.
- Locate Cohort Group in table.
- Click the Edit (pencil) icon.
- Complete all the fields in the Group Management Editor:

- Once the Cohort Group is created, it will appear on the Student Cohort Filter, below all of the Public Dynamic Cohorts.
- Click Actions (above the table, near top, left corner of the table).
- Creating or Adding to Cohorts with WISEids
-
This method requires some pre-work. You will need to locate a list of WISEids for the students you wish to include in the group. This should either be from a spreadsheet or a text file with each WISEid on a new line.
Get to a screen on WISEdash where you are viewing data as a Student Details Table, either by clicking on any bar graph (Drill and Click) or by accessing the Student Search Tool.
- Click Actions.
- Choose Manage Groups. This will open a new tab in your browser, displaying the Cohort Manager, Groups screen.
- Click Add New Group to either:
- Create a new Group or
- Edit an existing group to add additional students.
- From the Editing pop-up window, complete all the fields:
- Name: Type a unique and meaningful group name. The saved name will appear in dropdown fields, metrics, and reports, so if the name is too general, you’ll have a difficult time locating the Cohort Group you want.
- Avoid overly general names like, Group 1 or My Group.
- Cohort Group names should be specific. For example, “Graduating Class of 2028” is preferable to “Graduates.”
- Type (Student or School): This would be a Student Group.
- Status (Active, Not Active): Click in the checkbox to change status.
- Effective Start and End Dates: Set the From-To dates to the expected dates the group will be relevant or its members will exit the class, grade, or condition.
- Description: A free text field for you to add details and notes about this Cohort Group.
- Name: Type a unique and meaningful group name. The saved name will appear in dropdown fields, metrics, and reports, so if the name is too general, you’ll have a difficult time locating the Cohort Group you want.
To add students using WISEids, complete the following:
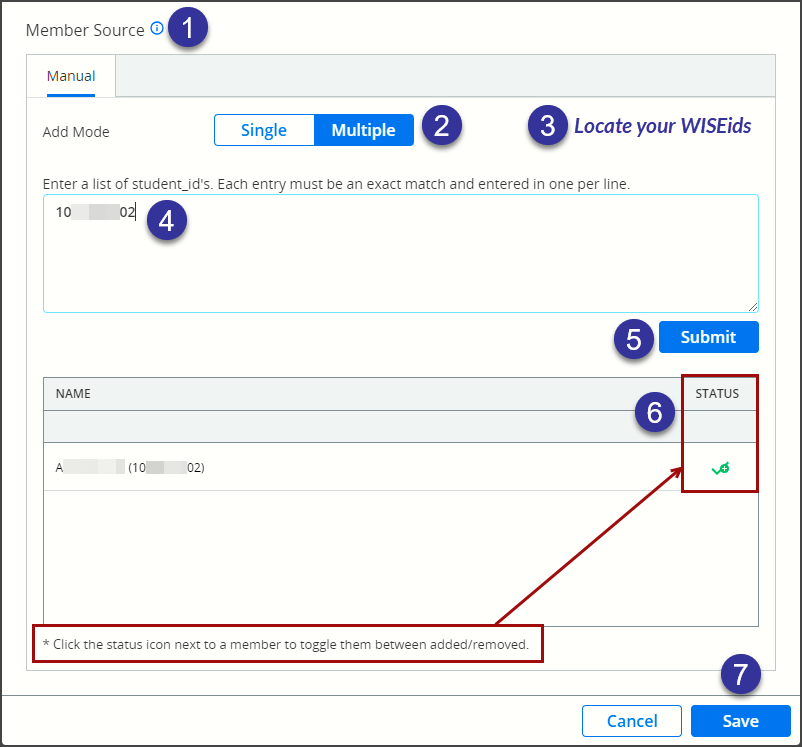
- Member Source: Determines where your Group members will come from. This bottom portion of the Editing pop-up window also offers an alternative method to search for more students. Options are Single or Multiple.
- Add Mode: Select Multiple.
- Copy (Ctrl-C) the WISEids for the students you wish to include in the group from your list.
- Paste (Ctrl-V) the WISEid list into the box.
- Click Submit when your list is complete.
- Any unmatched WISEids will be displayed for correction. Click the Status icon next to a member to toggle them between added/removed status. You can correct the WISEids and submit or bypass the unmatched IDs by clicking Cancel.
- Click Save when your Group is complete.
 NOTE: Remember that the Group Manager application opens multiple browser windows during its process. For security, please make sure to close all pop-up browser windows when finished with WISEdash.
Filtering and Grouping Cohorts
- Filtering by Student Cohort
-
The Student Cohort applies a predefined list of students to the dashboard results. All of the other dashboard filters are also applied.
NOTE: If you just created a new student group from this same dashboard, you may need to refresh the dashboard for the new cohort to appear in the list of cohorts. Click the dashboard name from the top menu to refresh.
Clear any dashboard filters that you do not want applied. Select the desired student cohort. The results will only display students in the student cohort.
- Group by Student Cohort
-
You can also display your results by students in a student cohort vs. students not in the cohort.
This feature can be applied to any cohort you have access to (e.g., a self created cohort, a cohort that was shared with you, or a Public Dynamic Cohort).
Clear any dashboard filters that you do not want applied. Click the Filter Data button. Click Student Cohort and select the desired cohort with the radio button. Click Group By and select Student Cohort from the bottom of the list. Click anywhere on the dashboard, or tap Enter on your keyboard, to apply the filter. The bar graph now displays two bar graphs: one for students within the Cohort Group and the other bar displaying students not within the Cohort Group.
- Filter by School Cohort
-
The School Cohort filter lets you see data and students associated with that school type. The School Cohort groupings are created by DPI. To view this data:
Clear any dashboard filters that you do not want applied. Click the Filter Data button. Click School Cohort; then click on the radio button for the School Cohort you want.
- Options are:
- Alternative Schools (Public)
- Perkins Schools (Public)
- Virtual Schools (Public)
- Vocational Schools (Public)
- Special Education Schools (Public)
- SAGE Schools (Public)
- Charter Schools (Public)
- Title I Schools (Public)
- Choosing a school outside the cohort type will result in a “No Data Found” message.
- Selecting a Student Cohort will further filter the data and display those students within the larger School Cohort group.
- Options are:
Managing Manual Cohorts
To manage your manual cohorts, click the Actions button, then select “Manage Groups.” This opens a new browser tab, displaying the Cohort Manager, Groups screen. All Cohort Groups available to you (either created by you or shared with you) will be listed here in a table.
The Actions column at the far right of the table displays three icons:
- Share/“Share” icon: click this to share with an individual, fellow WISEdash for Districts user or a group of other WISEdash for Districts users within your agency.
- Edit/“Pencil” icon: click this to edit any aspect of the group.
- Delete/“Trashcan” icon: click this to delete the group. You can only delete Cohort Groups you created.
Clicking the Edit (pencil) icon lets you manage who is in the Cohort Group, the effective dates, and existence of student and school cohorts.
- Select “Manage Groups”.
- Click edit to start the group definition editor.
- Click delete button to remove a whole group definition and its membership names. Once removed, it cannot be recovered.
- “+ Add New” creates a blank group. You must search and add at least 1 member to the new group.
- Clicking the check mark will delete the member from the group once saved.
- Click the trashcan icon to un-delete before saving.
An active group will automatically become inactive on the end date specified in the group manager and the end date will be extended one year.
If no action is taken, the inactive group will be deleted on the end date. If you wish to retain the group, extend the end date sufficiently and/or reactivate the group.
Sharing Cohorts
- Sharing Chorts
-
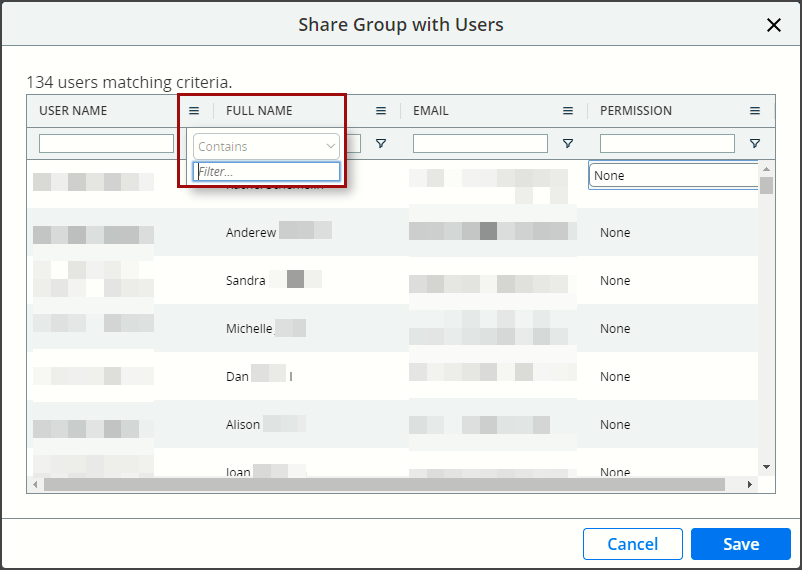
The share button within the Group Manager lets you share your student and school groups with individuals within your agency by WAMS ID.
To “collaborate”, you share the ability to edit the students included in the group and the effective dates.
“Read-only” allows other individuals to use your group but not edit it.
Only the group owner may modify individuals with whom the group is shared.
- Open the Group Manager as shown in Managing Your Group Cohorts.
- Click the share icon.
- Select either: Share with user or Share with user group.
- Clicking either will display a pop-up window that shows a list of all users and groups with whom you may share the group.
- Column filters can be used to locate individual users or groups.
- Column filters can be used to locate individual users or groups.
- If adding a user, under the “Permission” column in the row of a user or user group, click the drop-down menu and choose “read-only” or “collaborate”.
- To remove sharing from a user or user group, click “None” under the “Permission” column.
- Click Save.
To find an individual with the search function, the user must have previously signed in to WISEdash.
Newly authorized users who have not yet signed in will not be searchable.
- Creating a Group with which to Share Your Cohort
-
Within the Group Manager, the “Share with User Group” option allows you to create or modify a user group.
To collaborate with an entire user group, you share the ability to edit the students included in the group and the effective dates.
Read-only allows anyone in the user group to use your group but not edit it. Only the group owner may modify individuals within the user group.
- Open the Group Manager.
- Click the Share button and select “Share with User Group” from the dropdown.
- To modify an existing user group for which you are the owner, click Edit.
- To create a new user group, click “New User Group”.
- Type a unique and meaningful group name. Do not use the My Group or Group A because there is no additional description for user groups. Place the detail of group composition in the user group name.
- Add members by typing the staff name. A minimum of 3 letters must be provided for the search to return.
- Click Save.
Tips for Adjusting Table Data in WISEdash
When viewing student data as a table in WISEdash for Districts, you can:
- Click and drag the column header to move it to a new location within the table.
- Click on the column header name to sort contents by ascending order (arrow pointing up), descending order (arrow pointing down), or alphabetical order (default/no arrow).
- Click on the three lines next to the column header to use the filter function.
If your monitor is small, and sometimes even if it’s not, the table view can be tough to fit in your screen space. Here are some options:
- Shrink the view size from your browser in order to fit the entire table within the boundaries of your monitor.
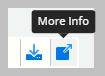 Click the “More Info” icon to view the table as a pop-out window which displays a condensed view of the table, simplifying the use of scroll bars.
Filtering to Create a Group
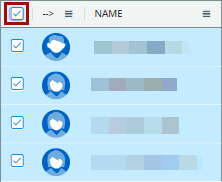
This filtering option is the ONLY method that allows you to “Select All.” You can do this by clicking the empty square in the top, left corner of the table. Students who have been selected appear in blue.
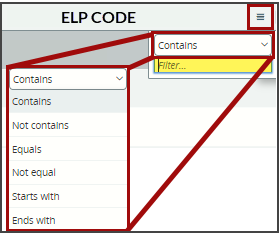
You can filter by a variety of values:
- Contains
- Not Contains
- Equals
- Not Equals
- Starts With
- Ends With
You can also filter by two values, using AND or OR.
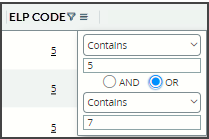
Using “AND”
This can help you display multiple subgroups within the group of students you have for any of the demographic column headers within the table. Select the filter phrase that works best for you. Below that, type in the word or number for which you are filtering (for example, female or a grade level or an ELP code). As you type, those filtered results will appear in the table.
Using “OR”
You can also use the “OR” feature to obtain two different subgroups. Student results will appear alphabetically by student last name. If you want them to appear in a different order (ascending or descending) by a specific column header, then click the header to show the upwards or downwards pointing arrow.
More Help and Resources
- How-to Guides: A Google folder containing short presentations describing WISEdash navigation and features.
- WISEdash Info, Help and FAQ: Home page for WISEdash for Districts.
- WISEdash ATD: About the data pages for all WISEdash for Districts data topics.
- Data Privacy: Home page for DPI training around resources around student privacy.
- WISE Home: Links out to resources webpages for school/districts staff based on user role.
- Consider joining our WISE Community! A Microsoft Teams environment where you can read up on current topics and post questions.
- Would you like to ask questions directly to a Customer Services Team member? We also host a recurring WISE User Group Webinar! Join us!
Didn't Find What You Needed?
We are here to help!
If the question you’ve been trying to answer isn’t showing up on our training or web materials, please open a Help Ticket.
Help Ticket for WISEdash - when the ticket is open, select WISEdash for Districts from the Applications drop-down menu.