
Purpose of Student Tribal Affiliation Cohorts
The Tribal Affiliation data element allows schools to collect and report tribal affiliations for American Indian students who identify (e.g., enrolled, a descendant of, affiliated with) with a tribe recognized by the federal government. (NOTE: Brothertown tribe is not federally, or state recognized. However, they are a nation that calls Wisconsin home.)
American Indian (a.k.a, First Families, Indigenous, Native American) students are under-identified and therefore under-reported. This data element, and your capacity to create Cohorts for it, has been made available in an effort to identify and service marginalized students.
This data collection can help to develop, test, and demonstrate the effectiveness of services and programs to improve the educational achievements of American Indian children and youth.
Creating a Cohort for students with Tribal Affiliations can help LEAs to:
- Provide targeted support and services for these students.
- Hold consultation meetings between tribal nations and school districts. These partnerships can become more specific by Nation or Tribe. Using the Tribal Affiliation data element allows LEAs to know how many nations attend that district. Understanding of Tribal representation helps align LEAs with the federally funded Title VI and Johnson O’Malley (JOM) programs, so Indigenous students receive the proper allocations of funding and/or services. Keep an eye on the Indigenous Studies calendar for training opportunities.
- Access Title VI funding/forms to align funding, services, and programming based on Tribal Affiliation identification. (NOTE: Title VI finding does not go through DPI; it goes directly from Title VI to the schools.)
Terminology
The following icons are used throughout WISEdash for Districts:
| ICON | DESCRIPTION |
|---|---|
| Dashboards Menu (upper left screen). Dashboard menu items appear on the left. Each Dashboard menu item has a corresponding sub-menu that appears on the right. Sub-menus are dynamic, changing with the selected dashboard. | |
| Utility Apps (upper left screen, below dashboards icon) | |
| Dashboard Tools (mid-right screen in darker gray area) |
Step-by-Step Instructions - Overview
These instructions show you how to create Tribal Affiliation Student Cohorts on WISEdash for Districts. Each step will go into more detail below, including screenshots to assist with your navigation.
- Log in to WISEdash for Districts via WISEhome.
- To view dashboards, click the dashboards icon.
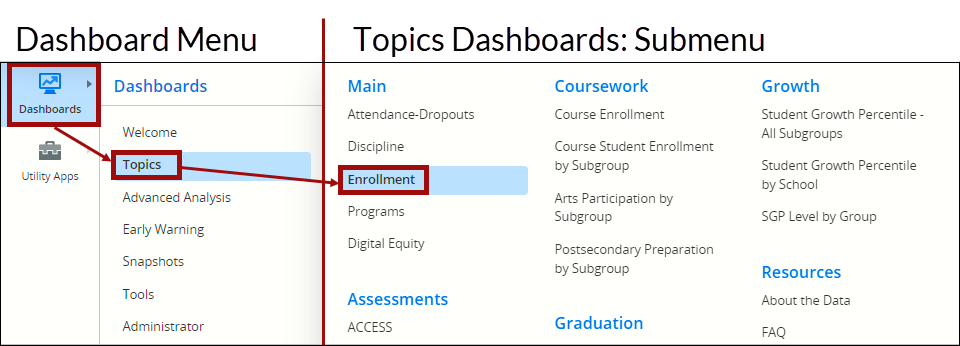
- Click “Topics” from the Dashboards Menu items.
- Select the Enrollments under the Main category.
- Select 'Enrollment by Subgroup.'
- Click on the graph, and a new tab will open in your browser displaying a table listing each student in that same student bar-graph.
- Tips are available for viewing the table data.
- Scroll through the table to find the Tribal Affiliation column header/data elements you want to see.
- Select students you want in the Cohort.
- Tips are available for filtering and sorting to find the students you want in the Cohort.
- Create and Name Cohort:
- Click Actions.
- Click Add to Group.
- Click Create New Group.
- Enter text into the “Name of Group” field.
- Click Save.
- Click Actions, Manage Group to share, edit or delete the Cohort.
Step-by-Step Instructions - Detailed Descriptions:
Click the links below to navigate to different steps within this section:
Step 1: Login to WISEhome
- Log in to WISEdash for Districts via WISEhome.

Helpful information can be found on the WISEhome and WISEsecure Login Information page.
Step 2: Dashboard Icon
- To view dashboards, click the dashboards icon

Step 3: Dashboard Menu Items
- Click Topics
Step 4: Dashboards Sub-Menu Items
-
Select the Topics submenu item you want: Enrollment.
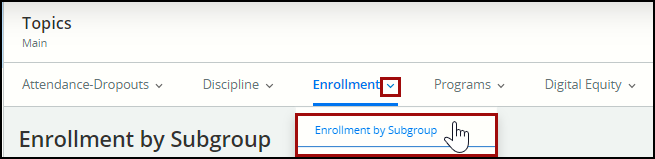
Step 5: Dashboard Dropdown Items
- Make sure “Enrollment by Subgroup’ is selected from the dashboard dropdown. NOTE: Screenshots in this tutorial use the "Enrollments by Subgroup" dashboard, but you can also use the "Enrollments - All Subgroups" dashboard as well.
Step 6: 'Filter Data' Button
-
Click on the displayed enrollment bar graph. (Screenshot is showing Enrollment by Subgroup dashboard, Current Enrollment by [All Students].)
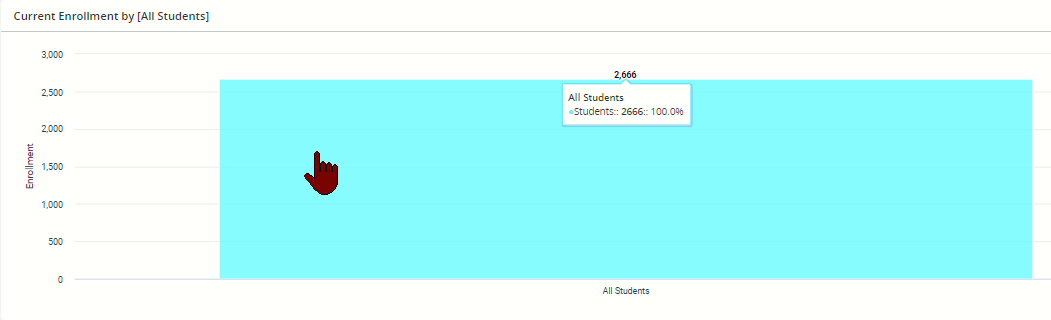
This will create a view of the Student details table.
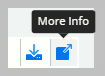
TIPS for Viewing the Table Data
If your monitor is small, and sometimes even if it’s not, the table view can be tough to fit in your screen space. Here’s some options:
- Shrink the view size from your browser in order to fit the entire table within the boundaries of your monitor.
- Click the “More Info” icon to view the table as a pop-out window which displays a condensed view of the table, simplifying the use of scroll bars.
Step 7: Locate Tribal Affiliation Columns Headers and Adjust Table View
Find the column headers marked, “Tribal Affiliation Group” and/or “Tribal Affiliation Short Description.” You will likely need to use the slider bar on the bottom of the table because the default location for these columns is at the far right edge of the table.
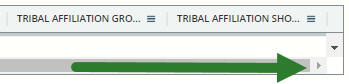
You can then click the column header and drag the column to a preferred location within the table.
![]()
Step 8: Select Students for the Cohort
With the Tribal Affiliation columns in the preferred location, now select the individual students who have a Tribal Affiliation. There are a number of ways to do this.
-
OPTION 1: FILTER Column Headers: Allows for “Select All”
-
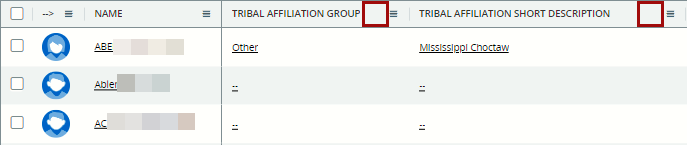
Click the three lines in the column header “Tribal Affiliation Short Description.” This will create a small pop-up window. The drop-down feature in the top cell allows you to select from Contains, Not Contains Equals, Not Equal, Starts with, and Ends with. Select the phrase that works best for you.
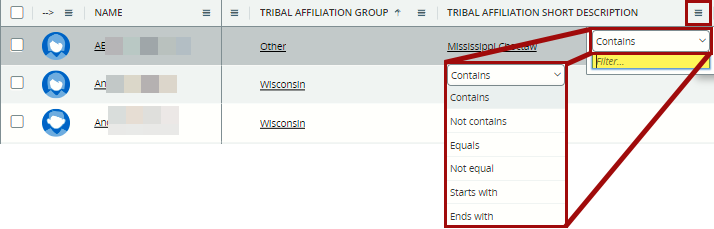
Then in the bottom cell (containing the word ‘filter’) type in the name of a specific tribe (e.g., Red Cliff, or Ho Chunk). As you type, those filtered results will appear in the table.

You can also use the “OR” Feature to obtain two Tribal Affiliation Short Descriptions. Student results will appear alphabetically by student last name. If you want them to appear in alphabetical order by Short Description, then click the header to show the upwards arrow.
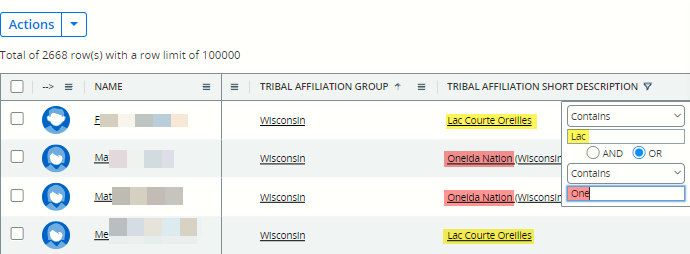
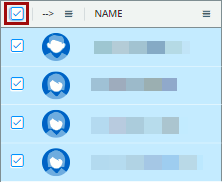
This filtering option is the ONLY method that allows you to “Select All.” You can do this by clicking the empty square in the top, left corner of the table. Students that have been selected appear in blue.
The example screenshots above show using the filter feature on the Tribal Affiliation Short Description header. However you can also use this filter on the Tribal Affiliation Group header. Using the filter with the “OR” feature, typing in Wisconsin and Other should bring up every single student in your districts with a tribal affiliation association.
This all-inclusive Tribal Affiliation Cohort group can be applied to any dashboard, and can be filtered using the standard dashboard blue filter button options. This is the best way to view students with a Tribal Affiliation who also identify as “Two or More” races.
-
OPTION 2: SORT Column Header (Look for the Arrows): Does NOT Allow “Select All”
-
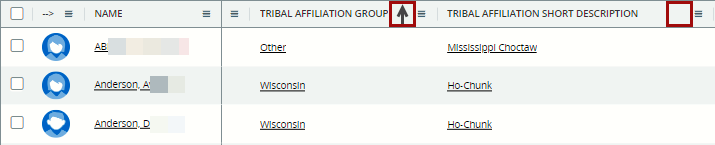
Click on the column headers allows you to sort column contents by ascending, descending, or alphabetical (default) order. When you click column headers, look for a very small arrow.
- If there is no arrow, the column is displaying alphabetically organized information.
- If there is an upwards pointing arrow, all students with data in that column get moved to the top of the table.
- If there is a downwards pointing arrow, all students with data in that column get moved to the bottom of the table.
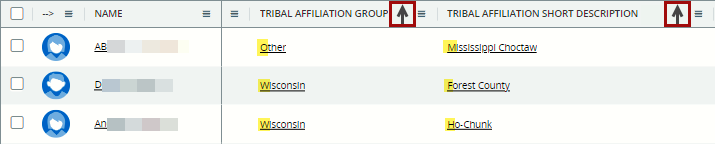
Press and hold the “shift” key on your keyboard to sort multiple columns. For example,
- The default sort has all students by alpha order.
- Then I click the Tribal Affiliation Group header to sort by Group, alphabetically by group and student name. Notice the upward pointing arrow by Tribal Affiliation Group to annotate that students are now being alphabetized within each Tribal Affiliation Group, and the Tribal Affiliation Groups are also appearing in alphabetical order.
- Finally, I press and hold the shift key, and then click the Tribal Affiliation Short Description header to also alphabetically sort by Short Description and student name. Notice how both Tribal Affiliation columns have upward pointing arrows. This means that students are now being alphabetized within each Tribal Affiliation Group, and the Tribal Affiliation Short Descriptions are also appearing in alphabetical order.
There is no Select all for this option. You must click on each individual student if you want them in the Cohort. Students that have been selected appear in blue.
If you need/want to continue filtering for different subgroups of students within your agency’s Tribal Affiliation population (e.g., Tribal Affiliation by grade, by gender, by race, ELP code, etc.), you can also continue to filter the selected list with any of the demographics in the other columns. Remember to press and hold down the shift key for each other demographic you sort for, or it will ‘undo’ the previously sorted columns.
To do this:
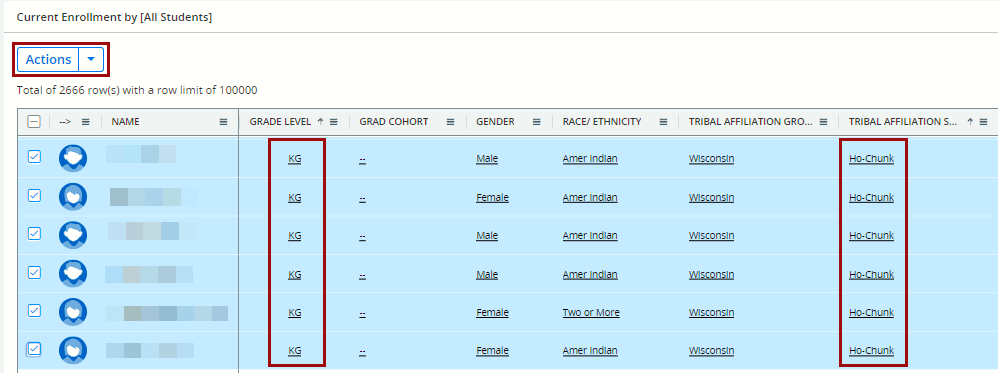
- First, click the header on the Tribal Affiliation Group to sort data in alpha, ascending, or descending order.
- Then press and hold the Shift key, and click the header on the Tribal Affiliation Short Description to match the order of Tribal Affiliation Group.
- Finally, you must press and hold the “shift” key on your keyboard; then click the header of the next demographic (e.g., grade).
- This will sort *each Tribal Affiliation Short-Description* by that next column header (e.g., grade).
- Click the far-left box to select each student.
- Table rows will highlight blue to indicate they have been selected.
For example, all students identifying as Wisconsin, Ho-Chunk will be sorted from youngest grade to oldest grade in the table, then students in Lac Courte Oreilles will be sorted from youngest grade to oldest grade in the table, etc. Each sub-filter can provide you with a new dynamic to watch longitudinally, over time.
This option allows you to “layer” data of your cohort students by sub-groups
-
OPTION 3: Scroll through the List: Does NOT Allow “Select All”
-
Scrolling through the table will allow you to select each student who is listed as having a Tribal Affiliation. This can be very time consuming. There is no Select all for this option. You must click on each individual student if you want them in the Cohort. Students that have been selected appear in blue.
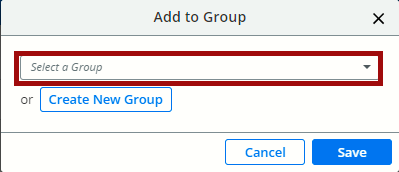
Step 9: Create and name the Cohort
When you have all of the required students selected, you can now create a Cohort group for them. To do this, complete the following steps:
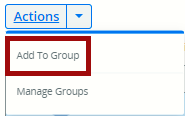
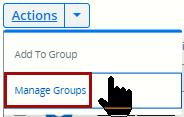
- Click Actions (above the table, near top, left corner of the table)
-
Add to Group
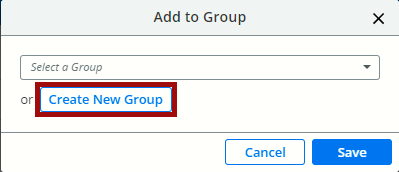
-
Create New Group
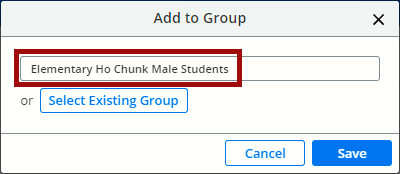
-
Name of Group
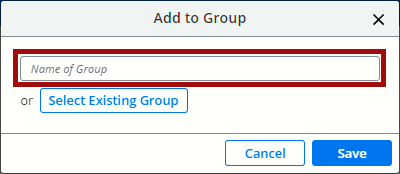
-
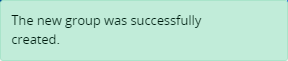
Type in your Group’s Name, then click Save
-
Actions, Manage Groups
This will display a listing of all Cohorts you’ve successfully created.
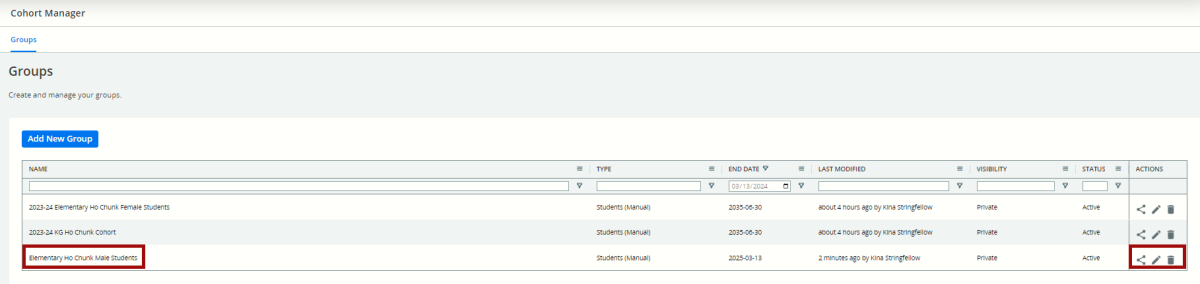
Notice the Cohort group at the bottom of the table doesn’t have a school year associated with it. Click the edit button in the far right column to edit the name.
- “Share” icon: click this to share with an individual fellow WISEdash for Districts user, or a group of other WISEdash for Districts users within your agency.
- “Pencil” icon: click this to edit any aspect of the group.
- “Trashcan” icon: click this to delete the group.
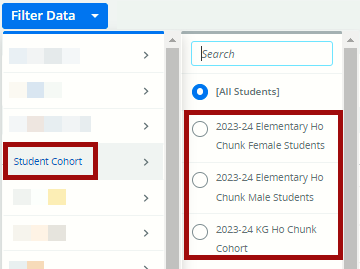
Once the Cohort Group is created, it will appear on the Student Cohort Filter.
Step 10: Manage the Cohort Manually
This Cohort group will require annual maintenance. This Cohort manager does not automatically add new students, neither does it remove students. This means that you will have to use the Actions, Manage Groups feature to make changes to the group manually.
Follow the same steps above whenever you need to update the Cohort, with slight changes in step 9:
- When you click "Add to Group," you can 'select a group' you previously created from the dropdown menu, and it will update that Cohort with the most recent selection of student.
- You can also click "Manage Groups," locate the cohort you previously created, and click on the pencil icon to edit the members of that group.
Managing the Cohort can be done at any time in the school year as needed. For example:
- If another student needs to be added (student starts later in the year).
- If a student needs to be removed (student moves out of district).
- If your district is made aware of an incorrect demographic that needs to be changed.
Cohort groups can be applied to any dashboard - even snapshot dashboards!
More Help and Resources
- DPI American Indian Studies Program
- National Congress of American Indians
- National Indian Education Association
- Wisconsin Indian Education Association
- Wisconsin First Nations Education
- WISEdata Reference Guide for Administrators
- WISEdash Reference Guide for Administrators
- Snapshot Preparation: A Detailed Guide (Google slides)
- How-to Guides: A Google folder containing short presentations describing WISEdash navigation and features.
- WISEdash Info, Help and FAQ: Home page for WISEdash for Districts.
- WISEdash ATD: About the data pages for all WISEdash for Districts data topics.
- Data Privacy: Home page for DPI training around resources around student privacy.
- WISE Home: DPI landing page for the WISE system, contains intro video and basics about WISE.
Didn't Find What You Needed?
We are here to help!
If the question you’ve been trying to answer isn’t showing up on our training or web materials, please open a Help Ticket.
Help Ticket for WISEdash - when the ticket is open, select WISEdash for Districts from the Applications drop-down menu.